Merge Tags For Email
Here are the merge-tags that you can use in outgoing autoresponder and broadcast emails sent through DAP.
%%FIRST_NAME%%
This will be replaced by the first-name of the user.
%%LAST_NAME%%
This will be replaced by the first-name of the user.
%%EMAIL_ID%%
This will be replaced by the email id of the user.
%%PASSWORD%%
This will be replaced by the password of the user.
%%SITE_NAME%%
This will be replaced by whatever text you have entered in “Setup > Config > Basic > Site Name” in your DAP Dashboard.
%%ADMIN_NAME%%
This will be replaced by whatever text you have entered in “Setup > Config > Basic > Admin Name” in your DAP Dashboard.
%%ADMIN_EMAIL%%
This will be replaced by whatever text you have entered in “Setup > Config > Basic > Admin Email” in your DAP Dashboard.
%%AFF_LINK%%
This will be replaced by the actual affiliate link of the member (Eg., http://yoursite.com/dap/a/?a=1234)
%%SITE_URL_DAP%%
Replaced by your actual web site url (Eg., http://yoursite.com)
%%UNSUB_LINK%%
This is replaced by a 1-click Unsubscribe link that you can add to the bottom of your outgoing broadcast and autoresponder emails.
Using Custom Fields In DAP Emails
You can send custom field values in the DAP emails by using merge tags like this – %%custom_tax_id%%
Add ‘custom_’ in front of the custom field’s database field name.
So if you have defined a custom field called tax_id in your database, to include this field in the autoresponder/broadcast email, just add this – %%custom_tax_id%% to the body of your email.
That’s it. When the user receives the email, dap will automatically replace the merge tag with the user’s tax id value.
So if your email message body contains the following text:
Your Tax Id: %%custom_tax_id%%
When the user receives the message, it will look like this (in this example, the user’s taxId = 9999):
Your Tax Id: 9999
Related Links:
Click here for full documentation about Custom Fields
Click here for merge tags you can use in WordPress posts/pages
This will be replaced by whatever text you have entered in “Setup > Config > Basic > Admin Email” in your DAP Dashboard.
Customizing Login Widget
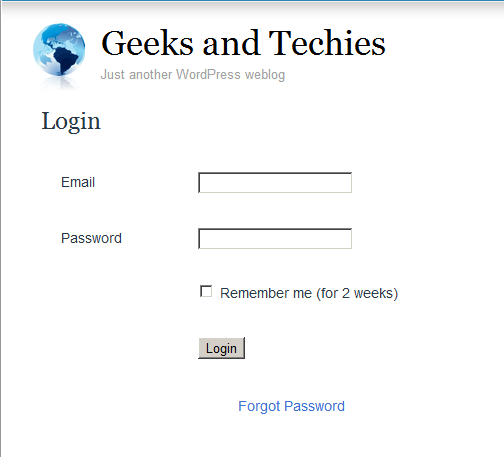
Here’s how you can customize the HTML, look & feel of the DAP Sidebar Login Widget.
There is a file in the following folder…
/wp-content/plugins/DAP-WP-LiveLinks/
by name…
DAP-WP-LoginForm-LoginLogout.html
Make a copy of that file on your desktop, rename it to…
customDAP-WP-LoginForm-LoginLogout.html
(just added the text “custom” at the front of the original file’s name).
You can then modify this new file however you want, including altering spacing, and that’s what will be displayed.
Just be careful what you change – do not modify the field names or the submit URL. Feel free to change other visual elements.
WordPress User Sync
NOTE: This content is for advanced users only, who understand the concept of user tables, database, etc. If you don’t understand any of this, then just ignore this – you don’t really need to know this in order to use DAP. This is only an explanation for those who wish to go under the hood of DAP and its integration with WordPress.
As you probably already know, WordPress has its own user database.
DAP has its own User database, and doesn’t use the WordPress database – for many reasons, not limited to the following…
1) Ability to store more user information than what WordPress allows
2) More powerful user search, profile updates, affiliate information, etc.
So, if you want to use any WordPress based plugins – like WordPress Forums or Subscribe2Blog – these forums are looking at WordPress’ native user database.
Now comes the necessity of “syncing” the DAP user data and your WordPress user data.
In the DAP Dashboard, in “Setup > Config > Advanced“, you will see two settings for syncing DAP & WP user data.
(1) Sync DAP User data and WP User data
If you turn this to “Y” (for “Yes”), then every time someone logs into DAP, their DAP user data (just name and email) is automatically “synced” with WordPress user data. If you set this to “N”, then no data will be transferred from DAP to WordPress.
(2) Sync WP data only for PAID users
This one matters only if you have set (1) above to “Y”.
If you want only your “PAID” members to be synced with WordPress, then set this to “Y“.
If you want both “FREE” and “PAID” members synced with WordPress, then set this to “N“.
Here’s how it actually works:
- For the sync to work, you must first setup and save the above 2 config settings
- After you save the above two config settings, make sure you log out of DAP and re-log in (if you are/were logged in and testing as a regular user), because only then, the Config settings above will take effect.
- Your user must log in through a DAP login form (not the WP login form).
- Make sure the user is redirected to any part of your WordPress blog after log in. This can be done via “Logged In URL” setting in DAP Config.
- The user can be redirected to any WP page, WP post or even your blog home page – that’s the only time the ‘syncing’ kicks in.
- When user lands on any page/post of your WP blog, then the DAP LiveLinks plugin (which you have already installed & enabled) kicks of the “sync”, copies the logged in member’s name and email over to the WordPress user table, and also automatically logs him into your WordPress blog.
That’s all there is to it.
Also see: Forum Integration
Free Signups: Adding Users Via DAP Signup Form
DAP allows you to create an opt-in form to directly sign-up users to your Product (which also acts as a “list” if you only want to drip or broadcast emails).
This is very similar to creating a sign-up form at Aweber or 1ShoppingCart, and allowing people to directly sign up by entering just their First Name & Email Id.
How To Generate Free Signup Form Code
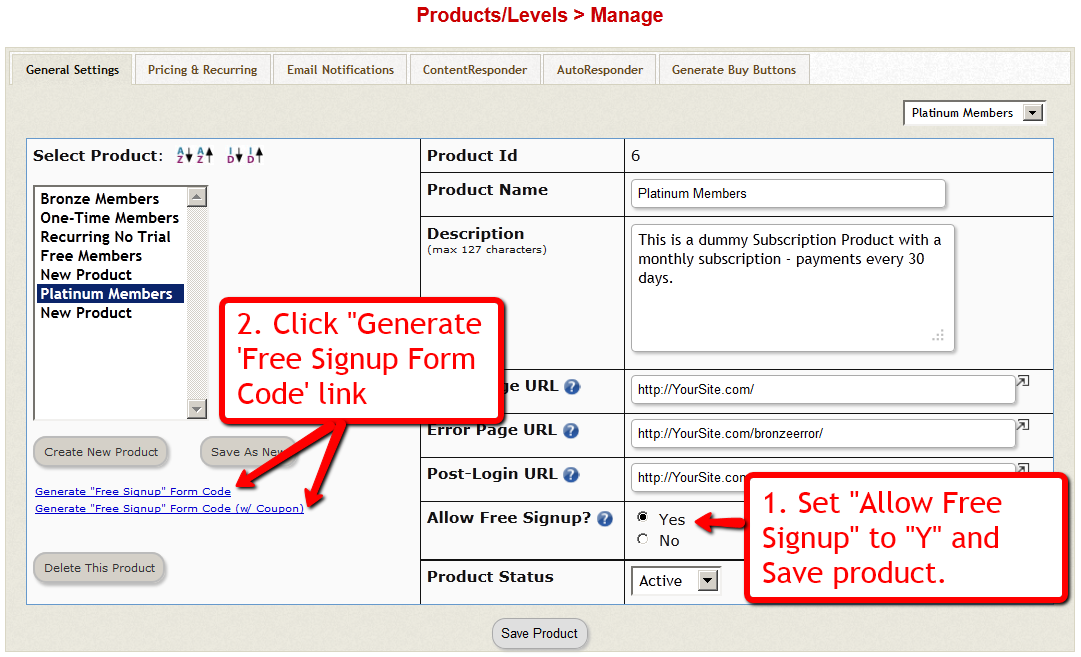
In the DAP Admin menu, go to Products > Manage , and pick the product for which you wish to create the free signup form
1) Set “Allow Free Signup” to “Y” and then first save the product.
2) Once product is saved and page reloads, now click on the first link that says Generate ‘Free Signup Form Code’ link.
(NOTE: This is for advanced DAP users only: Second one (that says w/ Coupon) generates the free signup form code along with an extra field for entering a coupon code – use this if you want the person signing up to also enter a coupon code before they can sign up for the product – you must have previously created the Coupon code under “Payment Processing > Coupons” page.
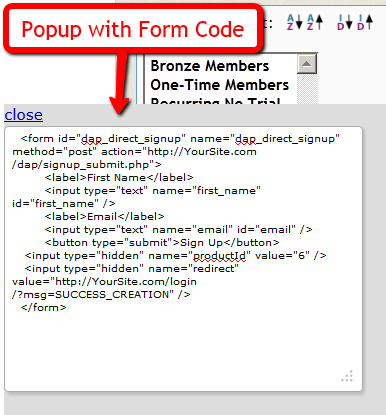
3) That will bring up a little pop-up that will have the HTML for the signup form.
4) The form looks something like this:
<form name=”dap_direct_signup” method=”post” action=”http://www.YourSite.com/dap/signup_submit.php”>
<table>
<tr><td>First Name: </td> <td><input type=”text” name=”first_name” size=”10″></td></tr>
<tr><td>Email:</td> <td><input type=”text” name=”email” size=”10″></td></tr>
<tr> <td colspan=”2″><input type=”submit” name=”Submit” value=”Sign Up”></td></tr>
</table>
<input type=”hidden” name=”productId” value=”1″>
<input type=”hidden” name=”redirect” value=”http://YourSite.com/login/?msg=SUCCESS_CREATION““>
</form>
Copy and Paste the above form into any HTML page, or WordPress Page or Post where you want the free sign-up form to appear.
The form already has all the code required to add the user to your member database, with “Free” access to the Product (for which you generated the HTML code)
That’s it!
Additional Fields On The Signup Form
We also allow the following additional fields to be accepted via the direct signup form:
first_name, last_name, user_name, email, address1, address2, city, state,zip,country, company,phone,fax,title,paypal_email
Take the direct signup form code from the dap products page, and to that, you can add additional attributes with the following names:
For ex:
If you want to accept the user’s paypal email address, the just that to the form code above:
<tr>
<td>Paypal Email:</td>
<td><input type=”text” name=”paypal_email” size=”10″></td>
</tr>
Frequently Asked Questions
Can this form be published on any site? Or can it be published only on the site where DAP is installed?
This form can be published on any web site – can be completely different from the site where DAP is installed. Please note that the above form submits to the url “http://www.YourSite.com/dap/signup_submit.php” – so doesn’t matter which site this form is published on, the user is always added to the site where DAP is installed, which is http://www.YourSite.com.
What happens after user signup?
If you note the text in bold in the above form (reproduced below)…
<input type=”hidden” name=”redirect” value=”http://YourSite.com/login/?msg=SUCCESS_CREATION“>
… you’ll see that the default form redirects to the page http://YourSite.com/login/?msg=SUCCESS_CREATION (which is the login page from your Setup > Config) and on that page, displays on the message “Success! Your membership account has been created. Check your email addresss in a few minutes for your password”.
After Sign up is complete, how to redirect to a link of my choice?
In the form, you can modify the field in the form named “redirect” to any URL of your choice. Here are some examples:
<input type=”hidden” name=”redirect” value=”http://www.SomeOtherNonDAPSite.com/thankyou.html“>
OR
<input type=”hidden” name=”redirect” value=”http://www.YourSite.com/2010/12/31/thank-you“>
Customizing Error Messages On Protected Pages
When an unauthorized visitor tries to access a protected page or post, you can choose from among two things that can happen:
1) Display an “In-Page Error Message“: They can be presented with an error message that shows a “lock” image. You can show the standard DAP version, or you can customize this message and add your own text.
-OR-
2) Redirect to Error Page: They can be redirected to any other page of your choice (WordPress page or post, or a completely non-WP page)
1. Display “In-Page” Error Message
“In-Page” basically means that this message will be shown on the same page that the user is trying to access (to which they do not have access). So basically, the content of the very post or page they’re trying to access, will be replaced by this “In-Page” error message.
The default error messages shown by DAP are as follows.
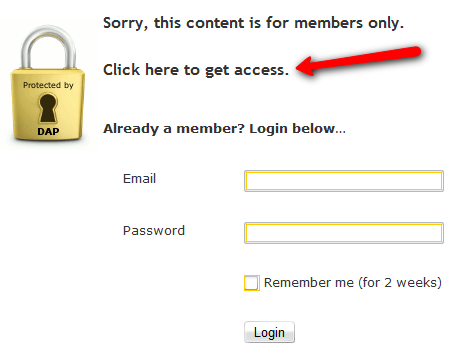
A) If a visitor is NOT logged in, then they will see…
(Image A)
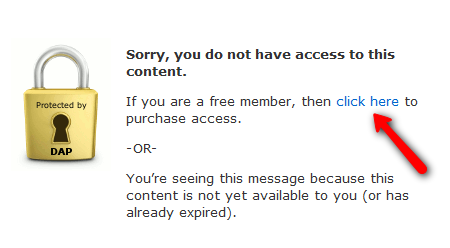
B) If a visitor IS logged in, then they will see…
(Image B)
If you see Image A above, there is a line of text that says: “Click here to get access”.
And in Image B above, there is a line of text that says: “If you are a free member, then click here to purchase access”.
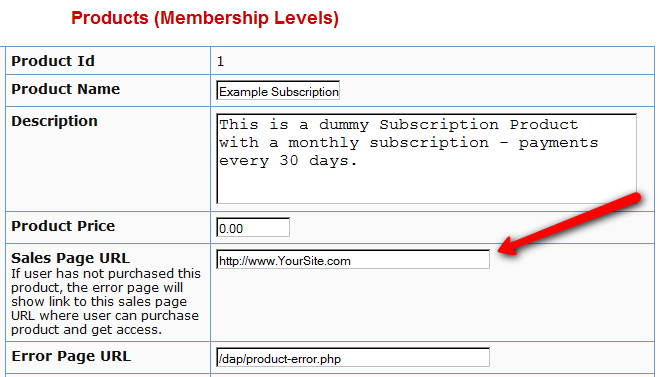
In both cases, the text “click here” is actually a link. And by default, that link will point to whatever you put in the “Sales Page URL” in your DAP Product (to which the above post/page is part of). See Image C below.
(Image C)
Displaying Custom Error Message
If you wish to customize the above standard error messages, then here’s what you need to do:
- Go to /dap/inc/ folder. There are two files there:error-loggedin.php , and
error-notloggedin.php - Make a copy of both files on your computer, and add the text ‘custom‘ to the front of each of the file names of the newly copied files. So the new files are now called: customerror-loggedin.php , and
customerror-notloggedin.php
- Open customerror-loggedin.php and customerror-notloggedin.php and modify them as you please, change the text, formatting, font size, color, etc.
- Upload the new files to the same folder – /dap/inc/ – as the original error files.That’s it. DAP will then ignore the old error files, and start displaying your new “custom” error messages.
2. Redirect to Error Page
Instead of showing an error page (default or custom, from (1) above) you can also redirect the un-authorized user to a completely new page/post of your choice.
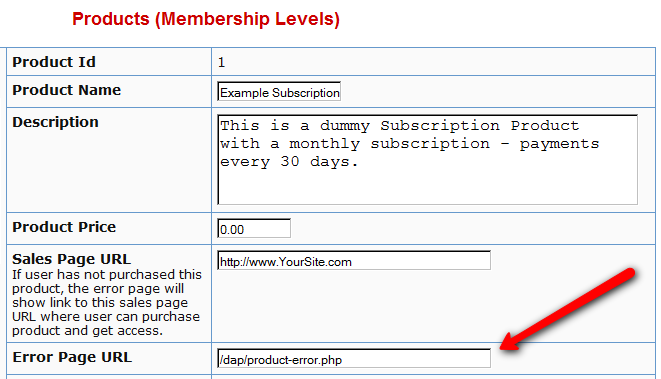
If you see Image D below, you will see that on the DAP Products page, there is a field called “Error Page URL“.
By default, this is pointing to /dap/product-error.php
(Image D)
Change this to any link you want. Examples…
http://YourSite.com/myerrorpage.html , or
http://YourSite.com/myerrorpage/
Whatever you put in the above field (Error Page URL) is what page the user will be redirected to, when they access a page that they don’t have access to (either because they have not logged in, or because they are logged in, but don’t have access to it yet).
Modify Content Under Padlock
When your visitor encounters a “Sorry, you’re unable to access this content” page that has the DAP Padlock image on it, you can customize the text that shows up below the padlock by doing this:
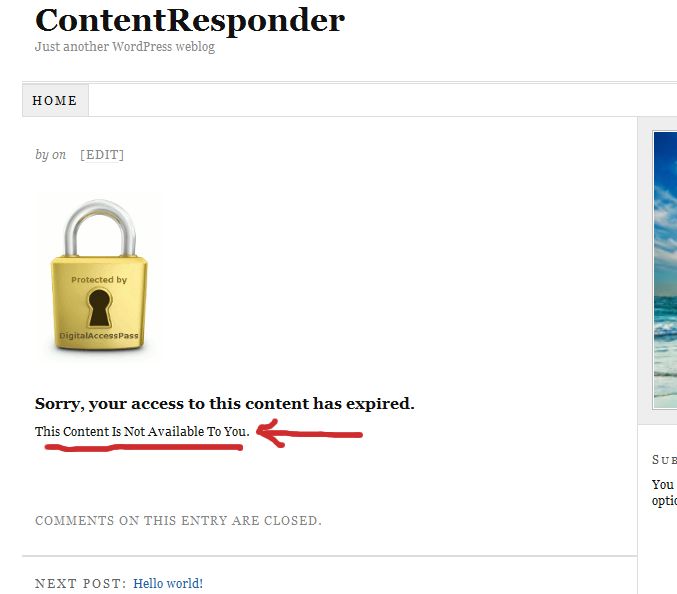
1) Open the file error.php that is stored in the /dap/inc/ folder.
2) RENAME it as (or COPY it as) customerror.php.
3) You can put ANY kind of HTML content within this. Images, javascript, css,, buttons, text, whatever. Any HTML can be used in this file.
4) Upload this new file customerror.php back to same folder /dap/inc/
5) error.php doesn’t matter any more. Whether you delete it, or just leave it alone, the fact that there is a customerror.php file in the same directory means that DAP won’t even bother about error.php any more.
6) Future updates of DAP will not touch your customerror.php file. So updates or upgrades will not mess with your custom error page copy.
Merge Tags For WordPress Posts & Pages
Here are the merge-tags that you can use in your WP posts, and what they mean. (Click here for merge tags for Autoresponder & Broadcast Emails)
This is better suited for a WP “page”. This text will be replaced by a login form using which your members can log in to your membership site.
%%AFFDETAILS%%
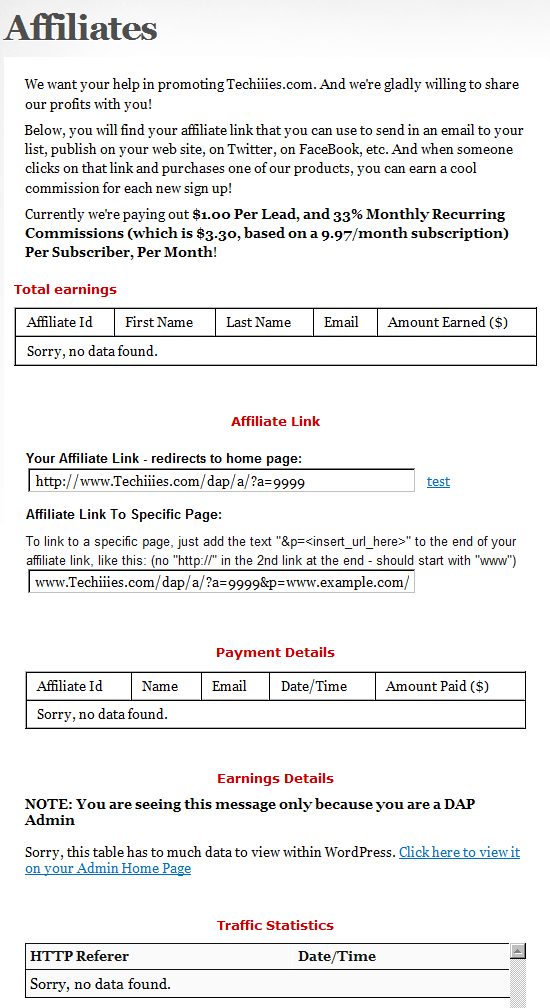
This will be replaced by the entire Affiliate section from the default home page at YourSite.com/dap/ . Better suited for a Page.
This will be replaced by the user profile from the default home page at YourSite.com/dap/. Better suited for a Page.
This will be replaced by the user links section (the list of what products and what links user currently has access to) from the default home page at YourSite.com/dap/. Better suited for a Page.
%%FIRST_NAME%%
This will be replaced by the first-name of the user.
%%EMAIL%%
This will be replaced by the email id of the user.
%%AFF_LINK%%
This will be replaced by the raw affiliate link of the member. If you want it to show up as a link in your blog post, use it like this:
<a href=”%%AFF_LINK%%”>%%AFF_LINK%%</a>
%%USER_NAME%%
This will display the DAP user’s “Username” on the page.
%%USER_ID%%
This will display the DAP user’s ID on the page (ID is a number).
%%FEEDLINK%%
Replaces with user’s personalized RSS feed URL.
%%PRODUCT_DETAILS_<insert-product-id>%%
Replaces merge tag with Product-specific details (including links available to the member as part of that Product) on a specific WordPress page/post.
%%DAPCUSTOMFIELD_<insert-custom-field-name>%%
You can display the value of the user’s own custom fields on your pages, using a merge tag like this:
%%DAPCUSTOMFIELD_tax_id%%
In the above example, tax_id is the custom field that you have created in DAP. So if the name of the custom field in DAP were “ssn”, then the above merge tag would become %%DAPCUSTOMFIELD_ssn%%
Displays data of the user’s “upline” affiliate.
Displays upcoming drip-feed scheduled content.
[DAPRefAffId]
Displays id of affiliate who referred visitor to site. If no affiliate set, displays DAP Admin’s id.
[DAPShowTransactions]
Shows list of all transactions/orders by logged-in user.
[DAPUserSubscriptions]
Shows list of all subscriptions by logged-in user.
Login/Logout Widget
DAP has a Login/Logout Widget that you can use in any widget-ready theme.
Log in as WP admin, and look under “Appearance > Widgets”.
You’ll see the widget. Drag this widget on to any customizable part of your theme.
The widget puts the DAP login form right on your sidebar.
When a user is not logged in, they will see the login form.
When they are logged in, they just see a “Logout” button.
Logout Link
Login/Logout Widget
If you are using the DAP Login/Logout widget on your sidebar, then the login widget automatically turns in to a “Logout” button once a member has logged in. No separate link needed if you’re using this widget. Click here to read more about the Login/Logout widget.
Logout link in your Menu
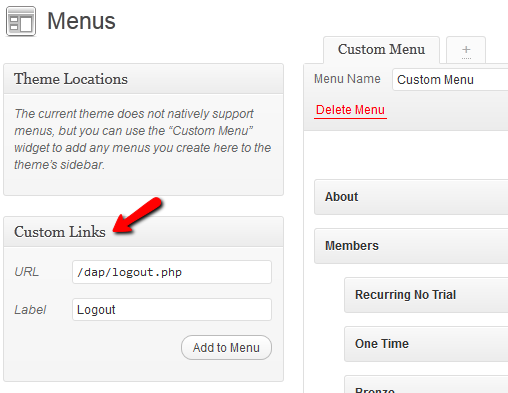
If you have a custom menu (WP Admin > Appearance > Menus), then you can add a custom link that points to “/dap/logout.php” or “http://YourSite.com/dap/logout.php” to your menu. This link will log your users out of both DAP and WordPress.
Default DAP Member Page
If you use the default member’s area that comes with DAP out of the box – http://YourSite.com/dap/ – then this page already has a “Log out” link at the top.
But if you are putting all of DAP’s member pages within your WordPress blog using our various shortcodes, then you need to publish the DAP logout link in your sidebar (or wherever you choose to).
Here’s the link for logging out of the member’s area:
http://YourSite.com/dap/logout.php
Replace “YourSite.com” with your actual site name, of course. And then publish the above link anywhere on your blog – sidebar, top menu bar, etc.
NOTE: Clicking on the DAP log out link will log you out of both DAP and WordPress.
Creating Member Profile, My Content & Affiliate Sections within WordPress
Creating Your “Member’s Area”
DAP has 4 main Member-facing pages (the rest of your content is all standard WordPress pages and posts and categories, along with your media – like Videos, PDF reports, etc.):
- Login page: This is where your members would log in at. (You, the DAP Admin don’t have to log in from here – you can log in to DAP admin when you log in to the WordPress admin dashboard.) This member login page can be either a stand-alone log in page (if you put the tag on a separate page), or it can be a a login form on the sidebar (that turns in to a logout button once they log in).
- My Content: This section shows all the products that the member has purchased or signed up for. This is the page that shows the links newly appearing as and when they are dripped on the member.
- My Profile: This shows all of the user profile fields – like first name, last name, email, password, address, etc. They can change all of their contact information on this page.
- Affiliate Info: This shows members their own personalized affiliate link, their link-referral stats, commissions earned, commissions paid, etc. If you want to make this page even more useful, you can add banners and emails and promo copy that the affiliate can simply copy/paste and send to their list.
So basically, only 4 “member” pages as far as DAP is concerned.
And all of these can be created right within your WordPress site, within a WP Page, so that they take on the exact same look & feel as your web site.
- “Login” page: Use [DAPLoginForm] (responsive)
(used to be %%LOGIN_FORM%%) - “My Content” (shows the user’s own products): Use [DAPMyContent] (responsive)
(instead of the old [DAPUserLinks] or %%USERLINKS%%) - “My Profile” (username/password): Use [DAPUserProfile] (responsive version coming soon)
(used to be %%USERPROFILE%%) - “Affiliate Info” Section: Use %%AFFDETAILS%% (responsive version coming soon)
Login Page within WordPress
Now DAP already provides you with a built-in, out-of-the-box login form, at YourSite.com/dap/login.php . But if you want to put this form “within” your WordPress blog, so as to give your login form the same Look & Feel as the rest of your blog, then do this…
1) Create a WordPress Page (not “Post”) with the text [DAPLoginForm] in the body of the page, and a title of say, Login, and save the new page. If you used the text “Login” for the title, then the actual link to this page would be YourSite.com/blog/login
2) This page now shows up as “Login” along with the rest of your “pages” on your blog.
3) Go to DAP Admin > Setup > Config . Scroll down to the field Login URL.
In the text box, enter the full link to your login page from Step 1:
http://YourSite.com/blog/login/
Or if your blog is in the root, then…
http://YourSite.com/login
That’s it! When someone clicks on the “Login” link that now shows in your “Pages” menu, they will now see a nicely formatted login form.
Related: Where is the Logout Link?
Creating The Member’s Area
- “My Content” section – use the merge tag [DAPMyContent]
- “My Profile” (username/password) – merge tag [DAPUserProfile]
- “Affiliate Info” Section – merge tag %%AFFDETAILS%%
Create a separate page for each of the tags.
Creating a “My Content” Page within WordPress
This is the page that shows all of a member’s content details – like what products the user has purchased, what are the access start and end dates for that purchase, and all of the content within each product – all separately organized.
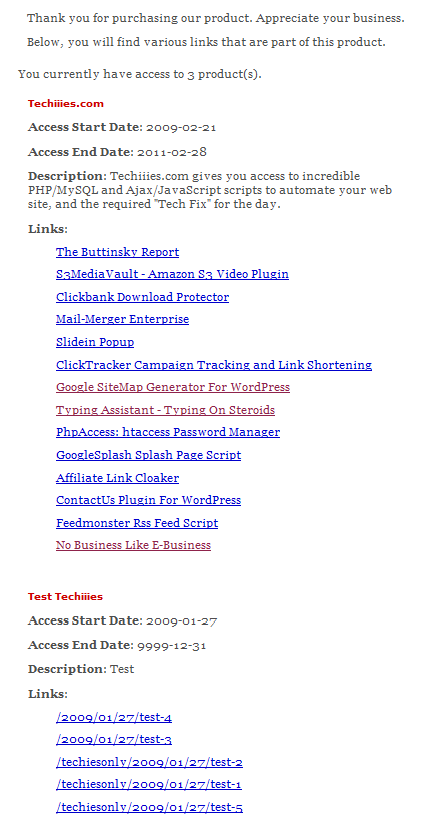
To create such a page, simply create a WordPress “Page” (not ‘post’) with the title “My Content” (for example) and within the body of the page, enter the text [DAPMyContent] and save the new page. Now if you visit the page, and you are logged in, it will show you something similar to the image below.
And if you gave this page the title of “My Content”, then the actual link to this page would be YourSite.com/blog/my-content/
Starting DAP 4.8, this tag generates a responsive template. See the full details at http://www.digitalaccesspass.com/blog/2015/03/responsive-login-templates/
Creating a “My Profile” Page within WordPress
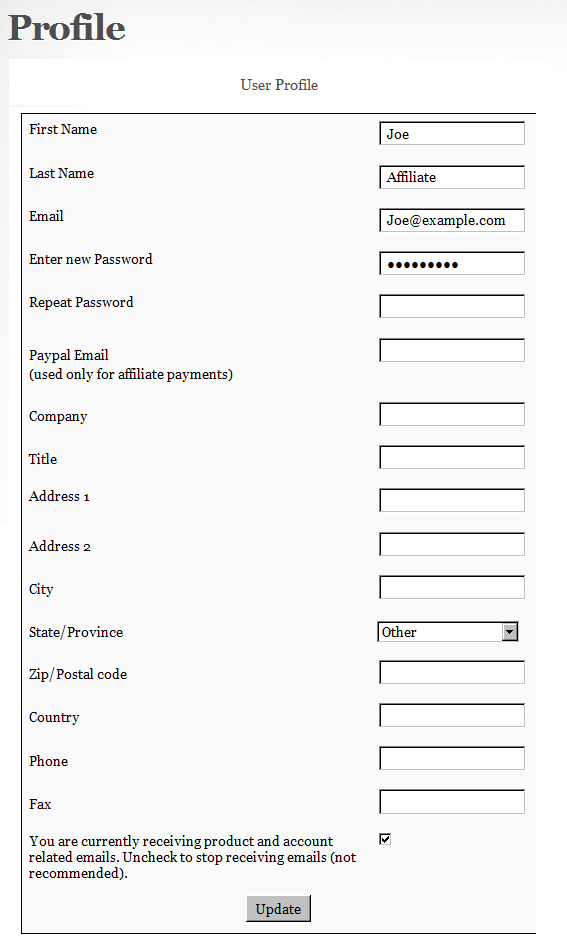
This is the section that shows the user’s profile information, where they can change their name, email id, address and other details.
For this, create a WordPress Page (not ‘post’) with the text [DAPUserProfile] in the body of the page, and a title of say, User Profile (or) My Profile and save the new page.
If you used the text “User Profile” for the title, then the actual link to this page would be YourSite.com/blog/user-profile/
Creating an “My Affiliate Info” Page within WordPress
This is the page that shows your users their affiliate link (which is instantly created for them upon purchasing any product on your site), link clicks, referrer details, earnings and payments.
For this, create a WordPress Page (not ‘post’) with the text %%AFFDETAILS%% in the body of the page, and a title of say, Affiliate, and save the new page.
If you used the text “Affiliates” for the title, then the actual link to this page would be YourSite.com/blog/affiliates/
That’s it!
Now if you want to make the affiliate page more powerful by creating a “ready-made affiliate toolbox” for your affiliates, then see this: Creating an Affiliate Toolbox


