How Do Members Get Added To Your Membership Site
(OR) How do members get access to the content
(OR) How does someone become a member?
With DAP, you can add users to your membership site in 3 different ways.
1. PURCHASE: Someone buys your product or subscribes (“Paid” member with access to both free and paid content)
2. FORM SIGNUP: Someone signs up through a signup form (“Free” members with access to only free content)
3. ADMIN ADDED: You add them as a member directly through the DAP Admin Control Panel (you can mark them as either “free” or “paid”)
All three are explained in detail below.
1. PURCHASE
*You first create a “Sales Page”.
On your sales page, depending on which payment processor you use, you go to Paypal/1ShoppingCart/ClickBank and create a new product with the EXACT same name as the product you created within DAP, and get the ‘Buy Button’ link from your Payment Processor. Publish this “Buy Button” on your sales page.
* Your visitor goes to your sales page
* They purchase your product
* Your payment process (Paypal/1ShoppingCart/ClickBank) notifies DAP that you have a new purchase.
* If the product names match, DAP automatically creates an account for them, generates a random password, and sends them an email with their email/password. You can customize the contents of this email on the “Templates” screen in your DAP Admin Control Panel. Integration with your shopping cart explained elsewhere (see documentation for setup).
That’s it!
That’s how “buyers” get added to your membership site and get access to the product they just purchased.
2. FORM SIGNUP:
You wish to give someone a “Free” membership.
NOTE: “Free” members who do not have a payment associated in DAP (which means they have not purchased anything) will have access only to content that you have marked as “Free”.
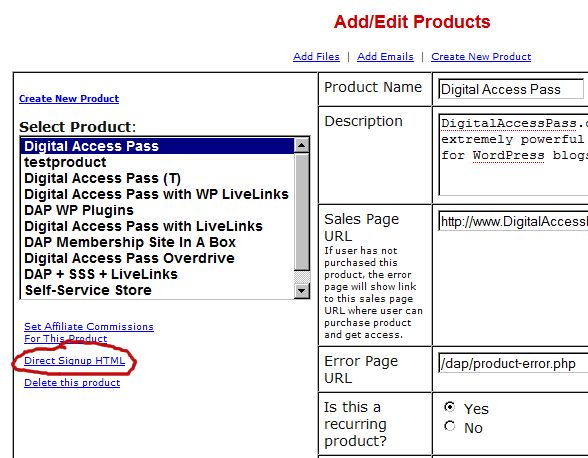
Once you have created a Product in DAP, and have added content (blog post/page links, links to files, etc), and have saved it, on the Product page, below the Product name list, you will see a link called “Direct Signup HTML”. (See image below). You must first select a Product before you can copy the correct form HTML.
Fig 1. Direct Signup Link on Products page

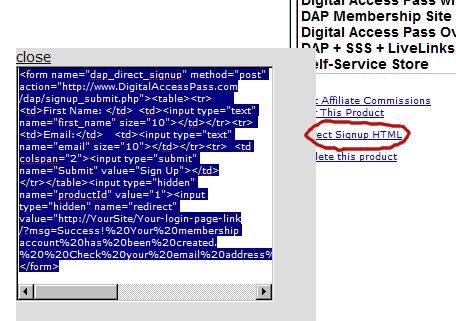
Fig 2. Form HTML that you get on clicking the Direct Signup Link

This HTML gives you the full HTML form code that you can publish on any page of your web site. This form only collects an email address and a first name.
Take this HTML code and publish it on page of your web site where you want sign up users. This could be a WP page or post too.
Note: When you see the above HTML code, there’s a field in there that looks like this:
<input type=”hidden” name=”redirect” value=”http://YourSite/Your-login-page-link/?msg=Success!%20Your%20membership account%20has%20been%20created.%20%20Check%20your%20email%20address%20in%20a%20few%20minutes%20for%20your%20password“>
Don’t forget to change the text above, where it says “http://YourSite/Your-login-page-link/?…” to point to your actual domain name and to your actual login page (if you have customized it).
Then, when someone enters their email address and first name and signs up through the signup form, DAP creates an account for them using that email address, creates a random password, and sends them an email with their email/password.
After that, you can drip any content or emails on them that are marked as “Free” (when adding content or emails).
At some later point, if they purchase any of your “Paid” products (see the “1. Purchase” section above), then as long as they use the same email id during purchase, DAP will automatically give them access to all of the “Paid” content in the Product that they just purchased.
3. ADMIN ADDED:
If you wish to directly give someone access to a Product and all its content and emails, you can add them directly from the DAP Admin screen (Users > Add/Edit).
You just need their email id and their first name (both of which they can change subsequently) to add them to a Product.
While adding them, you have the option of marking them as a “Paid” user by checking the “Mark as Paid” checkbox.
If you don’t check this check box, then they will be added as a “Free” user and get access only to “Free” resources (content/emails).
But if you check the “Mark as Paid” checkbox, then they will get access to all “Paid” content and emails, just like someone who is actually a “Paid” member.
Payment: Setup and Integration – FAQs
Q: I just made a test purchase. But DAP did not process the payment (or) did not add me as a member (or) is not creating a new member.
Make sure that the product name within DAP and the product name in your “buy” button (i.e., your shopping cart) are EXACTLY the same. Don’t just look at the two and say, “oh yeah, they’re the same”.We recommend “copying” the product name that you set up in DAP, and then “pasting” it when creating your “buy” button. If you are using Paypal, then this is the “Item Name” when you are creating your Paypal “buy” button. If you are using 1ShoppingCart, then this is the “Product Name” when creating a new product.
(Paypal users, skip ahead)
1ShoppingCart/ClickBank:
1) Make sure you have set up the “Email Order Processing” correctly.
2) Is your Cron Job dap-emailorder.php set up and running correctly?
3) Make sure you have not “removed” the 1Shoppingcart or ClickBank payment notification email from your server. Log in to your email server, and make sure that the email is still there, and also it needs to be “Unread”. If your email client (like Outlook or Thunderbird, or Gmail) already accessed it and marked it as read, then simply mark it unread, and the next time DAP runs (which should be in 10 minutes) it will pick up the email and process it.
Paypal Users:
1. If you are using Paypal IPN, then make sure you have enabled IPN within your Paypal account.
2. Make sure you put the correct IPN “notify_url” text in your button.
3. Make sure the Paypal button you set up is a “Buy Now” or “Subscribe” or “Add to Cart” button.
Also see these troubleshooting guides:
