Author Archives: Veena Prashanth
Author Archives: Veena Prashanth
Never been a better time to setup an online business. Never been easier to package your knowledge, skills, expertise into a product/training/course and start selling it online. And there's no better membership plugin than DigitalAccessPass (DAP) to build a membership site!
This video is just 20 minutes long but it'll help you get familiar with DAP and quickly setup your membership site.
DAP can power your entire sales funnel and it can be the backbone of your entire online business.
When a new payment is received, DAP automatically sends out a payment notification email with order details.
By default, it's turned on and notifications are sent for all products.
We've now added a new configuration that will allow you to turn OFF email notifications that goes out to the admin upon every successful purchase.
You'll be able to turn it off for ALL products or just for the configured products.
Go to DAP Setup >> Config page >> Notifications tab << Click on Order Notification

By default, notification is turned ON for all products.
By default, DAP will send payment notifications but you can turn it off.
Turn it off for all products or just the selected products.
You can turn off notifications for all products or just the selected products.
Integration between DigitalAccessPass (DAP) and the BuddyBoss platform will allow you create a powerful online communities membership site.
You can control access to your BuddyBoss groups and profile types at "membership/product level".
When users receive access to a Product/Level
When users lose access to a Product/Level (subscription cancellation or access is removed)
Assign Access to Profile Types
Step 1: Download the BuddyBoss Add-On from your Members Area on DigitalAccessPass.com

1. Login to your Members Area on the DigitalAccessPass Site.
2. Under the "Downloads" tab, you'll find the BuddyBoss Add-On. Download it.
3. Upload it to your site via WordPress Admin >> Plugins >> Installer.
4. Activate the DAP BuddyBoss Plugin.
Step 2: Set up Group Rules
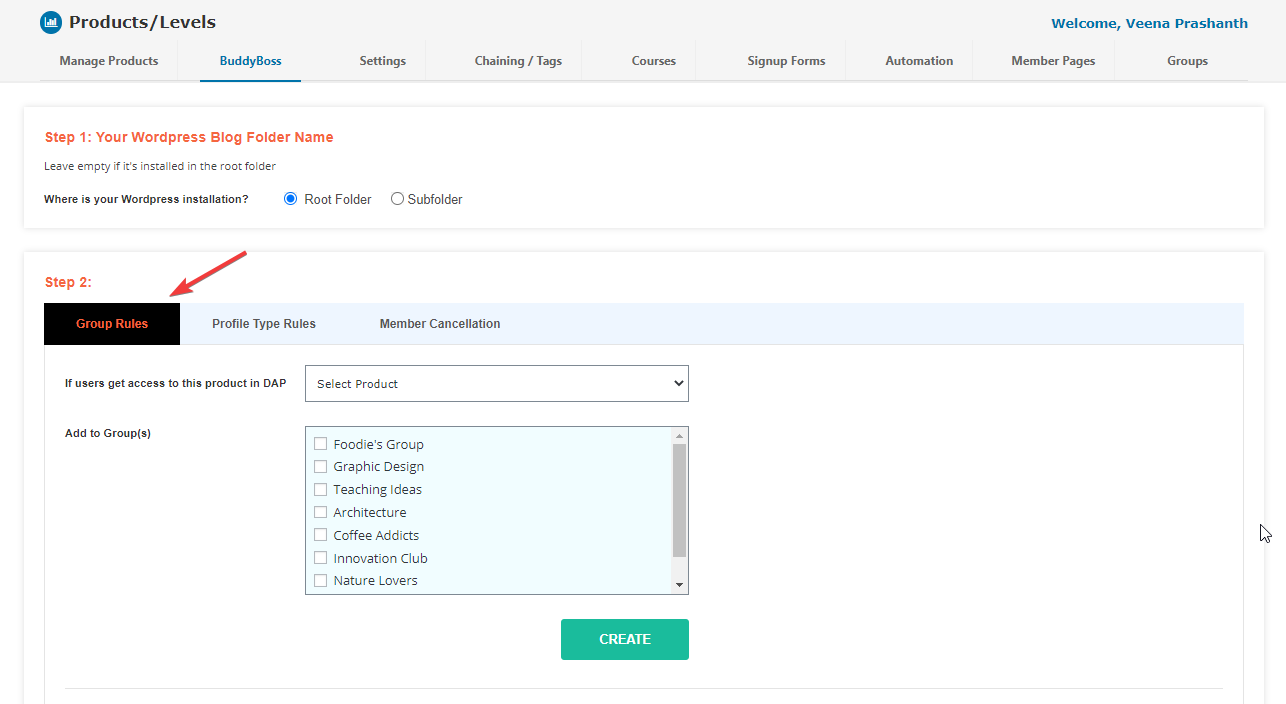
1. Go to DAP Dashboard >> Products/Levels >> BuddyBoss page.
2. In the Group Rules tab:
-> Select the DAP product/level.
-> Add To Group: Select the BuddyBoss group(s) to which you want to give access.
-> Remove from Group: Select the BuddyBoss group(s) from which you want to remove access.
3. You can set up different add/remove group rules for different products/levels.
Step 3: Set up Profile Type Rules
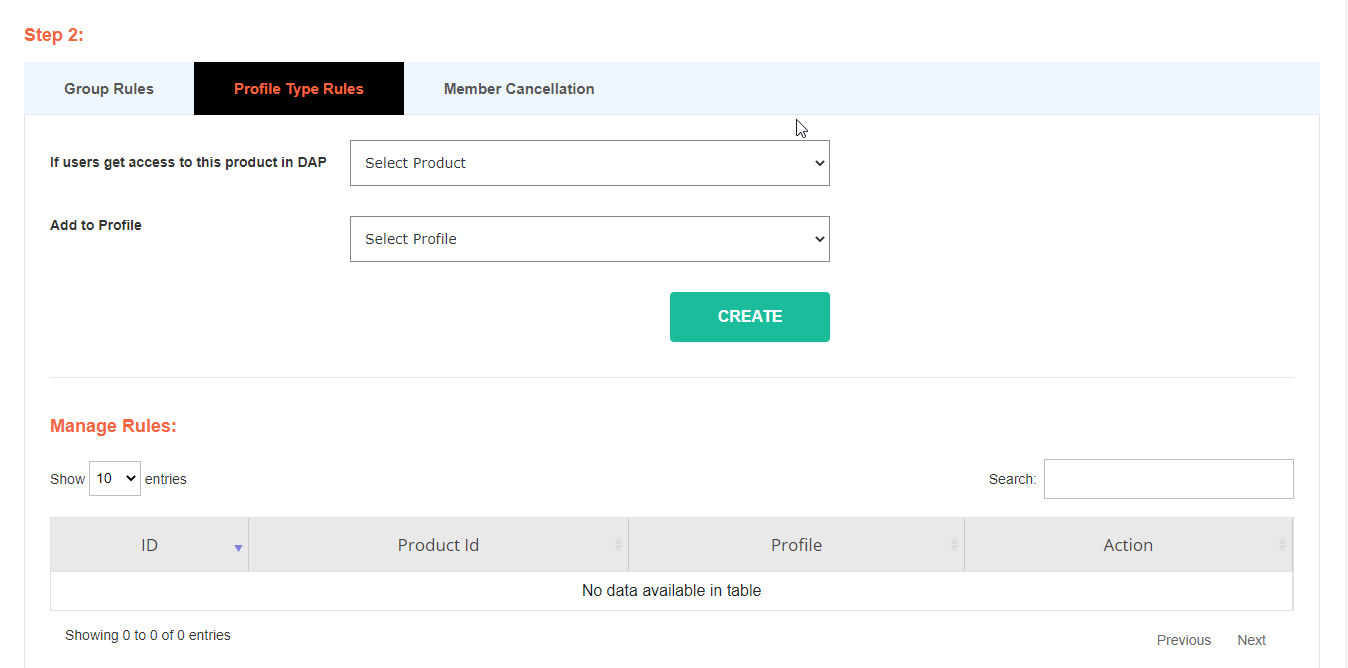
1. Go to DAP Dashboard >> Products/Levels >> BuddyBoss page.
2. In the Profile Type Rules tab:
=> Select the DAP product/level.
=> Select the BuddyBoss profile type to which you want to give access.
3. You can set up different profile type rules for different products/levels.
Step 4: Member Cancellation / Remove Rules
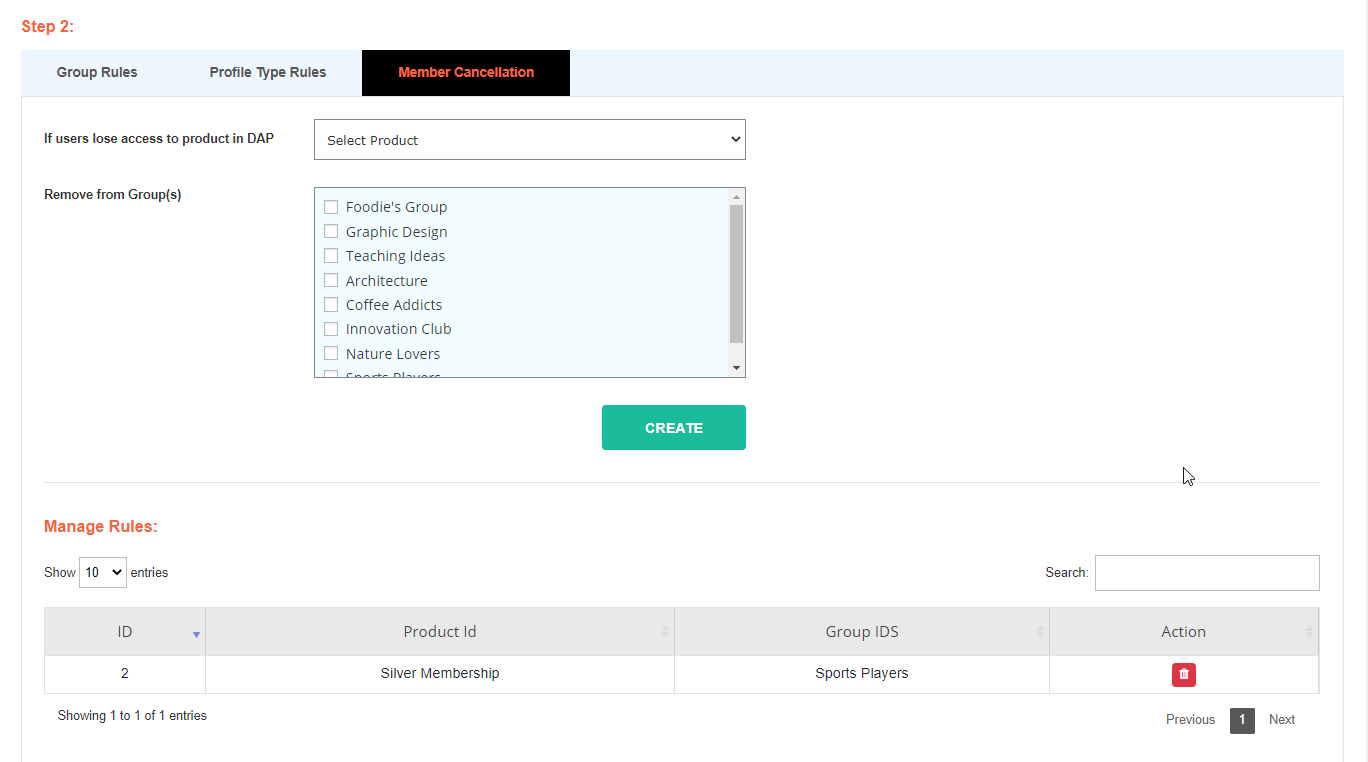
1. Go to DAP Dashboard >> Products/Levels >> BuddyBoss page.
2. In the Member Cancellation tab:
=> Select the DAP product/level.
=> Select the BuddyBoss group(s) from which you want to remove access.
3. You can set up different cancellation rules for different products/levels.
Say you have two products - Product A and Product B.
Set up group and profile rules for both of these products before your start testing.
Use Case 1: Give Access to Product A
1. Go to DAP Dashboard >> Members >> Add page
2. Add a NEW user to a Product A (for which you've setup "Group and Profile Type" Rules).
3. Login (via the DAP login page) using this new members' email / password.
4. Visit your BB Profile. See if you were added to the right group and assigned the right profile types.
Use Case 2: Give existing user access to Product B
1. Go to DAP dashboard >> Members >> Manage page.
2. Find the user that you added in the previous test case. Now give this user access to Product B.
3. Login (via the DAP login page) using this new members' email / password.
4. Visit your BB Profile. See if you were added to the right group and assigned the right profile types.
Use Case 3: Member Cancellation
1. Make sure to setup cancellation rules in DAP dashboard >> BuddyBoss page for products A and B.
2. Go to DAP Dashboard >> Products/Levels page >> Find the product >> Click on the Advanced Tab >> Set "Cancellation/Expiration" action to "Remove from Product".
3. Now to test this, go to DAP Dashboard >> Members Manage page >> Find the user from earlier tests and click on the "trash" icon to remove their access to product A or B. See if the cancellation rules are triggered. See if the group and profile type is set correctly in BuddyBoss.
Don't have a
DAP/SPC License yet?
No platform will give you as many options as SPC & DAP to grow your sales! Be sure to check out our platinum and elite packages!
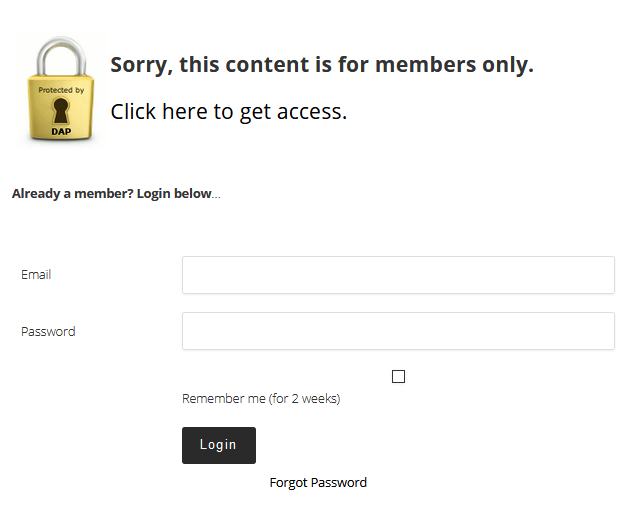
When users try to access a protected page in a not-logged-in state, or if they are logged-in but don't have access, DAP will display an error page.
The error page looks like this by default (for not-logged-in users),
Custom Error Page
If you don't want to use the default error page, you can create a page in WordPress and use that as your error page!
Please follow these steps (just one-time setup):
Step 1: Create a page in WordPress.
Let's say you call it "error".
Step 2: You can add two different messages on this page - One for logged-in users and another for not-logged-in users.
You can use the DAP shortcode to display different messages to logged-in members without access and not-logged-in members.
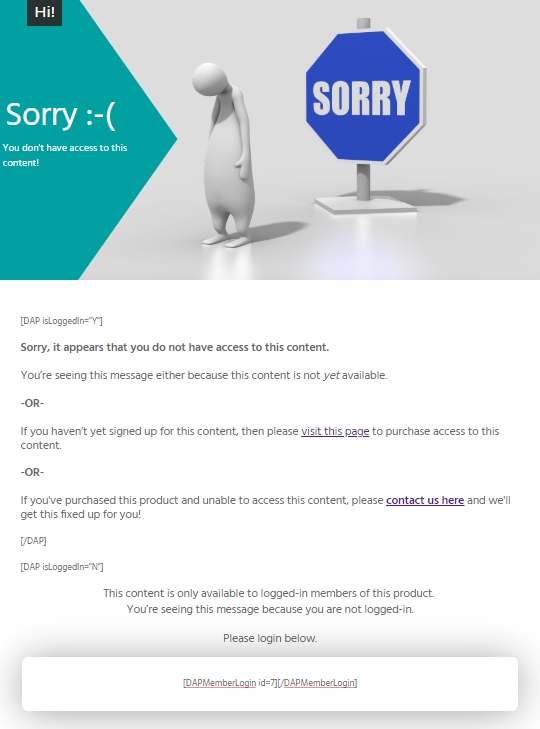
Here is an example:
[DAP isLoggedIn="Y"]
You’re seeing this message either because this content is not yet available.
-OR-
If you haven’t yet signed up for this content, then please visit this page to purchase access to this content.
-OR-
If you've purchased this product and unable to access this content, please contact us here and we'll get this fixed up for you!
[/DAP]
[DAP isLoggedIn="N"]
This content is only available to logged-in members of this product. You’re seeing this message because you are not logged-in.
Please login below:
[INSERT LOGIN SHORTCODE HERE]
[/DAP]
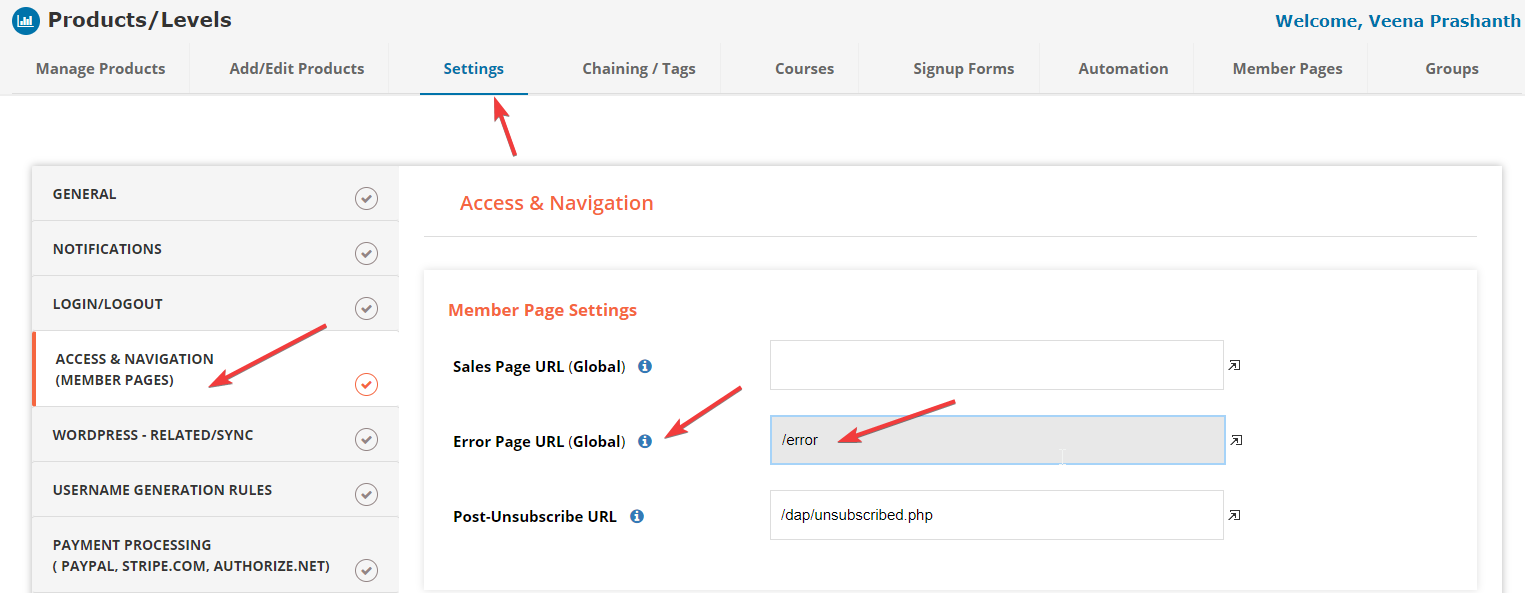
Step 3: Visit the DAP Admin >> Setup >> Config page >> Access & Navigation section >> set Error Page URL to /error .
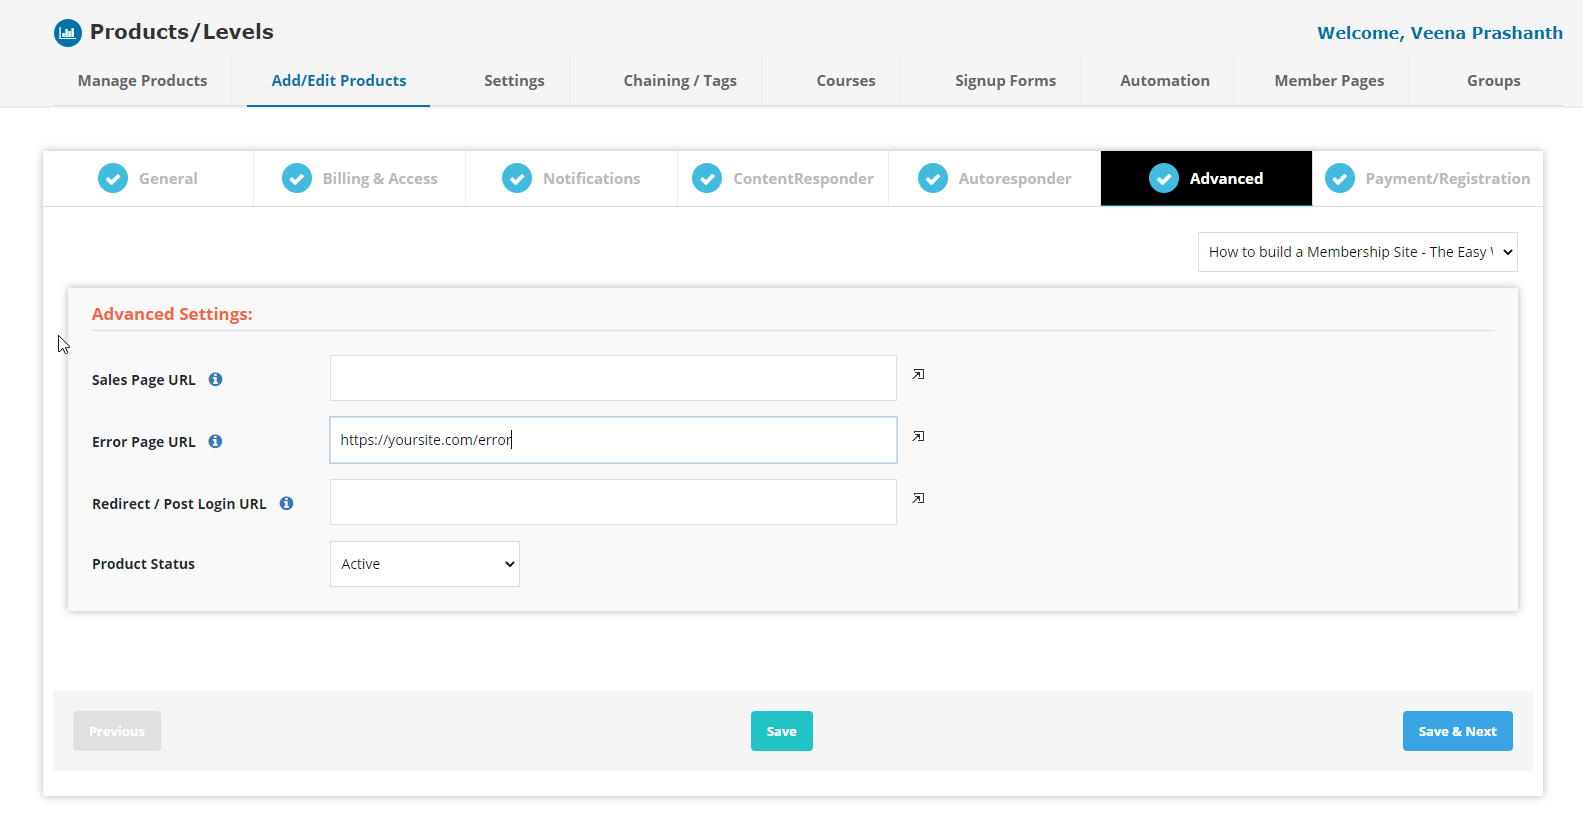
Step 4: Visit the DAP products page >> "Advanced" tab.
Select your product and set the Error Page URL to /error. Do this for all of your products.
That's it!
Going forward, whenever you add a NEW product in DAP, the only thing you have to do is set the Error Page URL to /error in the DAP Products page >> Advanced tab.
When you use WordPress plugins that interface with Facebook via APIs, you'll have to generate a Facebook App ID & Secret Key to use the plugin.
Watch this short video to see how to quickly and easily create a Facebook App ID & Secret Key for your domain!
Our Facebook Plugins
FB ShareToUnlock: Hide Premium Content behind a cool "ShareToUnlock" template. Users can share your page on Facebook to access the hidden content.
FB LeadMachine: 1-Click Facebook Registration Plugin
DigitalAccessPass (DAP): A membership plugin for WordPress that supports 1-click login with Facebook.
MailerLite provides all the latest email marketing features designed to help you grow subscribers and build stronger relationships.
MailerLite also has a FREE plan and it includes:
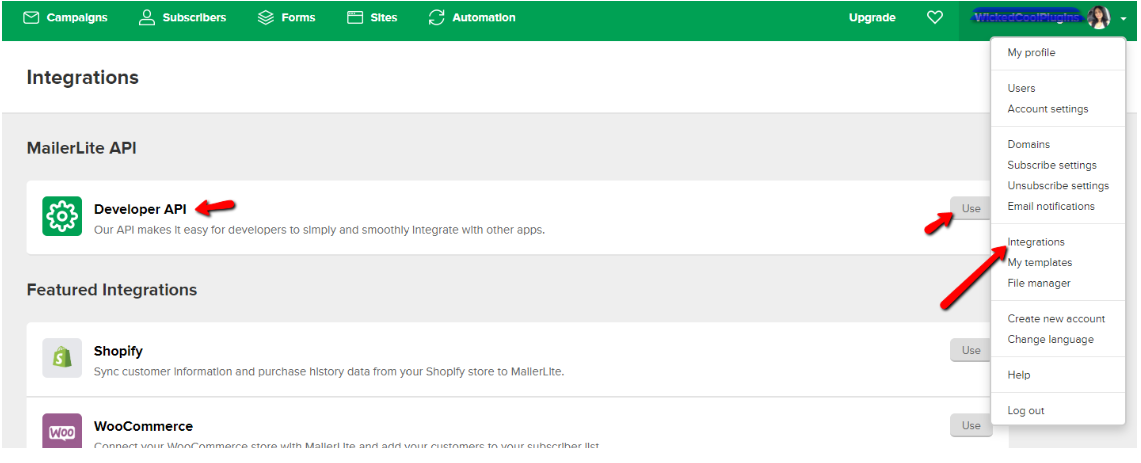
Login to your MailerLite account. You'll find your API Key in the Integrations page.
Click on "Use" under Developer API. You'll find your API Key there.
Create your Groups in MailerLite >> Subscribers >> Click on Groups.
Go to DAP >> Products >> Manage Connections page and add a new connection for
MailerLite. Enter your MailerLite API key on this page.

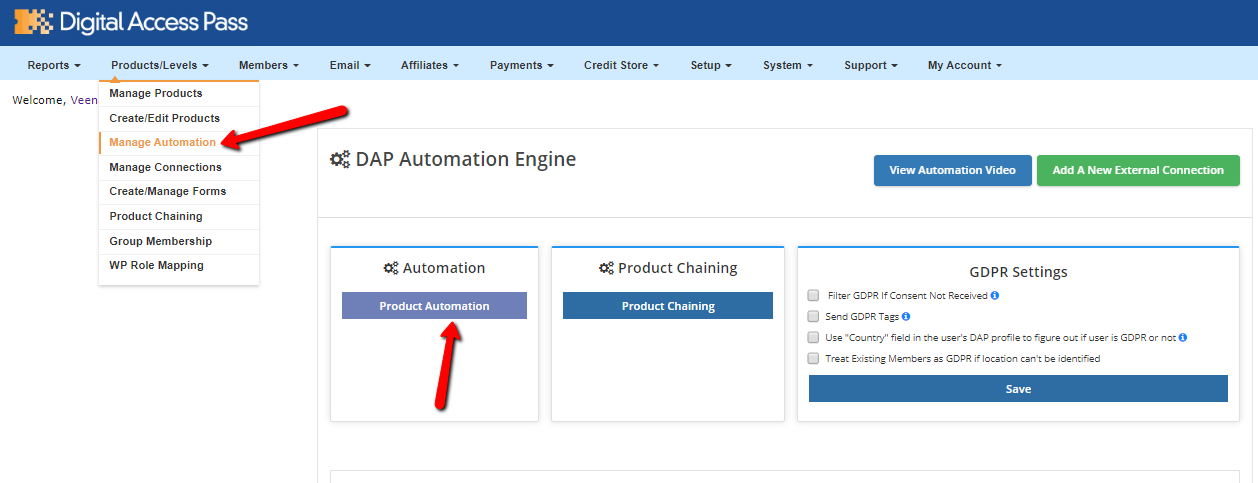
Go to DAP >> Products >> Manage Automation page, click on "Product Automation",
select the product and add two automation rules:
Add a new user to product that's connected to ML via DAP Members >> Add Member page.
Login to your ML account and click on Subscribers. See if you find the new subscriber in ML.
Watch Video to Learn:
Please watch this video to see you can create a member-facing invoice page in DAP.
Also, if you're on DAP v7.6 and LiveLinks v4.6 (or above), be sure to visit DAP admin >> setup >> DAP Security page and delete "invoices" folder as it's not longer required. You only have to do this once.
Please watch this video to see you can export member and member-product information from DAP.
If you want to use PayKickstart as your shopping cart platform, good news is... DAP has a full-fledged integration with PKS!
The following events are fully integrated with DAP.
When your buyers complete a purchase via PKS, they'll be given automatic and instant access to your DAP product.
If you process a refund or cancellation in PKS, your buyers will instantly lose access to the product in DAP.
In fact, DAP's integration with PayKickstart (PKS) is actually better than the integration we currently have other cart platforms like Thrivecart and Samcart because everything is automated with PKS, including refunds and cancellations.
Please refer this documentation from PayKickstart on how to configure PKS for DAP integration.


