Login/Logout Widget
DAP has a Login/Logout Widget that you can use in any widget-ready theme.
Log in as WP admin, and look under “Appearance > Widgets”.
You’ll see the widget. Drag this widget on to any customizable part of your theme.
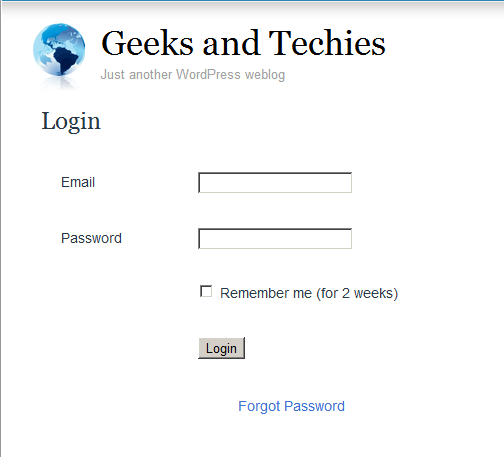
The widget puts the DAP login form right on your sidebar.
When a user is not logged in, they will see the login form.
When they are logged in, they just see a “Logout” button.
Logout Link
Login/Logout Widget
If you are using the DAP Login/Logout widget on your sidebar, then the login widget automatically turns in to a “Logout” button once a member has logged in. No separate link needed if you’re using this widget. Click here to read more about the Login/Logout widget.
Logout link in your Menu
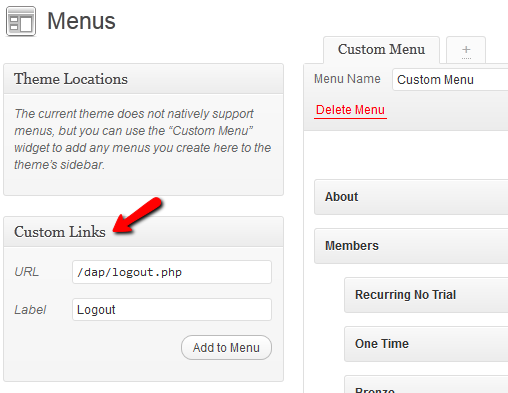
If you have a custom menu (WP Admin > Appearance > Menus), then you can add a custom link that points to “/dap/logout.php” or “http://YourSite.com/dap/logout.php” to your menu. This link will log your users out of both DAP and WordPress.
Default DAP Member Page
If you use the default member’s area that comes with DAP out of the box – http://YourSite.com/dap/ – then this page already has a “Log out” link at the top.
But if you are putting all of DAP’s member pages within your WordPress blog using our various shortcodes, then you need to publish the DAP logout link in your sidebar (or wherever you choose to).
Here’s the link for logging out of the member’s area:
http://YourSite.com/dap/logout.php
Replace “YourSite.com” with your actual site name, of course. And then publish the above link anywhere on your blog – sidebar, top menu bar, etc.
NOTE: Clicking on the DAP log out link will log you out of both DAP and WordPress.
Creating Member Profile, My Content & Affiliate Sections within WordPress
Creating Your “Member’s Area”
DAP has 4 main Member-facing pages (the rest of your content is all standard WordPress pages and posts and categories, along with your media – like Videos, PDF reports, etc.):
- Login page: This is where your members would log in at. (You, the DAP Admin don’t have to log in from here – you can log in to DAP admin when you log in to the WordPress admin dashboard.) This member login page can be either a stand-alone log in page (if you put the tag on a separate page), or it can be a a login form on the sidebar (that turns in to a logout button once they log in).
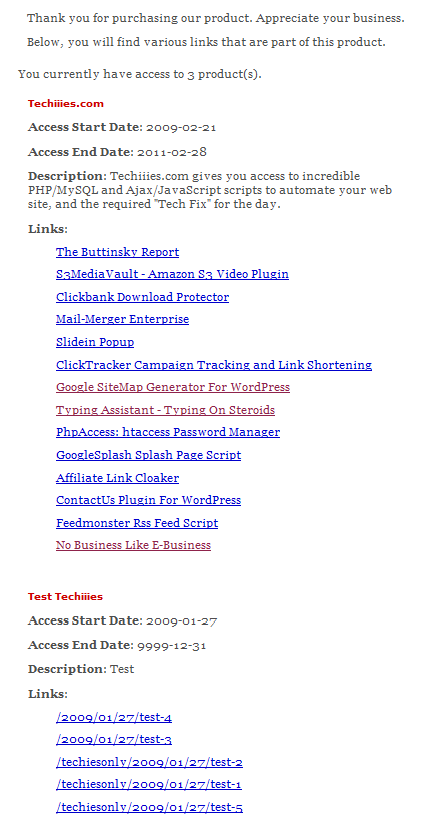
- My Content: This section shows all the products that the member has purchased or signed up for. This is the page that shows the links newly appearing as and when they are dripped on the member.
- My Profile: This shows all of the user profile fields – like first name, last name, email, password, address, etc. They can change all of their contact information on this page.
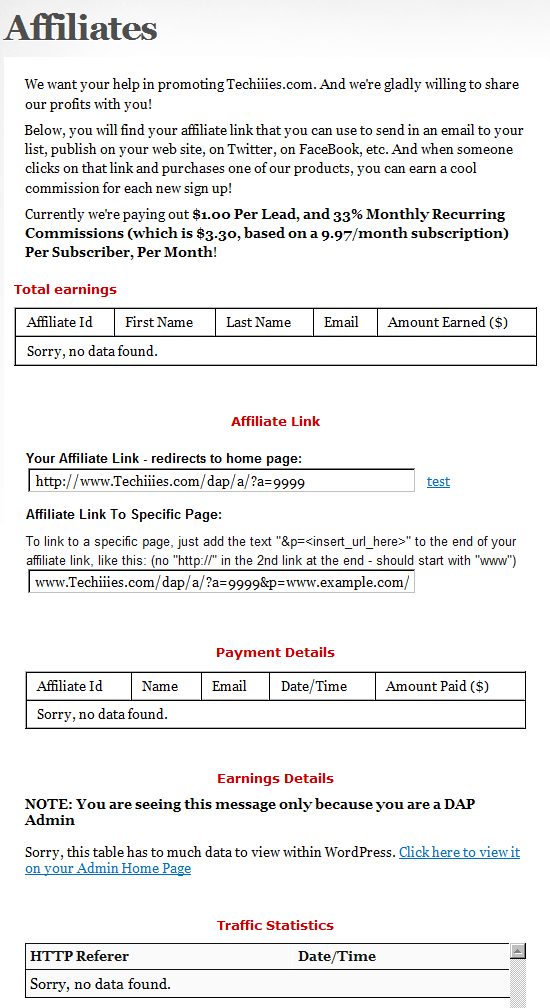
- Affiliate Info: This shows members their own personalized affiliate link, their link-referral stats, commissions earned, commissions paid, etc. If you want to make this page even more useful, you can add banners and emails and promo copy that the affiliate can simply copy/paste and send to their list.
So basically, only 4 “member” pages as far as DAP is concerned.
And all of these can be created right within your WordPress site, within a WP Page, so that they take on the exact same look & feel as your web site.
- “Login” page: Use [DAPLoginForm] (responsive)
(used to be %%LOGIN_FORM%%) - “My Content” (shows the user’s own products): Use [DAPMyContent] (responsive)
(instead of the old [DAPUserLinks] or %%USERLINKS%%) - “My Profile” (username/password): Use [DAPUserProfile] (responsive version coming soon)
(used to be %%USERPROFILE%%) - “Affiliate Info” Section: Use %%AFFDETAILS%% (responsive version coming soon)
Login Page within WordPress
Now DAP already provides you with a built-in, out-of-the-box login form, at YourSite.com/dap/login.php . But if you want to put this form “within” your WordPress blog, so as to give your login form the same Look & Feel as the rest of your blog, then do this…
1) Create a WordPress Page (not “Post”) with the text [DAPLoginForm] in the body of the page, and a title of say, Login, and save the new page. If you used the text “Login” for the title, then the actual link to this page would be YourSite.com/blog/login
2) This page now shows up as “Login” along with the rest of your “pages” on your blog.
3) Go to DAP Admin > Setup > Config . Scroll down to the field Login URL.
In the text box, enter the full link to your login page from Step 1:
http://YourSite.com/blog/login/
Or if your blog is in the root, then…
http://YourSite.com/login
That’s it! When someone clicks on the “Login” link that now shows in your “Pages” menu, they will now see a nicely formatted login form.
Related: Where is the Logout Link?
Creating The Member’s Area
- “My Content” section – use the merge tag [DAPMyContent]
- “My Profile” (username/password) – merge tag [DAPUserProfile]
- “Affiliate Info” Section – merge tag %%AFFDETAILS%%
Create a separate page for each of the tags.
Creating a “My Content” Page within WordPress
This is the page that shows all of a member’s content details – like what products the user has purchased, what are the access start and end dates for that purchase, and all of the content within each product – all separately organized.
To create such a page, simply create a WordPress “Page” (not ‘post’) with the title “My Content” (for example) and within the body of the page, enter the text [DAPMyContent] and save the new page. Now if you visit the page, and you are logged in, it will show you something similar to the image below.
And if you gave this page the title of “My Content”, then the actual link to this page would be YourSite.com/blog/my-content/
Starting DAP 4.8, this tag generates a responsive template. See the full details at http://www.digitalaccesspass.com/blog/2015/03/responsive-login-templates/
Creating a “My Profile” Page within WordPress
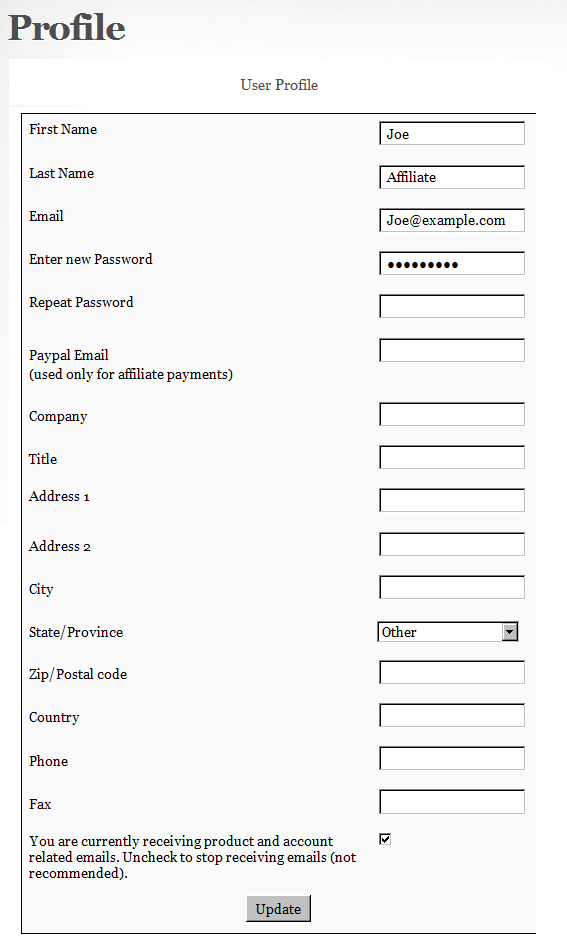
This is the section that shows the user’s profile information, where they can change their name, email id, address and other details.
For this, create a WordPress Page (not ‘post’) with the text [DAPUserProfile] in the body of the page, and a title of say, User Profile (or) My Profile and save the new page.
If you used the text “User Profile” for the title, then the actual link to this page would be YourSite.com/blog/user-profile/
Creating an “My Affiliate Info” Page within WordPress
This is the page that shows your users their affiliate link (which is instantly created for them upon purchasing any product on your site), link clicks, referrer details, earnings and payments.
For this, create a WordPress Page (not ‘post’) with the text %%AFFDETAILS%% in the body of the page, and a title of say, Affiliate, and save the new page.
If you used the text “Affiliates” for the title, then the actual link to this page would be YourSite.com/blog/affiliates/
That’s it!
Now if you want to make the affiliate page more powerful by creating a “ready-made affiliate toolbox” for your affiliates, then see this: Creating an Affiliate Toolbox
Creating A Login Page Within WordPress
Now DAP already provides you with a built-in, out-of-the-box login form, at YourSite.com/dap/login.php . But if you want to put this form “within” your WordPress blog, so as to give your login form the same Look & Feel as the rest of your blog, then do this…
1) Create a WordPress Page (not “Post”) with the text %%LOGIN_FORM%% in the body of the page, and a title of say, Login, and save the new page. If you used the text “Login” for the title, then the actual link to this page would be YourSite.com/blog/login
2) This page now shows up as “Login” along with the rest of your “pages” on your blog.
3) Go to DAP Admin > Setup > Config . Scroll down to the field Login URL
In the text box, enter the full link to your login page from Step 1:
http://YourSite.com/blog/login
Or if your blog is in the root, then…
http://YourSite.com/login
That’s it! When someone clicks on the “Login” link that now shows in your “Pages” menu, they will now see a nicely formatted login form.
Related: Where is the Logout Link?
Using Sneak-Peek For Blog Posts
By default, none of the posts or pages you have protected in DAP will be visible in any of the WP menus (not even in custom menus).
Which means, as far as your visitors (or search engines) are concerned, those posts/pages don’t even exist in your blog – until the content “drips” on them.
Some DAP users want it that way, and some don’t.
Also, from an SEO perspective, if your visitor (who is not a member, and one who is not logged in) can’t even see the post, then neither can Google. This means, if you do a blog-and-ping, when Google arrives at the permalink of your new post, because the post is protected, DAP will redirect Google to your login page. This means, you don’ get the benefit of SEO for your new post.
Also, from a “Curiosity” standpoint, if you protect all of the posts, then your visitor will only see a handful of non-protected blog posts, and logged-in members will see only content that has already dripped on them (accessible to them).
Giving them a “sneak-peek” of the protected content is a great way to get them excited about your content.
So for example, you could have a blog post that talks about a video, and goes into detail about everything that they can learn from watching the video – but the content ends just before the video, and where the video would’ve normally appeared, there appears a “Login Form” that asks them to login first before they can view the content, or purchase access if they wanted to see the video.
How to turn on Sneak-Peek
Go to DAP Dashboard > Config > WordPress Sneak-Peek
It is set to “N” (no) by default. Change this to “Y” and click on the “Update” button to save the change.
And then when they click on the “more” button to read the rest of the post, the full post is protected anyway, and they are presented with a login screen.
WARNING: READ THIS BEFORE YOU TURN ON SNEAK-PEEK
As soon as you turn on Sneak-Peek, DAP will show all content from your blog posts, but only up to the “More” tag. This means, if you don’t have a “More” tag in any of your content, then all of your blog posts will show to all users, regardless of whether they have access or not.
So, the most important thing here is this:
SNEAK-PEEK and MORE are INSEPARABLE.
If you do sneak-peek, you MUST include a “More” tag.
So when you create a WordPress blog post, split the post into two parts using the “More” tag. This creates a “public preview” portion of the actual post, that shows up on your blog’s home page and in the permalink when that post is displayed. To read the rest of the post, your visitor has to click on the “More” link, and that’s when depending on whether the user has access, the rest of the post will be displayed.
Creating a Product
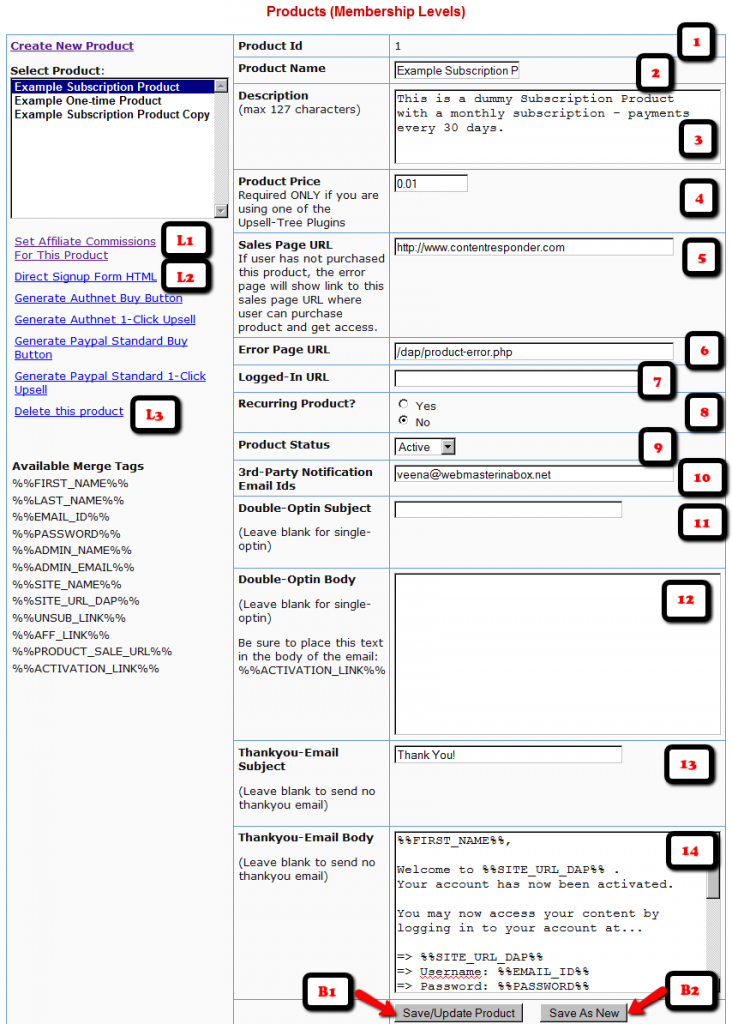
The “Products/Levels > Manage” page has 3 sections.
1. Product details
2. ContentResponder
3. Email Autoresponder
All three are explained below.
1. Product Details
1. Product Id
This is an internal number assigned to every product that is created. Nothing for you to do. It will automatically show a number after you save a new product.
2. Product Name (reqd):
Obviously, this is the name you give your product. So if you are creating a product (subscription-based, or one-time purchase) about how to make money online, then you would call it “How to make money online”. This name will be used by DAP on various screens, emails and reports. So, name it something intuitive, and not something cryptic.
3. Description (reqd)
Use this to expand on what your product does. This field is used on auto-generated error pages and such.
4. Product Price
Required only if you are using DAP itself as a shopping cart, by using one of our “Upsell Tree” Plugins. If you are using a 3rd party cart (like http://1SiteAutomation.com, e-junkie, Paypal standard where the buttons are hosted at Paypal), then you don’t need to enter anything here. Just leave it at 0.00
5. Sales Page URL (optional)
When a user who doesn’t have access to the links in this product, DAP shows her a default error page with a “Lock” symbol, and on that error page, it will say something to the effect of “Sorry, you don’t have access to this Product. Click here to get access.”. And the text “Click here” will point to this “Sales Page URL” will be shown, which the user can then follow to read your sales page and then purchase the product.
6. Error Page URL (optional)
Default value: /dap/product-error.phpIf you leave at this default value above, then DAP will show the default error page when a user tries to access a URL that she doesn’t have access to yet, URL to which access has expired, or she hasn’t purchased the product of which the URL is a part of.
Is this a recurring product? (optional):
Pick “Yes” or “No” depending on if this product is a recurring product for which you expect periodic payments to come in.
If you pick “No”, then when the user purchases this product (or you give her direct access from the admin area), then the user is given access from Day 1 to Day 9999.
Price
Enter the price of your product, regardless of whether it is one-time or recurring. This price is used only if you are using the Authorize.net plugin. If you’re using direct Paypal, ClickBank or 1ShoppingCart, then this field is ignored by DAP.
Billing Cycle (optional):
Applicable only if recurring is set to yes. If this is a recurring product, then you need to enter how often billing is done (in days). So, if your product is available for a monthly subscription, then enter “30” (as in, billing occurs once every “30” days).
Product Status (optional):
If you want to temporarily take this product offline, thus revoking access to this product by all users, then change the status to “Inactiveâ€Â.
3rd Party Notification Email Ids
If you want DAP to send email notifications to 3rd party email addresses (like autoresponder services – eg., Aweber – or to JV partners), then enter one or more email addresses here. Separate multiple email addresses by a comma.
Every time a user subscribes to this product (by paying, or because Admin gave her access), an email is sent out by DAP to all of these email addresses. The “From name” is the subscriber’s name, and the “From email” is the subscriber’s email address.
This is very useful for automatically adding your subscriber to a 3rd party list service that has a “subscribable” email address – like yourlist@aweber.com or 1sa-listid@1siteautomation.com.
Once you fill out the fields, click on the “Save/Update Product” button to save the changes.
Use the same form to make changes to the fields as well.
Integrating With A Payment Processor
The Product Name within DAP should be the exact same (even the case) as the Product Name in your Shopping Cart.
So if you were using a 1ShoppingCart (or private label) to accept payment for selling your digital info product or for access to your membership site, then the Product Name you use in your 1ShoppingCart admin panel should be the exact same name as what you use within DAP.
This is the only way for DAP to know about a new purchase through your 1ShoppingCart cart. And when it parses your 1ShoppingCart notification email, it can figure out that your buyer who purchased that product needs to be added to DAP, so that your buyer can get access to either your info product files, or to your subscription-based site.
Personalization For Your Blog Posts
1) Personalize post Titles and Content with MERGE variables:
%%FIRST_NAME%% – Gets replaced with their first name
%%EMAIL%% – Gets replaced with their email
%%MEMBER_HOME_PAGE%% – Gets replaced with the ‘login’ page
So if you create a blog post with the title “Welcome %%FIRST_NAME%%“, then when your member views that post after they’ve logged in, they will see “Welcome John“.
2) Personalize the Login Form:
You can put the Login Form on any WP “Pageâ€Â.
3) Personalize Member and Affiliate Information:

