DAP’s Incredibly Powerful Affiliate Program
DAP offers you a built-in Affiliate Program for your web site, where all your Members can automatically and instantly be enrolled as Affiliates.
And here are a few, rare and powerful features in DAP, that you won’t find in most other affiliate providers:
1) Instant Affiliates
This means that as soon as a buyer purchases any product, or even signs up for a free product, they can get an instant affiliate link that they can immediately start using to promote your membership site.
In fact, you can even send them their own unique affiliate link right in their welcome email itself, the same email where you send them their login info! So even before they’ve logged in to your site to download or view the content that they’ve just purchased, they’re already and affiliate and can start promoting your site to others, and earn back their investment even before they’ve reached your refund period.
2) Global Affiliate Link
There’s just one “core” (default) affiliate link that your affiliates can use to promote your web site, and regardless of which product the referral ends up buying, your affiliate gets paid on all of those purchased products.
So it’s like an Amazon affiliate link. One global link that gets you paid on any resulting purchases. So your specific affiliate link could be promoting a book, electronic gadget, shoe or clothing. And once your referral gets to Amazon.com after clicking your affiliate link, even if they don’t purchase that specific product that you just them to, and go on to purchase ANY other product from the entire Amazon.com catalog (which are commission-eligible, of course), then you’ll make commissions on any resulting sale. That’s exactly how the DAP affiliate program works too. Just one default affiliate link. Affiliate can redirect visitor to any landing page (see details below), and affiliate gets paid for any resulting sales.
3) Affiliate Link Redirection
Let’s say you were an Affiliate of Amazon.com. Now imagine if Amazon gave you just one, static affiliate link to promote ALL of their products across their ENTIRE web site. That is, one standard affiliate link to promote millions of products, and anyone who clicked on that standard link would always land at Amazon’s home page, no matter what – and that there was no way to direct affiliate traffic directly to any of the actual product pages.
Imagine if you saw a link on our blog that read “Click here to check out the amazing Bamboo Fun tablet” and the link, instead of taking you directly to the product page of the Bamboo fun, took you to Amazon’s home page? How incredibly annoying would that be for the visitor to always be taken to Amazon’s home page no matter what product someone were recommending? Think Amazon would be the e-commerce juggernaut it is today without that implementing that simple feature?
But Amazon lets you link directly to the product pages of the product you are referring to (or recommending, or promoting).
Like….
“Check out the amazing Bamboo Fun tablet” (links directly to product page)
“Check out my best-selling book ‘No Business Like E-Business’ on Amazon” (links directly to the book page)
We are amazed that so many affiliate software providers do not offer this simple, basic feature. And that is the ability to set the affiliate cookie, and then redirect the referred visitor to any page on any web site the affiliate wants the visitor to land on.
So when you use DAP, your affiliates are not forced to always send traffic to your home page. They can redirect the visitor (who just clicked on their affiliate link) to any part of your web site. In fact, they can redirect the visitor to any web page on any web site anywhere online! So they could be sending traffic to one of your free videos, one of your blog posts, or even to one of your articles published on someone else’s web site!
3) Multi-Tier Affiliate Program
DAP allows you to offer multiple tiers of commissions, not just one. So you can create an incredible revenue stream for your affiliates, where they get paid on the sales generated by their 1st level referrals. Which means more incentive for them to join and promote your affiliate program!
4) Paying A Per-Lead Commission To Your ClickBank Affiliates
You already know that DAP supports ClickBank purchases, and you can turn off the display of your affiliate section if you are using ClickBank’s own affiliate program, instead of DAP.
But wait – that does not mean that you can’t use the two affiliate programs IN TANDEM to pull of something really crazy – like awarding your ClickBank affiliates with a commission just for sending you a lead – meaning, the lead just signs up for your “free” newsletter – and of course, if they go on to purchase something from your web site (assuming you are selling through ClickBank), then they get the usual CB commissions.
So here’s how it works:
- Every member on your DAP-powered site gets their own affiliate link that looks like:
http://YourSite.com/dap/a/?a=1234 - And their CB affiliate link for your product would look like
http://affnick.merchantnick.hop.clickbank.net - Now DAP’s affiliate link has the capability of redirecting to any page on your site (or any page on any web site) by adding the destination URL to the affiliate link.
- So, now your affiliate adds their CB affiliate link to the END of their DAP affiliate link, like this:
http://YourSite.com/dap/a/?a=1234&p=http://affnick.merchantnick.hop.clickbank.net - So when someone clicks on this above link that your affiliate is promoting, then two things happen:
a) The DAP affiliate cookie is set
b) The CB cookie is also set - So within DAP, you can set up just a Per-Lead Affiliate Commission for your Product (which is say, a free newsletter or a free PDF, or whatever)
- So when the referred user signs up at your membership site, they first get paid the Per-Lead Commission
- If they then go on to purchase other products from your web site (which obviously you’re selling through ClickBank, otherwise, this whole section is of no meaning to you), then they get the Per-Sale commission from ClickBank too!
So that sums up some of the best features that are part of DAP.
Other Built-In Affiliate Features
Of course, there’s still all the other cool affiliate features in DAP, like…
- Commission Override: Give special treatment to your Top Affiliates and JV partners by giving them higher commissions than the rest of your affiliates.
- Pay affiliates both one-time or monthly recurring commissions for the life of the subscriber.
- Pay-Per-Lead and Pay-Per-Sale
- Ready-made Affiliate Links Displayed for Users
- Ready-made Affiliate Toolbox for your affiliates
- Affiliate-Analytics:
* Real-time Earnings Reporting
* Real-time Payment Report
* Real-time Traffic Stats for both Affiliates and Admin (with referers) - Paypal Mass-Pay Ready: You get a Paypal Mass-Pay ready, fully formatted affiliate list with all commissions listed.
- Offline Payments: Export Affiliates for payment, pay them using any offline means (eg., checks), and then once the checks have been mailed, you can mark them all as “Paid”.
- Process Refund for Affiliates: When you process a refund, DAP will also reverse the affiliate commission. It will not reverse the Pay-per-lead amounts. Only the Pay-per-sale amount is negated.
So these are the features available to right out-of-the-box, just waiting for you to start signing up an army of affiliates from day 1!
For more information about the Affiliate Module, check out our documentation page at http://DigitalAccessPass.com/documentation/ and see the
Creating Member Profile, My Content & Affiliate Sections within WordPress
Creating Your “Member’s Area”
DAP has 4 main Member-facing pages (the rest of your content is all standard WordPress pages and posts and categories, along with your media – like Videos, PDF reports, etc.):
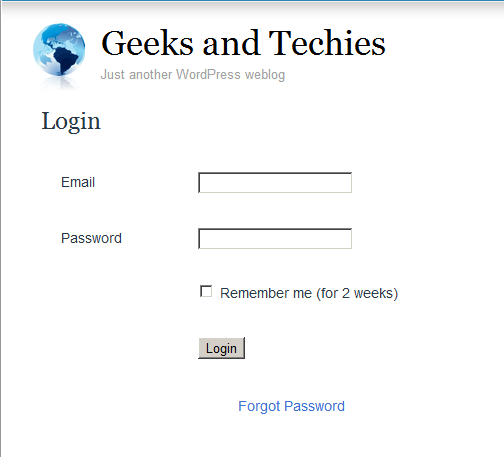
- Login page: This is where your members would log in at. (You, the DAP Admin don’t have to log in from here – you can log in to DAP admin when you log in to the WordPress admin dashboard.) This member login page can be either a stand-alone log in page (if you put the tag on a separate page), or it can be a a login form on the sidebar (that turns in to a logout button once they log in).
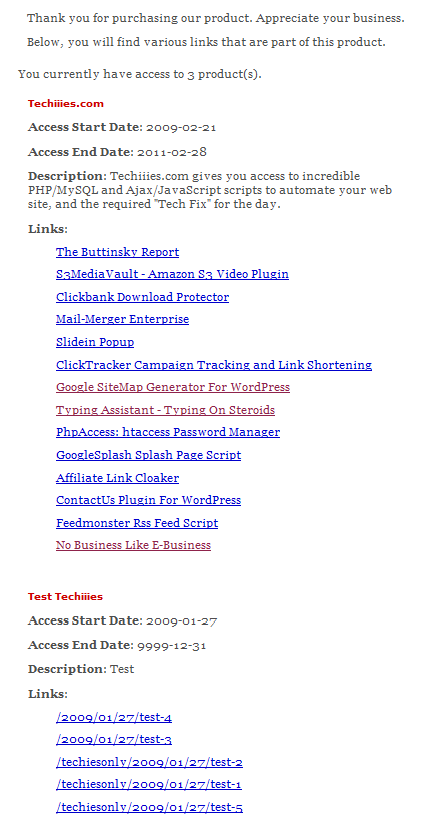
- My Content: This section shows all the products that the member has purchased or signed up for. This is the page that shows the links newly appearing as and when they are dripped on the member.
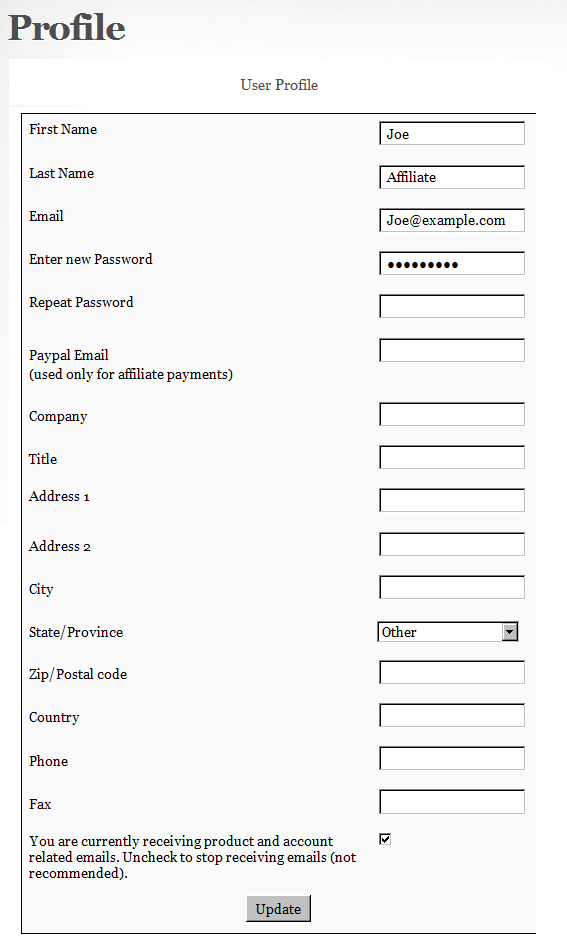
- My Profile: This shows all of the user profile fields – like first name, last name, email, password, address, etc. They can change all of their contact information on this page.
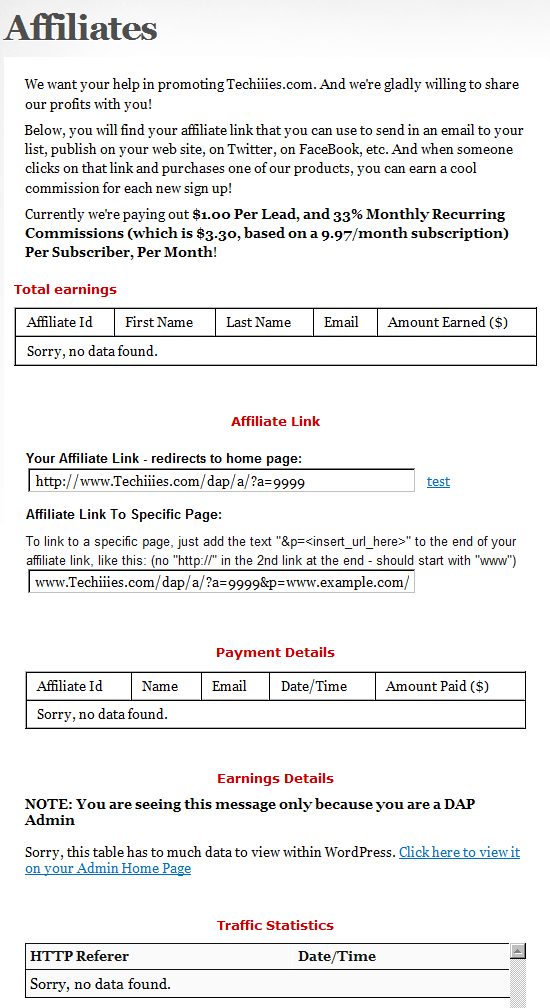
- Affiliate Info: This shows members their own personalized affiliate link, their link-referral stats, commissions earned, commissions paid, etc. If you want to make this page even more useful, you can add banners and emails and promo copy that the affiliate can simply copy/paste and send to their list.
So basically, only 4 “member” pages as far as DAP is concerned.
And all of these can be created right within your WordPress site, within a WP Page, so that they take on the exact same look & feel as your web site.
- “Login” page: Use [DAPLoginForm] (responsive)
(used to be %%LOGIN_FORM%%) - “My Content” (shows the user’s own products): Use [DAPMyContent] (responsive)
(instead of the old [DAPUserLinks] or %%USERLINKS%%) - “My Profile” (username/password): Use [DAPUserProfile] (responsive version coming soon)
(used to be %%USERPROFILE%%) - “Affiliate Info” Section: Use %%AFFDETAILS%% (responsive version coming soon)
Login Page within WordPress
Now DAP already provides you with a built-in, out-of-the-box login form, at YourSite.com/dap/login.php . But if you want to put this form “within” your WordPress blog, so as to give your login form the same Look & Feel as the rest of your blog, then do this…
1) Create a WordPress Page (not “Post”) with the text [DAPLoginForm] in the body of the page, and a title of say, Login, and save the new page. If you used the text “Login” for the title, then the actual link to this page would be YourSite.com/blog/login
2) This page now shows up as “Login” along with the rest of your “pages” on your blog.
3) Go to DAP Admin > Setup > Config . Scroll down to the field Login URL.
In the text box, enter the full link to your login page from Step 1:
http://YourSite.com/blog/login/
Or if your blog is in the root, then…
http://YourSite.com/login
That’s it! When someone clicks on the “Login” link that now shows in your “Pages” menu, they will now see a nicely formatted login form.
Related: Where is the Logout Link?
Creating The Member’s Area
- “My Content” section – use the merge tag [DAPMyContent]
- “My Profile” (username/password) – merge tag [DAPUserProfile]
- “Affiliate Info” Section – merge tag %%AFFDETAILS%%
Create a separate page for each of the tags.
Creating a “My Content” Page within WordPress
This is the page that shows all of a member’s content details – like what products the user has purchased, what are the access start and end dates for that purchase, and all of the content within each product – all separately organized.
To create such a page, simply create a WordPress “Page” (not ‘post’) with the title “My Content” (for example) and within the body of the page, enter the text [DAPMyContent] and save the new page. Now if you visit the page, and you are logged in, it will show you something similar to the image below.
And if you gave this page the title of “My Content”, then the actual link to this page would be YourSite.com/blog/my-content/
Starting DAP 4.8, this tag generates a responsive template. See the full details at http://www.digitalaccesspass.com/blog/2015/03/responsive-login-templates/
Creating a “My Profile” Page within WordPress
This is the section that shows the user’s profile information, where they can change their name, email id, address and other details.
For this, create a WordPress Page (not ‘post’) with the text [DAPUserProfile] in the body of the page, and a title of say, User Profile (or) My Profile and save the new page.
If you used the text “User Profile” for the title, then the actual link to this page would be YourSite.com/blog/user-profile/

Creating an “My Affiliate Info” Page within WordPress
This is the page that shows your users their affiliate link (which is instantly created for them upon purchasing any product on your site), link clicks, referrer details, earnings and payments.
For this, create a WordPress Page (not ‘post’) with the text %%AFFDETAILS%% in the body of the page, and a title of say, Affiliate, and save the new page.
If you used the text “Affiliates” for the title, then the actual link to this page would be YourSite.com/blog/affiliates/
That’s it!
Now if you want to make the affiliate page more powerful by creating a “ready-made affiliate toolbox” for your affiliates, then see this: Creating an Affiliate Toolbox
Creating A Login Page Within WordPress
Now DAP already provides you with a built-in, out-of-the-box login form, at YourSite.com/dap/login.php . But if you want to put this form “within” your WordPress blog, so as to give your login form the same Look & Feel as the rest of your blog, then do this…
1) Create a WordPress Page (not “Post”) with the text %%LOGIN_FORM%% in the body of the page, and a title of say, Login, and save the new page. If you used the text “Login” for the title, then the actual link to this page would be YourSite.com/blog/login
2) This page now shows up as “Login” along with the rest of your “pages” on your blog.
3) Go to DAP Admin > Setup > Config . Scroll down to the field Login URL
In the text box, enter the full link to your login page from Step 1:
http://YourSite.com/blog/login
Or if your blog is in the root, then…
http://YourSite.com/login
That’s it! When someone clicks on the “Login” link that now shows in your “Pages” menu, they will now see a nicely formatted login form.
Related: Where is the Logout Link?
DAP WP LiveLinks Plugin
Once you install this plugin, when someone visits your blog, they will ONLY see posts that they are “eligible” to view. This applies to your blogs main page as well.
So, if a casual visitor arrives at your blog, they only see titles and their summaries for posts that have NOT been protected (not added to DAP at all).
For instance, if you have 100 posts, and have protected 95 of them, then on your blogs home page, this visitor will see only 5 blog posts – titles and summaries – in TOTAL.
They wont even see the titles or bodies of the protected posts. And if they somehow get the link to it (from someone else, by email, say) and try to visit it, then the existing DAP protection kicks in, and theyre asked to login first to determine if they have access to that post “as of now.
But once this same visitor logs in, all blog posts that were HIDDEN earlier MAGICALLY re-appear ![]() And they see all posts that they are CURRENTLY eligible to access (this excludes posts to which access already expired, and posts to which they dont have access YET – i.e., future availability).
And they see all posts that they are CURRENTLY eligible to access (this excludes posts to which access already expired, and posts to which they dont have access YET – i.e., future availability).
If you want a certain portion of even your protected posts to always show up, even if the user is not eligible to see the post, see DAP “Sneak-Peek”.
This plugin lets you do two other things:
1) You can PERSONALIZE blog post titles and content with MERGE variables.
So, if you create a blog post with the title “Welcome %%FIRST_NAME%%“, then when your member logs in, they will see “Welcome John“.
Available merge variables;
%%FIRST_NAME%% – Gets replaced with their first name
%%EMAIL%% – Gets replaced with their email
%%MEMBER_HOME_PAGE%% – Gets replaced with the ‘login’ page
2) You can also put the Login Form on any WP “Page”.
Personalization For Your Blog Posts
1) Personalize post Titles and Content with MERGE variables:
%%FIRST_NAME%% – Gets replaced with their first name
%%EMAIL%% – Gets replaced with their email
%%MEMBER_HOME_PAGE%% – Gets replaced with the ‘login’ page
So if you create a blog post with the title “Welcome %%FIRST_NAME%%“, then when your member views that post after they’ve logged in, they will see “Welcome John“.
2) Personalize the Login Form:
You can put the Login Form on any WP “Pageâ€Â.
3) Personalize Member and Affiliate Information:


