Archive

Category Archives for "DAP"

How To Integrate BuddyBoss With DigitalAccessPass (DAP)

Integration between DigitalAccessPass (DAP) and the BuddyBoss platform will allow you create a powerful and advanced Membership & Community Site.

This integration will allow you to control access to your BuddyBoss groups and profile types at "membership/product level". 

Group Access Based on Membership Level/Product

1. When users receive access to a Product/Level, you can setup rules in DAP to:
Automatically add members to one or more groups.
Automatically remove members from one or more groups

2. When users lose access to a Product/Level or access is removed, you can setup rules in DAP to:
Automatically remove users from one or more group(s).

Assign Profile Types Based on Membership Level/Product

When users signup for your products, you can configure DAP to: 
Automatically add members to one or more profile types when they sign up for your products/levels.


Please follow these steps to integrate DAP with BuddyBoss.

Step 1

Download the BuddyBoss Add-On from your Members Area on DigitalAccessPass.com

1. Login to your Members Area on the DigitalAccessPass Site.

2. Under the "Downloads" tab, you'll find the BuddyBoss Add-On. Download it.

3. Upload it to your site via WordPress Admin >> Plugins >> Installer.

4. Activate the DAP BuddyBoss Plugin.

Step 2

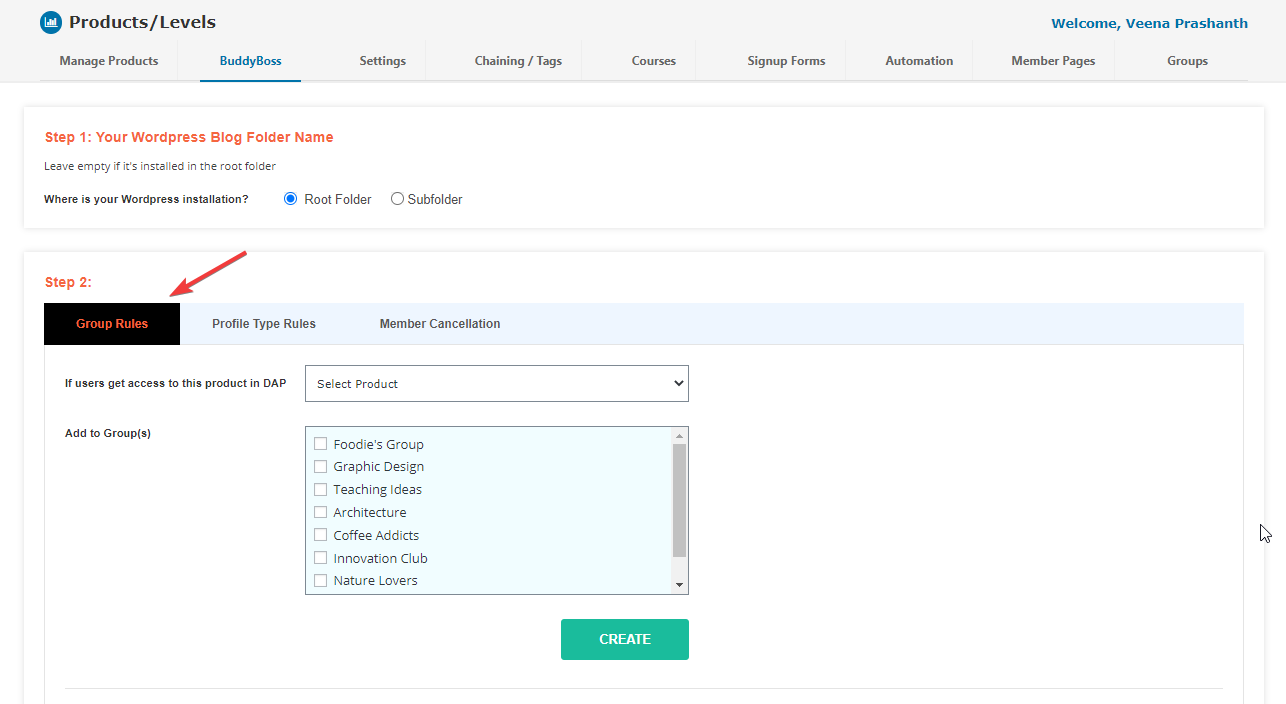
Set up Group Rules

1. Go to DAP Dashboard >> Products/Levels >> BuddyBoss page.

2. In the Group Rules tab:

-> Select the DAP product/level.

-> Add To Group: Select the BuddyBoss group(s) to which you want to give access.  

-> Remove from Group: Select the BuddyBoss group(s) from which you want to remove access.  

3. You can set up different add/remove group rules for different products/levels.

Step 3

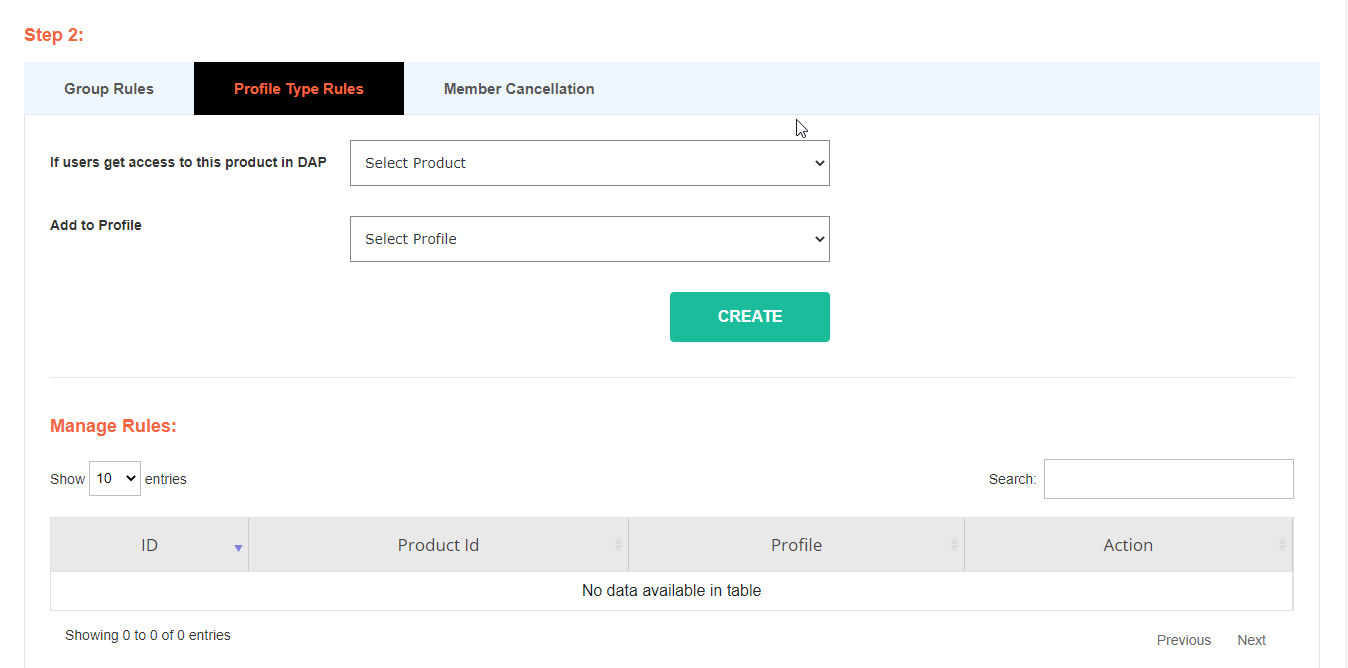
Set up Profile Type Rules

1. Go to DAP Dashboard >> Products/Levels >> BuddyBoss page.

2. In the Profile Type Rules tab:

=> Select the DAP product/level.

=> Select the BuddyBoss profile type to which you want to give access.  

3. You can set up different profile type rules for different products/levels.

Step 4

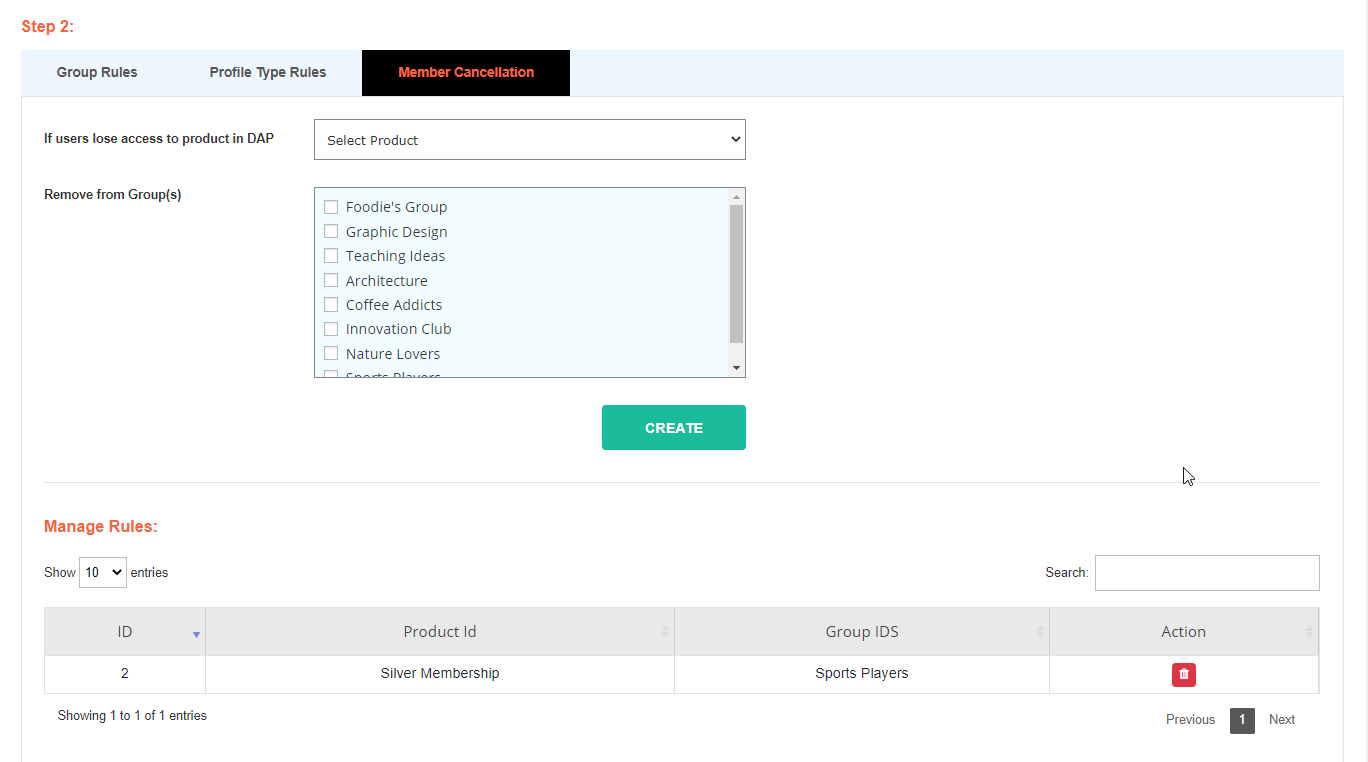
Member Cancellation / Remove Rules

1. Go to DAP Dashboard >> Products/Levels >> BuddyBoss page.

2. In the Member Cancellation tab:

=> Select the DAP product/level.

=> Select the BuddyBoss group(s) from which you want to remove access. 

3. You can set up different cancellation rules for different products/levels.

Testing Tips

Say you have two products - Product A and Product B. 

Set up group and profile rules for both of these products before your start testing.


Use Case 1: Give a test user access to Product A


1. Go to DAP Dashboard >> Members >> Add page.

2. Add a NEW user to a Product A. 

3. Go to your member login page. Login as this new member.

4. Visit the BB Profile of this member. See if the member was added to the right group and assigned the right profile types.


Use Case 2: Give existing users access to Product B


1. Go to DAP dashboard >> Members >> Manage page. 

2. Find the user that you added in the previous test case. Now give this user access to Product B

3. Login (via the DAP login page) using this new members' email / password.

4. Visit your BB Profile. See if you were added to the right group and assigned the right profile types.


Use Case 3: Member Cancellation


1. Make sure to setup cancellation rules in DAP dashboard >> BuddyBoss page for products A and B.

2. Go to DAP Dashboard >> Products/Levels page >> Find the product >> Click on the Advanced Tab >> Set "Cancellation/Expiration" action to "Remove from Product".

3. Now to test this, go to DAP Dashboard >> Members Manage page >> Find the user from earlier tests and click on the "trash" icon to remove their access to product A or B. See if the cancellation rules are triggered. See if the group and profile type is set correctly in BuddyBoss.


That's it!


It's very easy to build a comminity-focussed, powerful membership website using DAP and BuddyBoss!


Enable your customers to connect under your brand, increase engagement and retention, while gathering valuable feedback, allowing members to learn from each other and reduce your workload in the process!


How to Troubleshoot PayPal IPN Issues!

PayPal Payment Not Connecting with DAP?

Watch this video to see how you can quickly and easily troubleshoot any PayPal IPN issues.


Instant Payment Notification (IPN) is a message service that automatically notifies merchants of events related to PayPal transactions. It allows membership plugins such as DigitalAccessPass (DAP) to automate back-office and administrative functions, including automatically extending access to subscription products and providing customers with order status.

DAP relies on PayPal IPN to manage subscription access.

When users purchase a subscription, their access to the product in DAP depends on the billing cycle.

If it's a monthly subscription, they get 30 days access. If it's an annual subscription, they get 365 days of access. Upon a successful payment every month or every year (based on your billing cycle), their access is extended.

If users cancel their subscription or payment fails for any reason, access won't get extended and they'll automatically lose access to the product at the end of the current billing cycle.

So IPN is a very critical part of subscription access management. If it's not working right, your members will end up losing access to their membership, even after completing a successful subscription payment.

Watch this video to see how you can quickly and easily troubleshoot any PayPal IPN issues.


How to connect PayPal buttons with your DAP Membership Site

Sell Products using PayPal Buttons:

Want to sell your products and services using PayPal and connect PayPal buttons with your DAP-powered Membership Site for both one-off and subscription products?


Here's how you can do this in a few easy steps.


Step 1

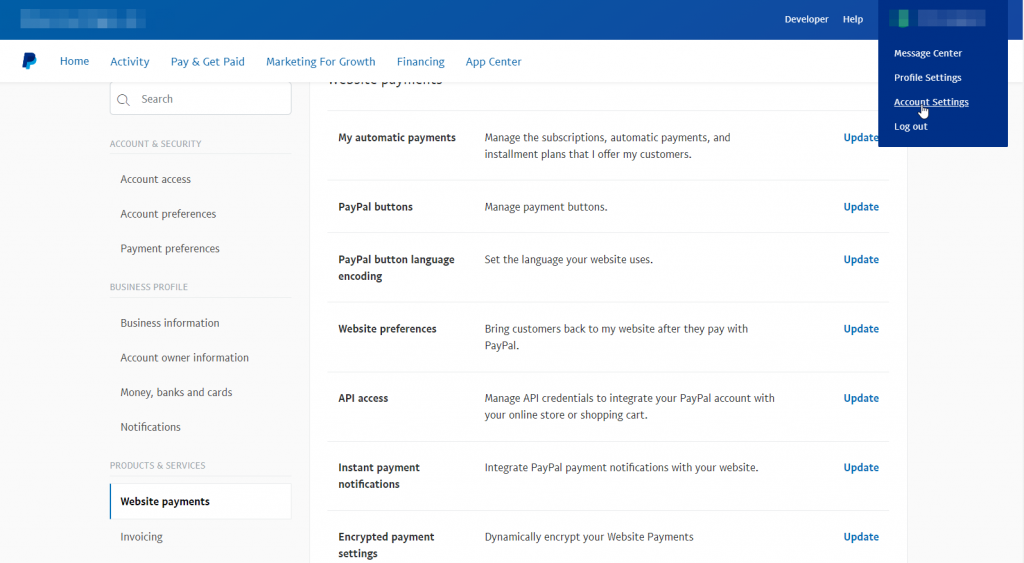
Login to your PayPal account.

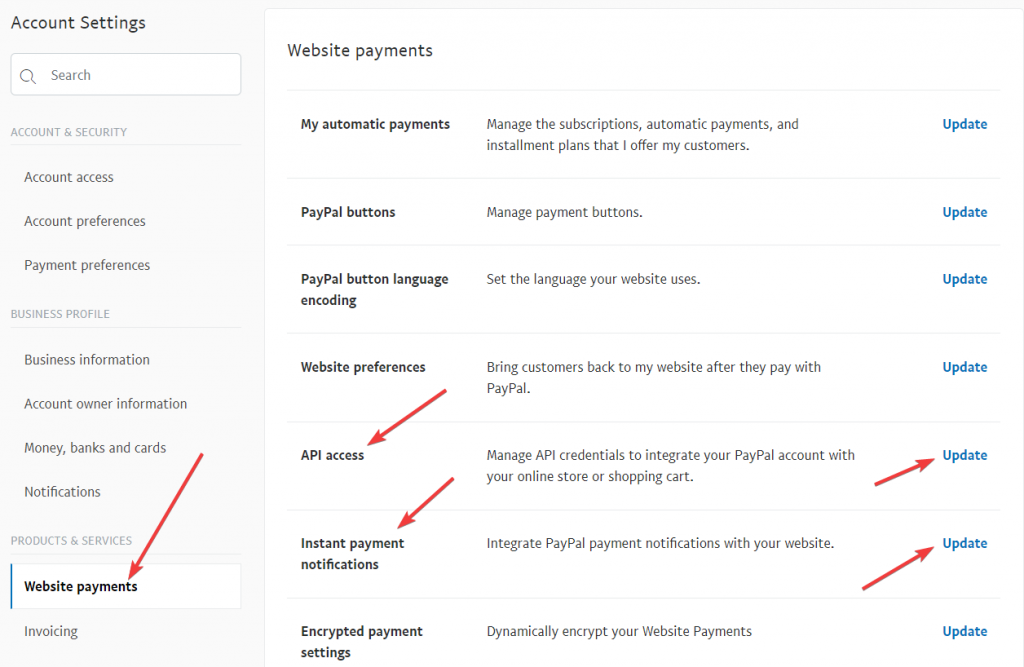
Click on Account Settings >> Website Payments

Step 2

On this page, click on the update link next to PayPal Buttons.

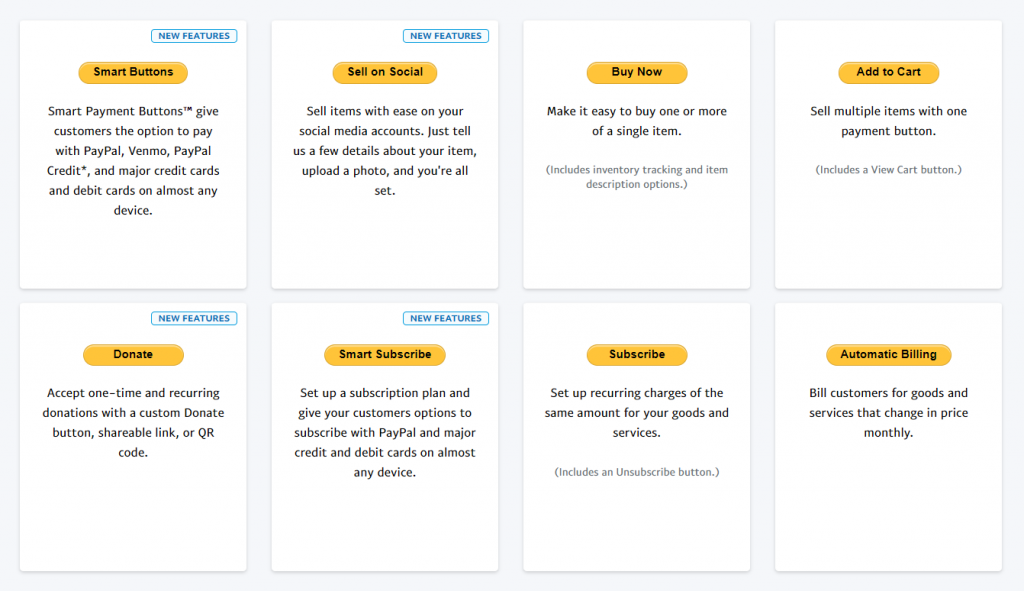
Step 3

Click on the button you want to create.

Step 4

It'll bring you to create button page.

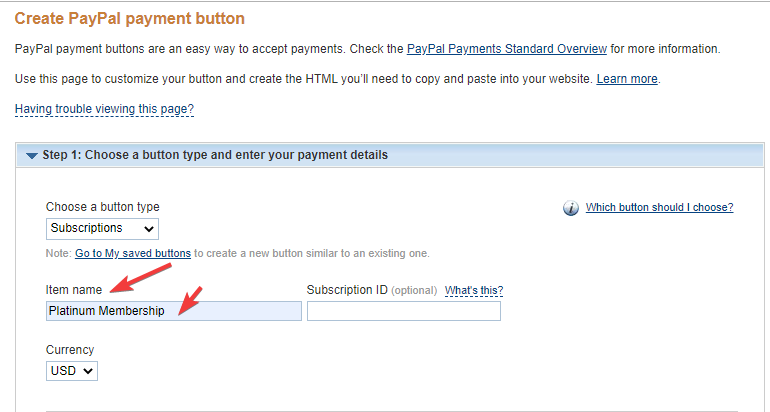
For DAP integration, make sure the item name EXACTLY matches your product name in DAP


Step 5

In the create button page >> Step 3 >> under advanced setting, check the Add Advanced Variables box and enter this in the text area.


notify_url=https://yoursite.com/dap/dap-paypal.php


(Replace yoursite.com with your domain name)

Step 6

Enable IPN in PayPal and get PayPal API keys


See this post on how you can enable IPN and get PayPal API Keys.

Step 8

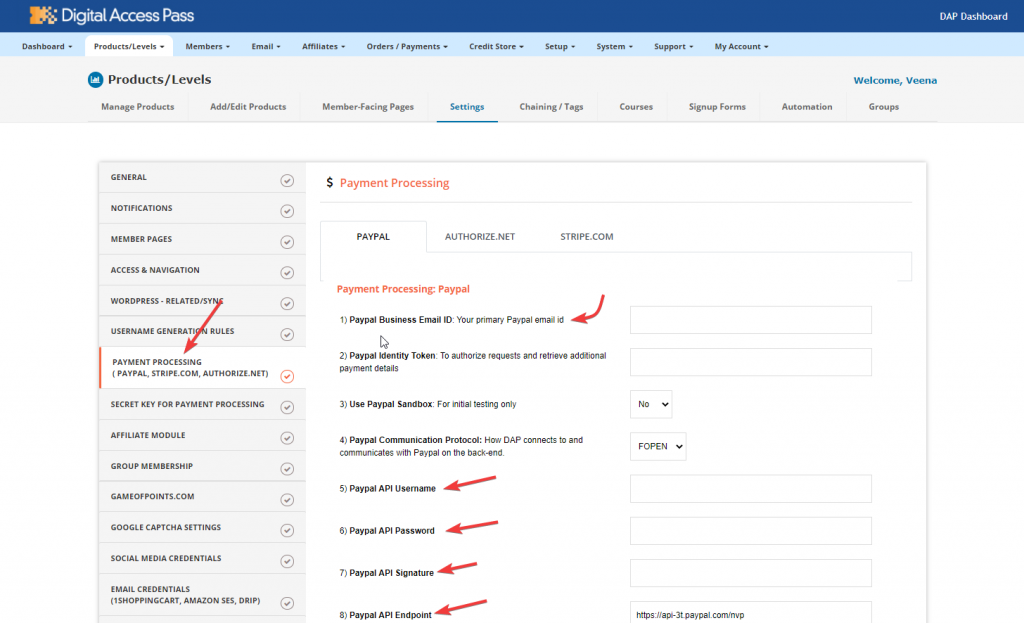
Enable PayPal business email and API credentials in DAP setup >> config page >> Payment Processor tab. 


You can leave the Identity Token field empty.


That's it!


Sell Products using PayPal Buttons:

What if you could create a member dashboard where you could show members all of their accomplishments and a roadmap?Imagine what it can do for your member engagement!

It'll allow you to make your membership site fun and addictive. It'll help you create positive user experiences. And positive user experience leads to better engagement, higher participation and more sales.


This is EXACTLY what you can build using DAP's "Member Engagement Builder"!

Watch the video above to see step-by-step how to create and customize a member dashboard page using DAP's new member engagement builder!

How to create a Member Dashboard Page

Watch video to see how to set up a Member Engagement Dashboard in less than 1 Minute!


What is a Member Engagement Dashboard?

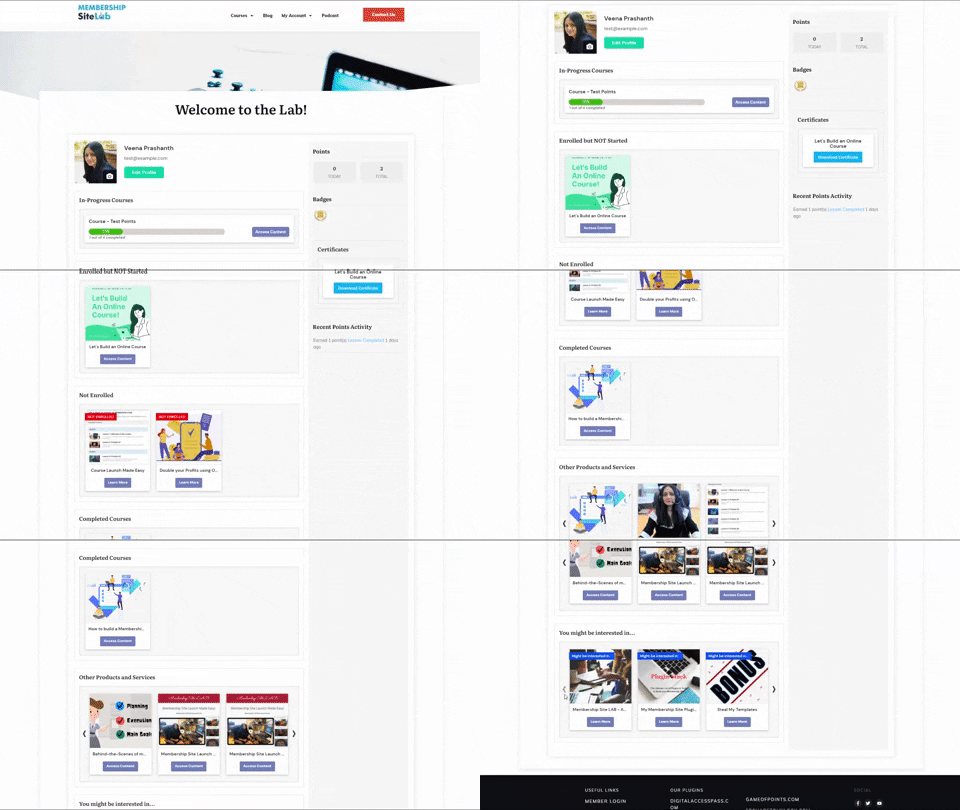
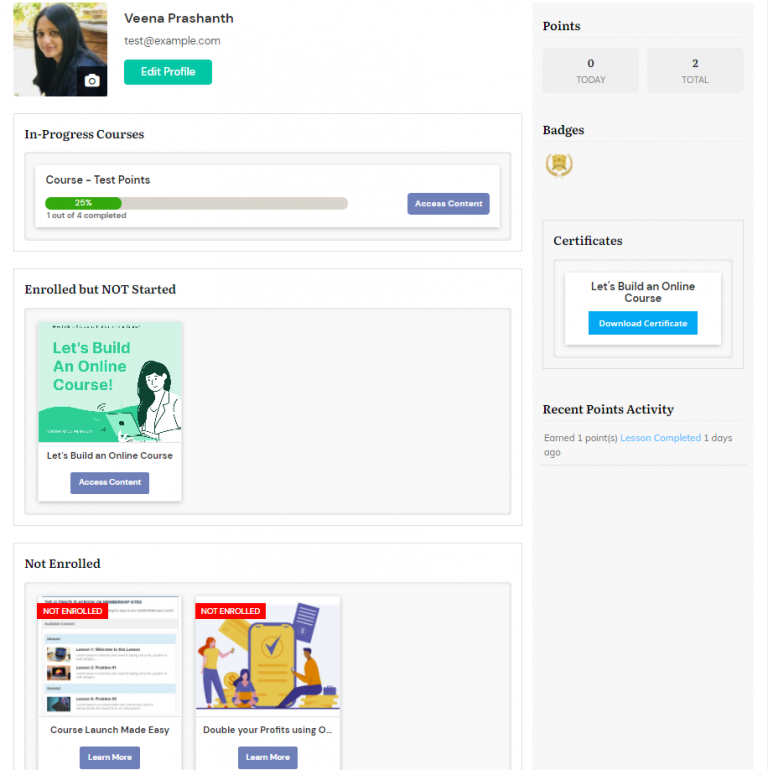
Say your members log in to your membership site and find something like this in the members area:

  • Their name and image (gravatar).
  • All the badges they have earned.
  • All the certificates they have earned.
  • All the courses they have completed.
  • All the courses they started but didn't complete. What % is still left? 
  • All the courses they enrolled in but didn't start.
  •  All the courses they have not yet signed up for (upsell).
  • All the other products and services (non-courses) they have signed up for.
  • Poducts and services that they don't yet have.
  • How many points they earned that day and the total points.
  • Recent membership activity.

What if you could create a member dashboard where you could show members all of their accomplishments and a roadmap?Imagine what it can do for your member engagement!

It'll allow you to make your membership site fun and addictive. It'll help you create positive user experiences. And positive user experience leads to better engagement, higher participation and more sales.


This is EXACTLY what you can build using DAP's "Member Engagement Builder"!

Watch the video above to see step-by-step how to create and customize a member dashboard page using DAP's new member engagement builder!

Display different WordPress Menus to Logged-in & Logged-out users

Want to display different WordPress Menus to your logged-in and logged-out members? Just follow these steps!  

Watch this video to see how to create member-facing pages in DAP!

Step 1: Create 2 Different Menus

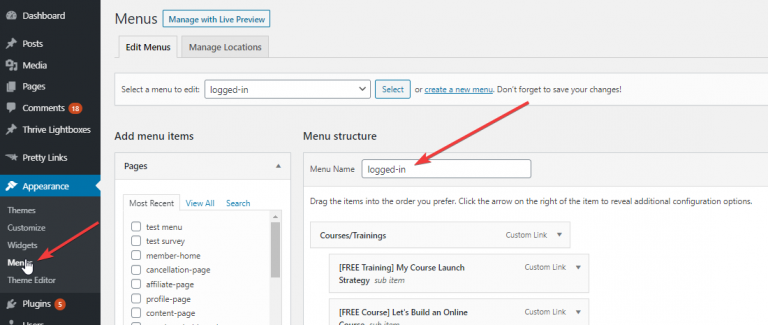
Visit  your WordPress Admin >> Appearance >> Menu.

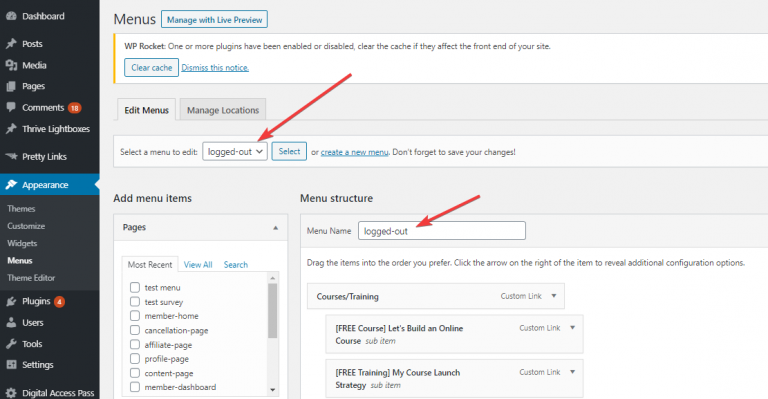
Create 2 different menus in WordPress - one for logged-in members and another one for logged-out members. 


Let's say you call the menu for logged-in users - "Members". 

And the menu for logged out members - "logged-out".

Step 2: Configure Menu In DAP

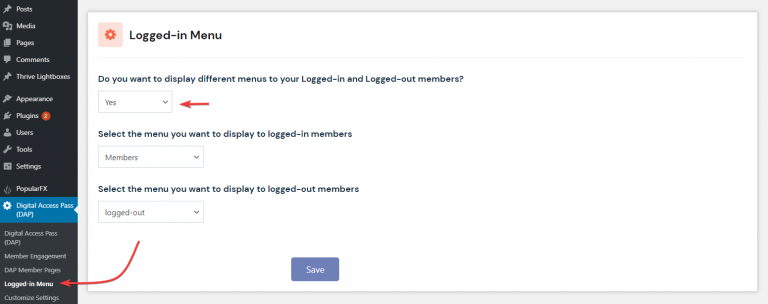
1. Visit DAP >> Logged-In Menu page.


2. Select your logged-in and logged-out menu.

3. Save the settings.

Please NOTE: if you want DAP to only control the menu displayed to the logged-in members but not the one displayed to the not-logged-in members, just select the logged-in menu on this page. Don't select any logged-out menu.

Step 3: Test To Make Sure It's Working

Visit a page where you have activated WordPress menu.

If you are logged-in to DAP, it should show the logged-in menu regardless of the menu you have activated on the page.

If you are not logged-in to DAP, it should show the logged-out menu regardless of the menu you have activated on the page. 

How to Create Member-Facing Pages in DAP!

DAP comes with an advanced member page builder. You can create member-facing pages with the click of a button.

Watch this video to see how to create member-facing pages in DAP!

Member Dashboard Page: DAP comes with a unique member dashboard builder that will allow you to quickly and easily build a fun membership dashboard page. You can send your members to this page when they login. See image. Watch video above for all the details. 


Read this post for more on the Engagement Builder.


Login Page: Membership site is any website that has premium content and requires an account and login to access it. So one of things you're going to need as a membership site owner is a way for your members to login and access the premium content that they have purchased from you.


You can create and customize a member login page in DAP >> Member Pages. 

My Content Page: This page basically shows the logged-in member a list of all the products they have access to, when the access to the product starts and ends, etc. This is also the page that will list all of the content/links that are available to them. The most recently dripped link will show up at the top of the list. You can use the DAP member page builder to create and customize a My Content page. 


My Profile Page: This page will allow your members to update their profile information such as name, email, password, billing details, other custom fields, etc. You can use the DAP member page builder to create and customize a My Profile page. 


Affiliate Page: DAP comes with a built-in affiliate module. Your affiliates will find their earning, traffic and payment details on this page. You can use the DAP member page builder to create and customize an affiliate details page.


Invoice Page: Your members will find their purchase invoice on this page. They'll find a list of all of their purchase orders and invoice on this page. You can use the DAP member page builder to create and customize an invoice page.


Member-Facing Cancellation Page: You can create a member-facing cancellation page to allow your members to self-cancel their subscription. DAP will also allow you to add a pause/resume button if you want to allow your users to pause or resume their subscription themselves.


Watch this video to how to create a cancellation page and trigger different cancellation workflows in DAP.


SendInBlue Integration with DAP

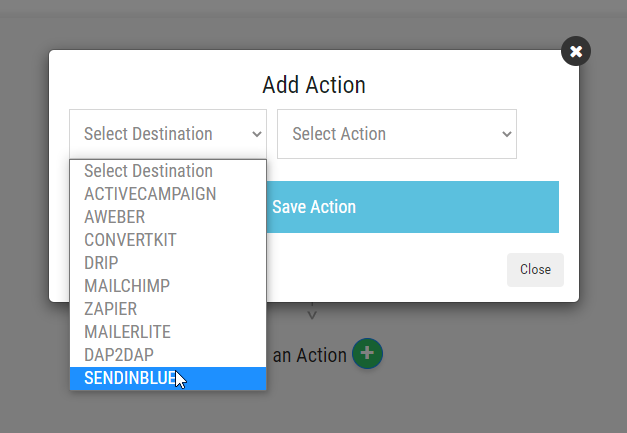
DAP integrates with all leading Email Marketing platforms such as AWeber, ActveCampaign, ConvertKit, MailChimp, GetResponse, Drip, MailerLite and now we've added SendInBlue to the list!


Sendinblue is one of the best email platforms for trigger-based and transactional emails. 


It's very easy to integrate DAP with SendInBlue using the Automation Engine.


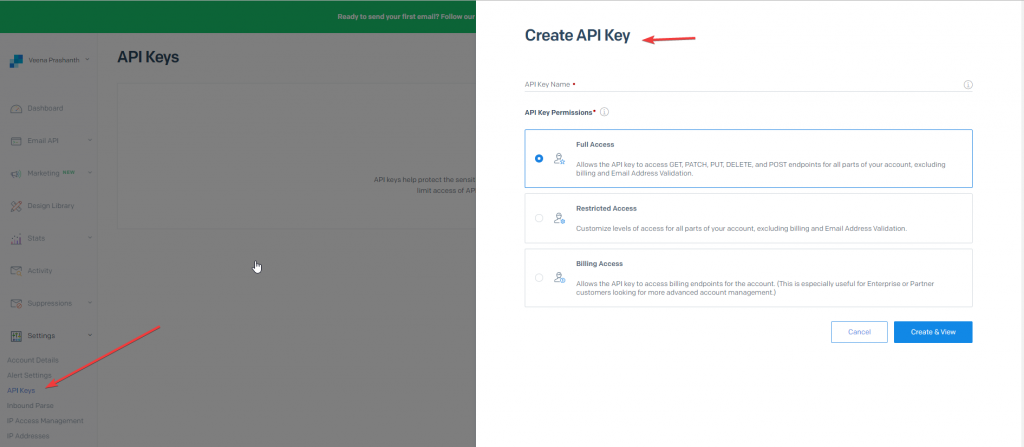
Step 1. Get SendInBlue API Key

Login to your SendInBlue account. Get the API Key from the SMTP & API page.


Step 2. Add a NEW External Connection

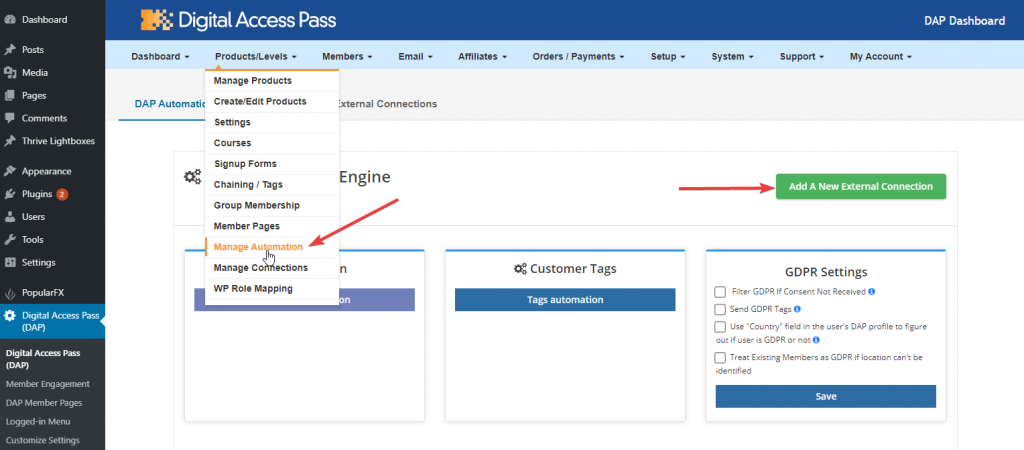
Visit the DAP Products >> Manage Automations Page and click on the Add a New External Connections button.


Step 3. Connect DAP with SendInBlue

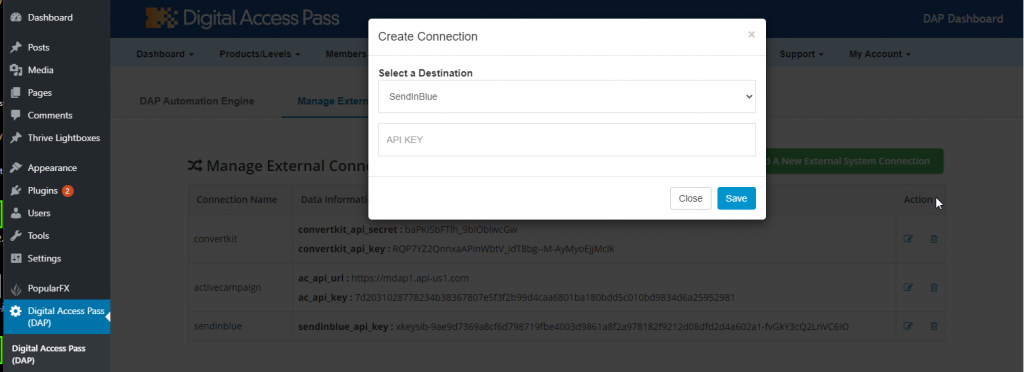
On the External Integrations page, enter your SendInBlue API Key.


Step 4. Visit the DAP Manage Automations page >> Create a New Automation

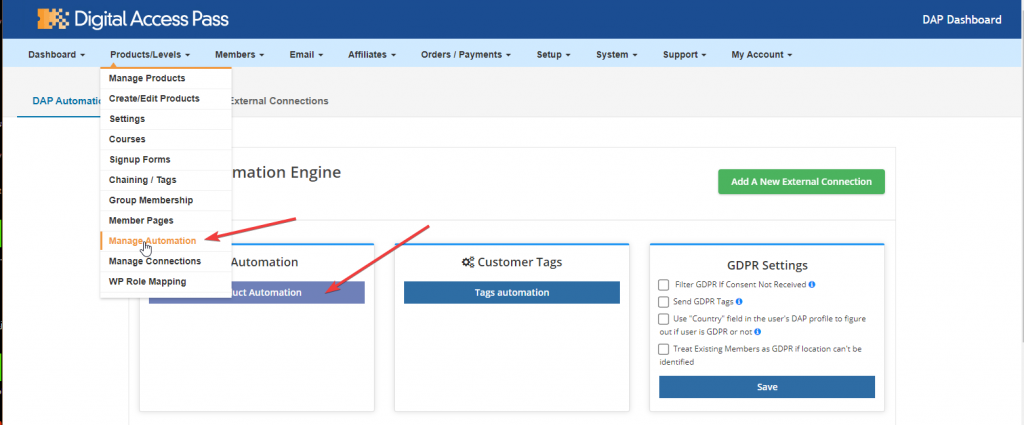
=> Visit the DAP Products >> Manage Automations Page and click on the External Integrations button.


Step 5. Start Automation

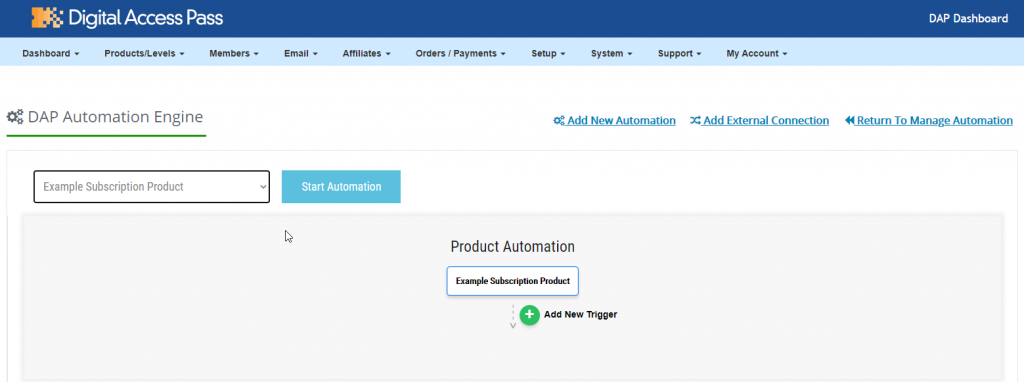
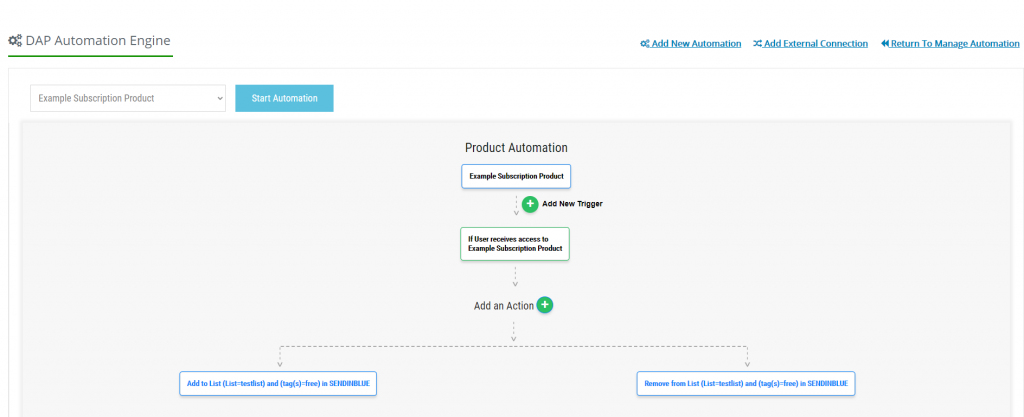
=>  Select a DAP product and click on Start Automation


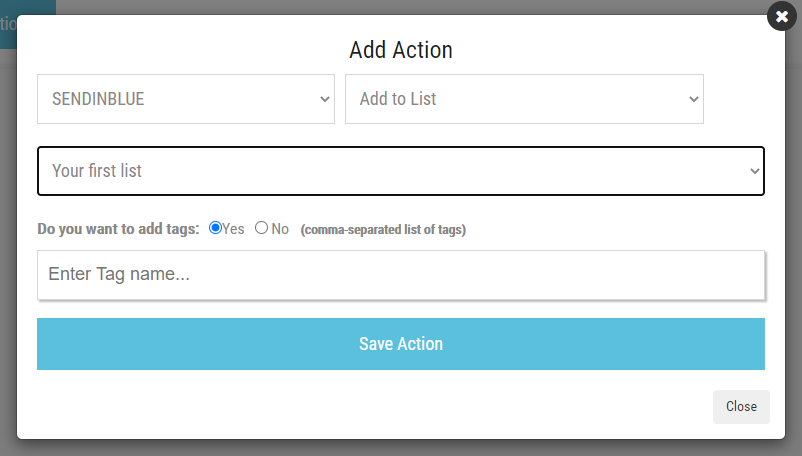
Step 6. Connect your Product to the list in SendInBlue

Add automation rules.


You can create different rules for "when users get access to a product" and "when users lose access to a product". 

=> DAP will add users to the configured SendInBlue list when they get access to the product in DAP.

=> DAP will remove users from the configured SendInBlue list when they get access to the product in DAP.

That's it! 


Now you can test by giving any user access to the DAP product that's connected to SendInBlue and user should automatically get added to the right list in SendInBlue.

SendGrid Integration with DAP

By default, DAP connects with your webhost's email SMTP service to send out emails. However, you can easily connect DAP with an external SMTP provider.


If you want to integrate DAP with SendGrid's SMTP API, please follow these steps:

Step 1. Create an API Key in SendGrid.


Step 2. Enter your SendGrid API Credentials in DAP Email >> SMTP page


Login to your DAP admin dashboard.


Visit Email >> SMTP page:
=> Set the hostname to smtp.sendgrid.net
=> Set username to apikey
=> Set password to the API key generated in step #1.
=> Set the port to 587
=> Set SSL to N

This will allow DAP to connect to SendGrid via API.

Group Memberships And Sub-Accounts

DAP comes with a built-in group membership feature where schools, coaches, companies, corporate organizations, etc., can buy memberships on behalf of a group of people - referred to as sub-accounts.

You can specify the number of seats the group owners can create and manage. The group owners can give their sub-accounts access to products, remove access and add/remove sub-accounts.The sub-accounts will receive an email with their login credentials when the group owners give them access.

Here are some of the key features:

Key Features

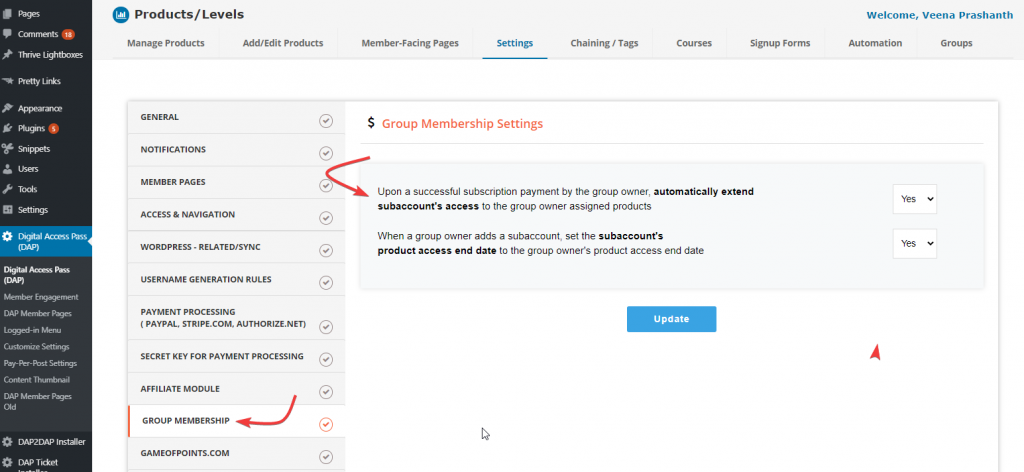
  • Payment stops, access stopsWhen a group owner makes a subscription payment, you can configure DAP to automatically extend subaccount's access to the group owner assigned products. If payment stops, subs will automatically lose access. You can configure this in the DAP Setup >> Config Page >> Group Membership tab.
  • Payment stops, access stopsWhen a group owner makes a subscription payment, you can configure DAP to automatically extend subaccount's access to the group owner assigned products. If payment stops, subs will automatically lose access. You can configure this in the DAP setup >> config page.
  • Match subaccounts access dates with group owner's access dates: When a group owner adds a subaccount, you can configure DAP to set subaccount's access end date to be the same as the group owner's access end date, regardless of when they receive access.
  • Group owners can give subaccounts access to any configured product: You can configure a list of products that the group owners can manage. Group owners can give their subs access to any of these products. The total number of subaccounts they can manage depends on the total number of seats they have purchased.
  • Group owners can add one subaccount at a time or add in bulk: You can create a group account page where the group owners can add/remove subs. They can add subaccounts one at a time or in bulk. 

Lorem ipsum dolor sit amet, consectetur adipisicing elit, sed do eiusmod tempor incididunt ut labore et dolore magna aliqua. Ut enim ad minim veniam, quis nostrud exercitation ullamco laboris nisi ut aliquip ex ea commodo consequat. Duis aute irure dolor in reprehenderit in voluptate velit esse cillum dolore eu fugiat nulla pariatur. 

The Solution:

Lorem ipsum dolor sit amet, consectetur adipisicing elit, sed do eiusmod tempor incididunt ut labore et dolore magna aliqua. Ut enim ad minim veniam, quis nostrud exercitation ullamco laboris nisi ut aliquip ex ea commodo consequat. 

Watch this video to see step-by-step how you can set this all up in DAP.

Magazine Model – Shortcodes

Say that you want to create a magazine subscription style content dripping where the content is available between a certain date range, and only active users (that had access to the content during that time period), are allowed to access it, you can easily do this using the new magazine model shortcodes in DAP. 

Here are a few examples to show you how it'll work:

Case 1:  

Content start: Oct 1st, 2020  

Content end; Oct 31st, 2020.

Say the user signed up on Oct 10th, 2020.

Say now it's the month of November.


Shortcode:  

[DAP hasaccessto='5' startdate='2020-10-01' enddate='2020-10-31' post_cancel_access='Y']

If user has access to product id = 5, then the user can access this content if they had access to it anytime in October and as long their access to product has not yet expired.

[DAP]


Result: User can access the content even though the content expired in Oct because user had access to it when they joined.


Case 2:

Content start: Oct 1st, 2020

Content end; Oct 31st, 2020.

Say the user signed up in November 2020 and has active access now.


Shortcode:
[DAP hasaccessto='5' startdate='2020-10-01' enddate='2020-10-31' post_cancel_access='Y']

If user currently has active access to product id = 5 but started in November 2020 or later, then the user cannot access this content as they started after the content had already expired.

[/DAP]


Result: User cannot access the content because user started after the content had already expired.


Case 3:

Content start: Oct 1st, 2020

Content end; Oct 31st, 2020.

Say the user signed up in August but access expired in September 2020.


Shortcode:
[DAP hasaccessto='5' startdate='2020-10-01' enddate='2020-10-31' post_cancel_access='Y']

If user does not have active access to product id = 5, no matter when they started, they can't access the content.

[/DAP]


Result: 

User cannot access the content because user does not have active access to product.


Case 4:

Content start: Oct 1st, 2020

Content end; Oct 31st, 2020.

Say the user signed up in August, had access to content in October but access expired mid October.


Shortcode:
[DAP hasaccessto='5' startdate='2020-10-01' enddate='2020-10-31' post_cancel_access='Y']

User had access in October but as the user no longer has access, cant access content.

[/DAP]


Result: 

User cannot access the content because user does not have active access to product.


Have you signed up for our FREE course to learn step-by-step, how to build a list of qualified prospects, and how to build and launch a digital course? If not, click the button below to get instant access!

1 2 3 18