Order Of Links On “My Links” page
[Updated 05/20/2012: Drag & Drop Re-ordering of links available since DAP v4.3.1]Ordering Links
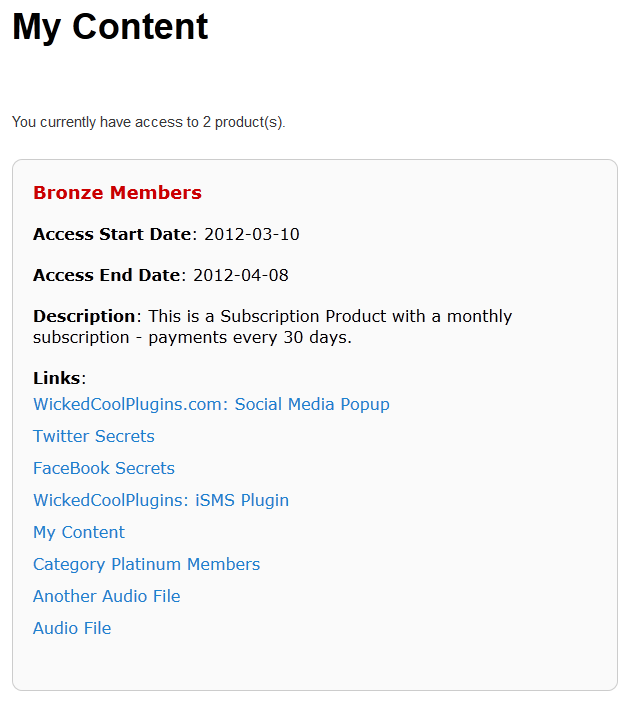
The ordering of links in the ContentResponder tab of a product is required ONLY if you have a “My Content” page (see example below – page uses the merge tag %%USERLINKS%%) and you want control over exactly how those links are displayed in that list:
Fig 1: Example “My Content” page which uses the merge tag %%USERLINKS%%
Ordering by Drip Day
The easiest way to organize links, is to set the dripping “day” for each link.
So if you’re setting up 5 links to be available on Day #1, 2, 3,4 & 5, then in the “My Links” section, DAP will display the links in “Newest On Top” order.
So the newest link (Day #5) will appear first, followed by Day #4, and so on, until Day #1.
Ordering When There Is No Dripping
If you have multiple links that you’re making available all on the same day (like say, all on Day #1), then once you’ve added the links from left to right in the ContentResponder tab of your DAP Product, you can then hold down any row from the Protected Content section, drag and drop and re-order it however you wish to.
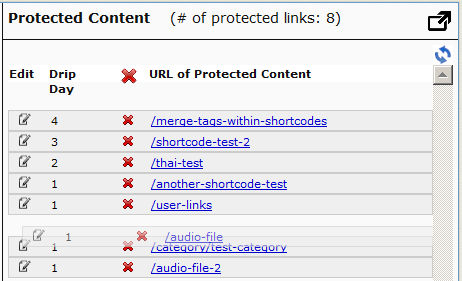
Remember that the drag-and-drop re-ordering will only work within different links that are all set to drip on the same day. So for eg., dragging a day 1 link above a day 4 link (see screenshot below) will not work, and it will simply come back to it original position after refreshing the screen. But dragging one Day #1 link above or below another Day #1 link will re-order the links exactly in that order.
Fig 2. Screenshot showing drag-and-drop reordering in action

If you see the links order in the above screenshot, that’s the exact same order in which the links will appear when the member views their “My Content” page (or whatever you have called the user links page).
[DAPUserLinks] Shortcode
If you want even more control over how many links are displayed, order of the links, date format etc, then consider our new shortcode shown below:
[DAPUserLinks showProductName=”N” showAccessStartDate=”Y” showAccessEndDate=”Y” showDescription=”Y” showLinks=”Y” orderOfLinks=”NEWESTFIRST” howManyLinks=”10000″ errMsgTemplate=”SHORT” productId=”ALL” dateFormat=”YYYY-MM-DD”]NOTE: orderOfLinks can have one of two values…
NEWESTFIRST will drip newly dripped links at the top. So day 7 link will be above day 1 link.
OLDESTFIRST will drip newly dripped links towards the bottom. So day 1 link will be above day 7 link.
So, here’s another version of the DAPUserLinks shortcode:
[DAPUserLinks showProductName=”N” showAccessStartDate=”Y” showAccessEndDate=”Y” showDescription=”Y” showLinks=”Y” orderOfLinks=”OLDESTFIRST” howManyLinks=”10000″ errMsgTemplate=”SHORT” productId=”ALL” dateFormat=”YYYY-MM-DD”]Related: See more such shortcodes at DAP Shortcodes
Protecting An Entire WordPress Category
You can protect an entire WordPress “Category” in your WP blog, simply by adding the “Permalink” of that category to a “Product”, just like you would protect the permalink of a blog post or page.
Please note that on the DAP Product page, you will only see the permalinks to Pages and Posts, not Categories. So the category permalink is something you would have to figure out (it’s very easy) as shown below, and then directly add that permalink to the DAP Product.
Figuring Out The Category Permalink
So, browse to your blog in your browser, visit the category that you wish to protect on your blog.
If your blog is in the root, it will look like….
http://www.digitalaccesspass.com/category/my-category-name/
If your blog is in a sub-folder called, say, “blog”, then the link will look like…
http://www.digitalaccesspass.com/blog/category/my-category-name/
So copy the link that you see in your browser (this is the “permalink” for that category), log in as DAP Admin, and add it to one of your products. That’s it.
Just protecting the category will protect all posts assigned to that category, be it posts that were already assigned to it, or posts that you will be creating in the future and assigning to that category.
IMPORTANT
When you add an entire category of posts to DAP, then all posts in that category – posts currently in that category, as well posts you will be adding in the future under that category – will all become automatically protected.
So if you add the entire category to DAP and then configure that “link” to be available on a certain day, or date, then remember that ALL posts within that category will automatically become available on that day or date.
WARNING 1
Also remember that because you are adding an entire category of posts, and not individual posts, you won’t be able to configure individual posts within that category to be dripped at various times. Only the “category” link can be configured to be dripped, and not the individual posts within it.
ALTERNATIVE
Please note that when you protect a category in DAP, then all posts that are assigned to this category will drip at the same time. It’s not possible to drip the category itself on “Day #X” and then drip the posts within on different days. It’s ALL OR NOTHING when it comes to category protection.
So if you want a much more tighter control on the dripping, then better to use Pages and Sub-Pages in WordPress.
Since you would anyway need to set up a dripping “day” for each piece of content, it is actually highly recommended that you drip them as Pages and not posts.
So let’s say you create 3 pages:
http://yoursite.com/Month-01
http://yoursite.com/Month-02
http://yoursite.com/Month-03
Then there would be sub-pages (Pages which have above Pages as the Parent) under each of these, like…
http://yoursite.com/Month-01/Week-01
http://yoursite.com/Month-01/Week-02
http://yoursite.com/Month-01/Week-03
Etc.
So then you can drip a Page on Day #1 (say), and then drip the sub-pages on Day #2, #3, etc.
That’s the easiest, best and most convenient set up, especially if you want a great deal of control over the dripping, and also don’t want anyone to see even any links or hints regarding what else is coming.
IMPORTANT
If you do category protection, then you MUST use a custom error page. So basically, create a custom error page – like http://YourSite.com/error/ – and then use that as the “Error Page URL” of the product under which you’ve protected the category, and also the Error-Page URL (Global) under setup config.
Troubleshooting
If you protect a category, and you can still access all of the posts assigned to that category, then it could mean…
1) You are already logged in as a user who does have authorized access to the product under which the category is protected. Or,
2) It means you have turned on “Sneak-Peek” but haven’t inserted any more tags into your posts, so the entire posts are showing up unrestricted. In which case, you will either need to turn off Sneak-Peek, or keep sneak-peek on and insert more tags into all of your posts.
Protecting WordPress Posts & Pages
- Log in to DAP Dashboard and go to the “Products/Lists” page.
- Select the product to which you want this blog post/page to be a part of
- Scroll down to the “ContentResponder” section
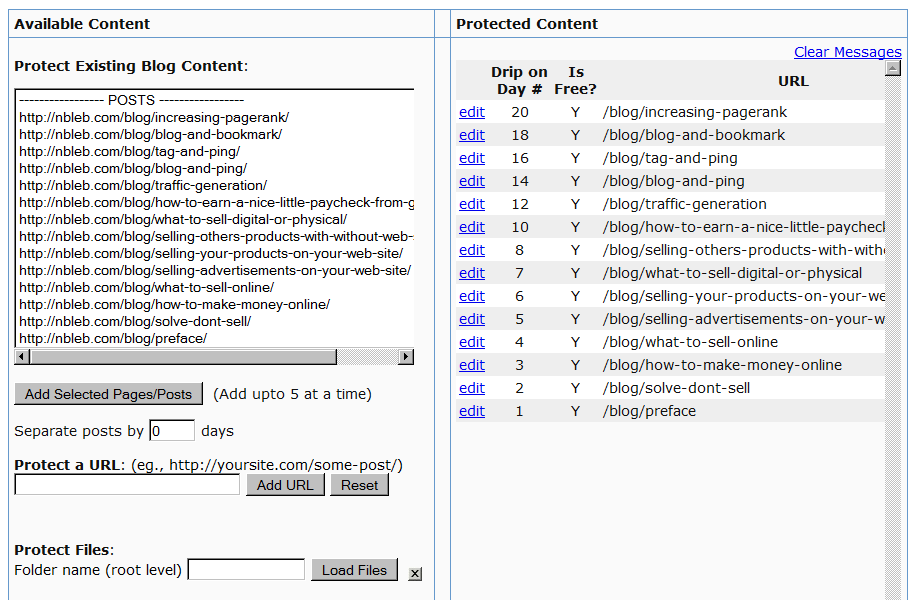
- On the left, you will see a list of blog posts & pages that have been published (if you scroll down in the window where the list of “posts” show, you will also see list of “pages”)
- Select one or more (hold Ctrl + Click to select multiple)
- Click on “Add Selected Posts/Pages” to protect the posts/pages.
- The post(s)/page(s) will now show up on the right-hand side of the box.
- Click on “edit” next to each link to configure dripping for individual posts/pages.


