Author Archives: Veena Prashanth
Author Archives: Veena Prashanth
In the upcoming release of DAP (4.6), we have automated CB->DAP refunds and cancellations.
If a customer contacts you to request a refund or cancellation, you can initiate a refund or cancellation ticket from within your ClickBank account. And when you complete the refund / cancellation in CB, DAP will automatically remove user’s access to product.
1) Login to your CB account. Just visit the Transactions page of your account which is located under the Reporting Tab.
2) On the Transactions page, you can look up the order by the customer’s email address or order number.
3) A link to open a ticket on any order is available when you search for transactions (orders) from the Transaction page under the Reporting tab. Simply click on the “T” in the Actions column for that order. The Actions column is on the far left of the table.
4) When the ticket comes up, select “More options…” from the drop-down menu and choose the option to either refund or cancel the order as you needed. Add a comment showing that you as the vendor have honored the customer’s request for a refund or cancellation and then process the action and send the notice to the customer by pressing the “Send” button.
5) As the vendor, when you request a refund/cancellation, the ticket processes in 5 minutes, not one business day. It is assumed you do not want to try to save the sale if you enter the request yourself. You have 5 minutes to close the ticket before the refund/cancellation occurs, in case you mistakenly created the ticket.
6) After the refund/cancellation is complete in CB, CB will send an INS notification to DAP.
DAP will automatically remove the user’s access to the product. The users can still login to their membership but can no longer access any protected content under this product.
Please follow these steps to create multiple membership levels (say FREE, SILVER, GOLD, PLATINUM) in DAP:
1. Create the top-level product first (e.g. platinum).
2. Clone (do a ‘save as copy’ in dap products page) that product (e.g. clone platinum to create gold), update the product name and other product details and remove access to the platinum content from the gold product (dap products page => content responder tab).
3. Repeat appropriately for the silver-level and free-level.
4. Create appropriate Product Chaining Rules. The product chaining rule that you create in dap should be something like this:
1) If a user gets platinum, automatically remove access to :
FREE, SILVER, GOLD
2) If a user gets GOLD, automatically remove access to :
FREE, SILVER
3) If a user gets SILVER, automatically remove access to :
FREE
That’s it. Now you can add a user to FREE first (via dap admin -> add users page). Then give the same user access to SILVER product (in dap users->manage page). See how the chaining kicks in and automatically removes user’s access to FREE level.
Usecase 1)
How can I setup DAP to accept a 3 payment plan – 3 payments of $39 each ?
Define the product as recurring product in DAP Products page -> Pricing tab.
Then set total recurring count = 3.
Set product price = $39
Set trial amount = $0
Set initial and subsequent recurring cycle = 30 days (for monthly payment)
Generate a payment button for the product, publish on the sales page.
Then click on the button, see what the payment agreement says on the paypal site.
If it says 3 payments of $39/month, then it’s all setup correctly.
DAP integrates with Xenforo, vBulletin, and several other free WP plugins like BBPress, SimplePress, Buddypress, Mingle etc.
The integration with free WP forum plugins is not at product/member level but you can set up DAP to ONLY allow registered or paid members to POST to the forums.
But if you use paid plugins like Xenforo and VBulletin, you can control access at membership level. You can restrict forum access based on user’s membership level in DAP.
There was just 1 limitation with the DAP=>Xenforo integration and that was with Automatic Login’. But we have eliminated that limitation in DAP 4.7.
If you are on older version of DAP (DAP 4.6.2 or below), then DAP cannot auto-login the users to the forum when they login to DAP.
But if you upgrade to DAP 4.7 (or above), DAP can not only control forum access at membership level but DAP can also autologin users to the forum when they login to DAP.
Here’s the steps to setup the integration :
Install Xenforo forum.
Say it is installed under http://YOURSITE.com/community
Follow these instructions to integrate Xenforo ONLY if you are on DAP 4.7 or above.
1. FTP to your site. You will find a file called api.php under /dap/plugins/dap_xenapi folder.
Upload the api.php file to your forums folder. If you installed forum under /community, then upload api.php to that folder.
2. Generate a hash by using an online service, like http://www.miraclesalad.com/webtools/md5.php
3. Set an API key for XenAPI, this can be done by editing the `api.php` file and replacing the `API_KEY` string with the hash generated in step 2.
$options = array(‘api_key’ => ‘set this to the hash generated in step 2 above’);
Follow these instructions to integrate Xenforo ONLY if you are on DAP 4.6.2 or below (SKIP 1-6 below if you are on DAP 4.7 or above).
1. Download XenAPI for Xenforo from the GitHub repository:
https://github.com/Contex/XenAPI/archive/master.zip
2. Open the downloaded ZIP archive and extract the contents of the zip file to your desktop.
3. Upload `/XenAPI-master/net/xenapi/XenAPI/api.php` to the root directory of your XenForo installation. So if the installation is under /forum folder, upload api.php to the forum folder.
4. Generate a hash by using an online service, like http://www.miraclesalad.com/webtools/md5.php
5. Set an API key for XenAPI, this can be done by editing the `api.php` file and replacing the `API_KEY` string with
the hash generated in step 4.
$options = array(‘api_key’ => ‘set this to the hash generated in step 4 above’);
6. Upload `/XenAPI-master/net/xenapi/XenAPI/examples/dap/plugins/dap_xenapi/dap_xenapi.class.php` to
`/dap/plugins/dap_xenapi/` of your DAP installation.
1. a. Login to your XenForo Admin panel and go to user groups, `Users -> User Groups -> List User Groups`.
1. b. Find the group you wish the user to be assigned to when they register.
21 c. Note the ID of the group, we’ll use it later, `admin.php?user-groups/example-group.6/edit`, 6 is the group ID.
2. We now need to create the string that is going to be sent to DAP XenForo Plugin.
Here’s the the string that is sent to DAP XenForo Plugin:
dap_xenapi:API_KEY:PROTOCOL:API_LOCATION:GROUP_ID
a. `API_KEY` should be replaced with the md5 hash you generated in STEP 2.
Example API_KEY: a5b2b1f2mc1mas2f3
b. `PROTOCOL` should be replaced with which protocol you wish to use, current options are only `http` and `https`.
Please note that if you use `http`, the password of the user will be sent over a unecrypted protocol.
Example PROTOCOL: https
c. `API_LOCATION` should be replaced with the location of XenAPI’s file, `api.php`, which you should now have in the
root directory of your XenForo installation. Make sure you do NOT include the `http` of the URL.
Example API_LOCATION: YOURSITE.com/forum/api.php
d. `GROUP_ID` should be replaced with the group ID you wish the user to be assigned to when they are added to a product in dap, this is the group ID you
found in step 7.
If you wish not to assign the user to a group, you can remove this parameter or set it to `0`.
Example GROUP_ID: 6
Example GRPOU_ID: 0
Example:
a. Register the user AND assign the user to a specific group: `dap_xenapi:a5b2b1f2mc1mas2f3:https:example.com/forum/api.php:6`.
b. Register the user AND assign the user to a specific group AND use a custom field identifier: `dap_xenapi:a5b2b1f2mc1mas2f3:https:example.com/forum/api.php:6:unique_user`.
3. Open your DAP admin dashboard and go to Products/Levels -> Manage page.
4. Find the product you wish to integrate XenForo with, click on the `Notifications` tab.
5. Add the string you created in step 8 to the `Plugin Notification upon User “Add”`
and `Plugin Notification upon User “Add”` fields.
PLEASE NOTE: The only part that will change from product to product is the ‘group id’ (the last field).
The group id is the id of the usergroup in the forum that the user should get access to when they signup for a dap product.
If you create your own usergroup in xenforo, you can set the usergroup id of that in the group id field.
Now when a user registers to a product in dap, they will automatically be added to the specified usergroup id and thus will have the same ‘permission’ to the forum that the specified usergroup id is set to have.
Each product in dap can be configured to add the user to a different usergroup in forum if you want each product/level to have different forum permission.
FTP to your site, find dap-config.php file under the dap folder, edit it and add this to your /dap/dap-config.php file.
Add it towards the top after php start tag (<?php) :
define(‘XENFOROFORUMPATH’, ‘/home/crespond/yoursite.com/community’); // path to your Xenforo forum
VERY IMPORTANT: Remove all occurrences of backticks (`) in the line above and replace it with single or double quote.
NOTE:
If you want to find the path to the Xenforo forum on your site, you can visit this page: http://yoursite.com/dap/getpath.php in a browser. It will give you the path to the “dap” folder on your site. Just remove the /dap from the end of the path and instead append /community (or whatever is the name of your forums folder) to it.
Now upload dap-config.php file back to the dap folder on your site.
STEP 5:
Testing:
1) Add a user to the product integrated with xenforo using the dap admin -> add users page.
2) Login to your xenforo admin dashboard on your site and you can search for this new user and find the user in xenforo
Current integration limitation with xenforo is that if a user logs in to dap, they will not be auto-logged in to xenforo.
You can send the users their xenforo login in the welcome email. They can login to xenforo using their dap email id and dap password.
But if they change their dap account password, it will not get sync’d to Xenforo.
Users can change the xenforo password directly in xenforo if they want it to match dap password Or they can continue to use their old password to login to xenforo.
This is a limitation for now but we will address it in a few months from now.
When you integrate CB with DAP using this feature, the user will get auto-logged-in to dap upon purchase, and you can redirect users wherever you want after they are auto-logged-in. The users will get auto-logged when they hit the ‘Complete My Purchase’ button on the CB page after they complete purchase. But even if the users decide to abort and do not hit the ‘Complete My Purchase’ button, the great thing about this new feature is… DAP has a backdoor to make sure the user account gets created automatically (for successful purchase) and you do NOT have to handle the user creation manually.
So you are fully covered regardless of what the user/buyer does after the purchase as far as membership account creation is concerned.
Pls NOTE: DAP does not have this feature currently but we will make this feature available in DAP 4.5 (upcoming release of dap).
======================================
Users will get auto-logged-in to membership upon CB purchase.
1. Login to your ClickBank account
2. Go to the “Account Settings” tab at the top
3. Click on “My Site” from the sub-menu at the top.

4. Under Advanced Tools, update the Instant Notification Service URL (accept the terms of service etc), and make sure the URL points to:
http://YourSite.com/dap/dap-clickbank-6.0.php (Version 6.0)
Replace YourSite.com above with your actual domain name.

5. Whatever value you put in the Secret Key field in ClickBank (see image above), put the same value (must be ALL UPPERCASE) in to your DAP Admin Dashboard on your web site, at:
DAP Admin -> Setup > Config > Payment Processing > Secret Authorization Key used when interfacing with external systems

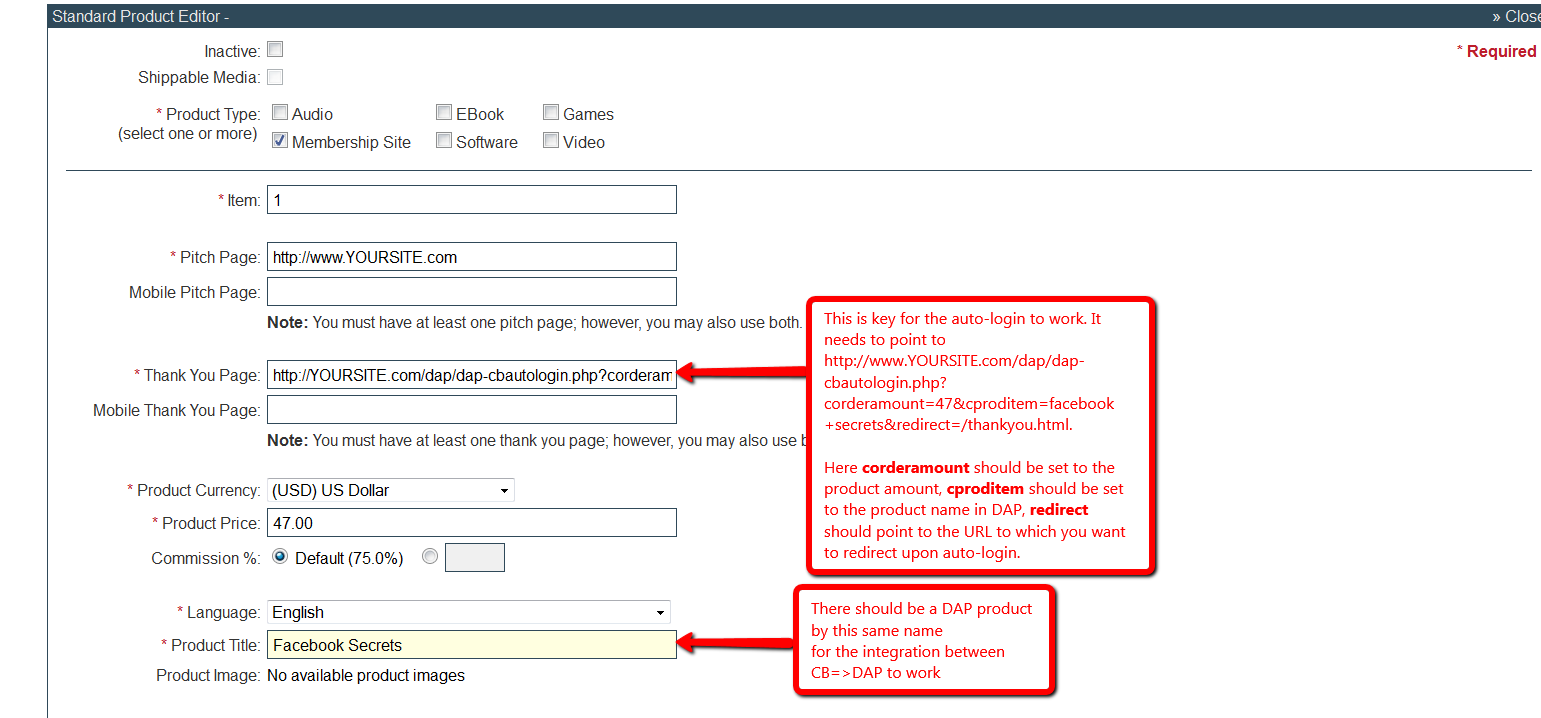
6. Create product in your CB account. Say the product name is ‘facebook secrets’. Say the product price is $47 (one-time).
7. Create same name (facebook secrets) product in DAP.
IMPORTANT: The Product Title in CB must match the Product Name in DAP.
8. Set the CB Product => ‘Thankyou URL‘ to :
http://www.YOURSITE.com/dap/dap-CB-autologin.php?corderamount=47&cprodid=2&cproditem=facebook+secrets&redirect=/thankyou.html
The corderamount should be set to your product price in the thankyou url querystring.
The cproditem needs to be set to your CB product name (replace space with “+” in the name, for ex- “facebook secrets” will be “facebook+secrets”).
The cprodid needs to be set to your CB product ID.
Set the redirect tag to tell dap where to send the user after they are logged-in automatically. If you want to redirect to http://YOURSITE.com/thankyou.html, then set the CB thankyou URL to:
http://www.YOURSITE.com/dap/dap-CB-autologin.php?corderamount=47&cprodid=2&cproditem=facebook+secrets&redirect=/thankyou.html
9. Go to Clickbank -> Account Settings -> ‘My Site’ tab (https://CLICKBANKUSER.accounts.clickbank.com/account/site.htm)
Here you can generate test CC for test the auto-login.
11. For testing, visit the CB payment page (for ex : 1.pay.clickbank.net if your CB productID=1) and test using the test CC generated in step #10 above.
That’s it.
In DAP 4.7, we have added a new feature to the hourly dap cron where once every day (it’s hardcoded to run ONCE between 10:00 PM – 11:00 PM PDT) the cron will look for users whose access expired that day.
You can configure the Cancellation Options in DAP Products page -> Cancellation & Expiration tab.

Then based on these settings, the DAP Hourly Cron will check if the current time is between 10:00 – 11:00 pm PDT (Server time), and if yes, it will take a look at each product, pick up the ‘Expiration Action’ setting for that product, then get a list of ALL users whose access to that product has expired and apply the ‘Expiration Action’ to that user->product record in DAP users -> manage page.
The reason the DAP Cron checks the current time and runs the ‘expiration job’ only once a day is because running it too often will burden your server/resources as this job needs to pick up all products and then apply the cancellation rule to all users whose access has expired.
The main thing is to make sure it only runs once.. does not matter if that’s between 10 – 11 or 11 – 12 etc. We just picked the time to be between 10 – 11 PM (server time).
User’s access will auto-expire at the end of current recurring cycle. If the user re-signs, they will start from where they left off instead of starting over at day 1.
Infact this is how all older versions of dap already work.
If a user cancelled access to a subscription product before and say that the same user now wants to start back after a couple of months break.
If you have selected NO ACTION as this product’s expiration setting (in dap products page -> cancellation & expiration tab),
then when the user re-signs, they will start their dripping from where they left off and will not start fresh again from day 1.
Say a user’s access start date is 07/01/2014 and access end date is 07/30/2014, when the cron runs on 07/31/2012
and finds the user’s access has expired, it wont do anything.
If the same user re-signs for the same product on 08/30/2014 using the same email id, their access start date will be what it was before (07/01/2014) and their new access end date will simply be extended from what it was before. It will be set to previous access end date (07/30) + 30 days instead of new signup date (08/30) + 30 days. User’s access to product will remain expired. You will have to set post-expiry access to “Y” in dap setup->config page for access to ‘paid-for content’.
See this for more details: Cancellation
If selected, dap will automatically find users whose access to this product has expired and remove user’s access to product completely for those users.
You will need this setting to prevent access for expired users. Users will completely lose access to product.
If these users signs up again, they will start over like a new member.
To enable this option, you will have to first enter the following in /dap/dap-config.php file.
Please ftp to your site, find dap-config.php file, edit it and add this to your /dap/dap-config.php file:
Add it towards the top after php start tag (<?php) :
if(!defined(‘EXPIREACCESS’)) define(‘EXPIREACCESS’,’Y’);
IMPORTANT: Replace all occurrences of backticks in the line above with single or double quote character.
Then upload back to your site (under dap folder).
We are forcing the dap-config.php setup in DAP 4.7 so users do not pick this option by mistake. We also want this feature to be BETA tested fully (in DAP 4.7) and then we will remove the extra steps (to add lines to the dap-config.php).(
After you set this in dap-config.php, this dropdown option will be available in the ‘expiration action’ dropdown.
If you pick this option for a product, then DAP CRON will automatically find a list of expired users (whose access has expired to this product) nightly and move the expired user’s access start and end day (set the access end date to the previous date).
When the cron wakes up and runs this job once once every night at 10:00 PM, it will move the user’s access start / end date forward in such a way that user’s access will remain expired but the access end date will not be stuck somewhere in past. It will be always set to the previous date (from current date).
Say a user’s access start date is 07/15/2014 and access end date is 08/15/2014.
When the cron runs on 08/16/2014 and finds the user’s access has expired, it will set the access end date to previous date.
So first time when the cron runs after the user’s access expires, nothing will happen. The access end date will remain 08/15 as it’s already set to previous date.
When cron runs on 8/17, it will move forward the the access start and access end window, so the new access start date will be 07/16 (moved forward by 1 day) and end date will be 8/16 (moved forward by 1 day).
This way the user’s access is still expired (as it’s always set to previous date) but the access dates are not stuck in the past.
If they re-sign, when DAP extends access, the access end date will be in the future instead of being expired.
If the cancelled user re-signs, the user’s access will not remain expired as their access will be extended from the current access end date to a date in future and the dripping will continue from where they left off.
1) EXPIRATION: SET ACCESS TO PREVIOUS DATE
We recommend that you enable this option ON a test product first. DO NOT use this option on an actual live product. Add a few test users to the test product. Move their access start/end date manually to a date in the past .Make a note of it. Enable the admin option to ‘move date to previous date’ for this product. Then run the cron manually. Go back to dap manage users page and check the new access start / end dates for these users. If all looks good, then use it for live products.
2) CRON JOB:
The dap cron (dap-cron.php) runs once every hour at the top of the hour… but it will only do the expiration job between 10- 11 PM (server time). The expiration part of the cron only executes once a day.
To force run the cron, run this command in a browser (dont run cron too close to the top of the hour as it will collide with the normal running of cron ).
http://yoursite.com/dap/dap-cron.php?forcerun=Y (replace yoursite.com with the name of your site)