Author Archives: Veena Prashanth
Author Archives: Veena Prashanth
Here’s how the list of users belonging to broadcast option – 1 is derived.
1. Broadcast Option One (1)
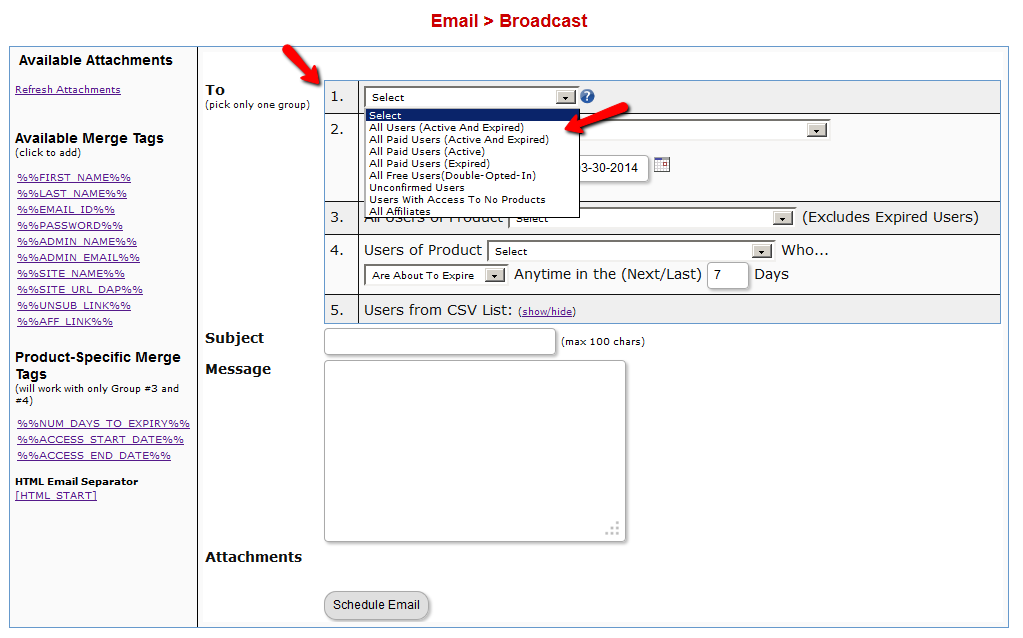
1) All Users (Active And Expired)
Select users where :
– user status is “A” (Active)
– user has not opted out of email (opted_out = ‘N’)
2) All Paid Users (Active And Expired)
Select users where :
– user status is “A” (Active)
– user has not opted out of email (opted_out = ‘N’)
– user has access to atleast 1 paid product
– user’s product status to that paid product is “A” (active).
3) All Paid Users (Active)
Select users where :
– user status is “A” (Active)
– user has not opted out of email (opted_out = ‘N’)
– user has access to atleast 1 paid product
– user’s product status to that paid product is “A” (active)
– user’s ACCESS END DATE to that paid product is in future (not expired)
If you want to find out what users will receive this email, go to DAP Users => Manage Page => Export => And select these options:
All Paid Users, Email Opt-In Status= Opted-In, Access End Date=Is Active, User Data Or User/Product Data=Select ‘Just User Data‘
This will result in a csv list of all users in this category.
4) All Paid Users (Expired)
Select users where :
– user status is “A” (Active)
– user has not opted out of email (opted_out = ‘N’)
– user’s product status is “A” (active)
– user’s access end date to ALL paid products must have expired (in the past)
Basically pick users where user does not have access to ANY paid product where ACCESS END DATE is in future. Pick only users whose access to ALL paid products has expired.
If you want to find out what users will receive this email, go to DAP Users => Manage Page => Export => And select these options:
All Paid Users, Email Opt-In Status= Opted-In, Access End Date=Has Expired, User Data Or User/Product Data=Select ‘User And Product Data‘.
Then look for users in this list whose access to all paid products has expired.
Note: this export option will result in users that have ANY Expired paid products.
But when you use this broadcast option, it will result in broadcast email to only those users that have ALL expired paid products.
5) All Free Users (Double-Opted-In)
Select users where :
– user status is “A” (Active)
– user has not opted out of email (opted_out = ‘N’)
– user has access to a FREE product(s)
– user’s product status is “A” (user has double-opted-in)
When you integrate JVZoo with DAP using this automated login feature, your users/buyers will get auto-logged-in to their membership upon purchase and they can instantly download / access the purchased content. They do not have to wait for their welcome email to login.
And you can redirect users wherever you want after they are auto-logged-in.
The users will get auto-logged when they hit the ‘Access My Purchase’ button on the JVZoo Receipt/Thank-you page after they complete purchase. But even if the users decide to abort and do not hit the ‘Access My Purchase’ button, the great thing about this new feature is… DAP has a backdoor to make sure the user account gets created automatically (for successful purchase) and you do NOT have to handle the user creation manually. You will receive emails or tickets from your users complaining about ‘no access’ after purchase.
This is a unique integration that only DAP has where your users do NOT have to take any action after a purchase for automatic account creation or auto-login.
1) Users do not have to enter an email/password on a web form to gain access to membership after their purchase (unlike few other membership programs where they need to do this extra step to get access). With dap, it’s automatic. No manual action needed.
2) Your users do not have to click on ‘access my purchase’ for account creation. If they click on it, they will get auto-logged-in. If they don’t and abort, no harm done. Their account will still be created automatically by DAP. They will receive the welcome email with their login credentials seconds after purchase so they can login that way.
So you are fully covered regardless of what the user/buyer does after the purchase as far as membership account creation is concerned.
Pls NOTE:
You need to be on DAP 4.6 or above to use this feature.
Please use this document to integrate JVZoo with DAP.
Zaxaa Integration
If you want to use Zaxaa as your shopping cart /affiliate platform and integrate it with DAP as your membership platform, then it’s a simple 3 step integration process:
Please NOTE: replace YOURSITE.com above with the name of your site.
That’s it.
If you want to use DAP for your membership and arpReach for email marketing, then you can do so by integrating arpReach with DAP using this document.
You can integrate BOTH DAP Free and DAP Paid products with arpReach.
1) Login to your arpReach account and create a form for your autoresponder.
In the ‘content’ tab for form setup, click ‘fields’ and scroll down to see your custom fields. Select these fields:
Email
First Name
Last name
Address #1
Address #2
Town or City
State or Province
Country
ZIP code
Then save the form and use the “Choose action” button to “Get form code”.
Say your form has the URL:
http://yoursite.com/ar/a.php/sub/1/ak881s
Make a note of this. You will need this in the next step.
2) Integrate DAP Free Signup Form => arpReach List
You can use DAP Free Signup Form and integrate it with your arpReach form.
(1) Create your FREE product in DAP Products Page.
(2) Make sure that “Allow Free Signup” is set to “Yes” in DAP Products page.
(3) In Products/Levels -> Manage -> Notification tab -> Plugin Notification upon User “Add”, enter data in this format:
arpreach:<arpreach form url>
For ex: if your arpreach form url is http://yoursite.com/ar/a.php/sub/1/ak881s (please refer step 1 above to see how to get this url), then enter this in the DAP products -> Notifications -> Plugin Notification (add/remove) section:
arpreach:http://yoursite.com/ar/a.php/sub/1/ak881s
That’s it.
Now when a user signs up to your free DAP product, they will automatically get added to the right arpReach form.
2) Integrate DAP Paid Product => arpReach Form
If you want your paid members to get added to the arpReach form automatically after a purchase, then you can use the same steps to integrate DAP to arpReach that you used above to integrate the DAP free product to arpReach .
– In Products/Levels -> Manage -> Notification tab -> Plugin Notification upon User “Add” and “Remove”, enter data in this format:
arpreach:<arpreach form url>
For ex: if your arpreach form url is http://yoursite.com/ar/a.php/sub/1/ak881s (please refer step 1 above to see how to get this url), then enter this in the DAP products -> Notifications -> Plugin Notification (add/remove) section:
arpreach:http://yoursite.com/ar/a.php/sub/1/ak881s
That’s it.
Now when a user purchases paid DAP product, they will automatically get added to the right arpReach form.
If you want to integrate all your payment flows with Infusionsoft in such a way that even if a user makes a purchase on your site using a DAP generated payment button or using paypal-hosted button, Clickbank etc, you want the users to be added to Infusionsoft subscriber list, then please use the following steps for integration.
You can set up ‘plugin notification’ in DAP Products=>Notifications tab to automatically add DAP users (upon successful payment) to an Infusionsoft compaign/group.
1) Install the Infusionsoft SDK as described here
2) Create your PAID Product in DAP Products / Levels -> Manage page.
3) Click on the Notifications tab -> Plugin Notify Add / Remove section, and add your Infusionsoft Compaign Id and GroupId in this format for infusionsoft integration :
infusionsoft:compaignId:groupId
NOTE:
campaignId is the Id number of the follow-up sequence.
groupId is the Id number of the tag you would like to apply. This is found under the Setup->Tags menu.
For ex:
infusionsoft:41:6
4) Complete the DAP product setup (set up the DAP products => Pricing/Notifications/ContentResponder/Autoresponder tab)
5) Generate payment button (paypal, CB, DAP Cart etc) for this DAP product and publish it on your sales page.
That’s it.
To test, visit the page where you have the payment button and complete a test purchase. Now login to Infusionsoft and see if this user automatically made it to the Infusionsoft subscriber list.
When a ser opts in via the DAP FREE signup form, you can set up ‘plugin notification’ in DAP Products=>Notifications tab to automatically add users to an Infusionsoft compaign/group.
1) Install the Infusionsoft SDK as described here
2) Create your FREE Product in DAP Products / Levels -> Manage page.
3) Set ‘Allow Free Signup’ to “YES” in DAP products page for the FREE Product.
4) Click on the Notifications tab -> Plugin Notify Add / Remove section, and add your Infusionsoft Compaign Id and GroupId in this format for infusionsoft integration :
infusionsoft:compaignId:groupId
NOTE:
campaignId is the Id number of the follow-up sequence.
groupId is the Id number of the tag you would like to apply. This is found under the Setup->Tags menu.
For ex:
infusionsoft:41:6
5) Complete the DAP product setup (set up the DAP products => Pricing/Notifications/ContentResponder/Autoresponder tab)
6) Click on Generate Signup Form tab and generate the FREE signup form code for this FREE DAP Product.
7) Publish the DAP generated free signup form code on your squeeze page or whichever page you want the users to register from.
8) That’s it.
To test, visit the page where you have the free signup form and signup as a test user. Now login to Infusionsoft and see if the test user automatically made it to the Infusionsoft subscriber list.
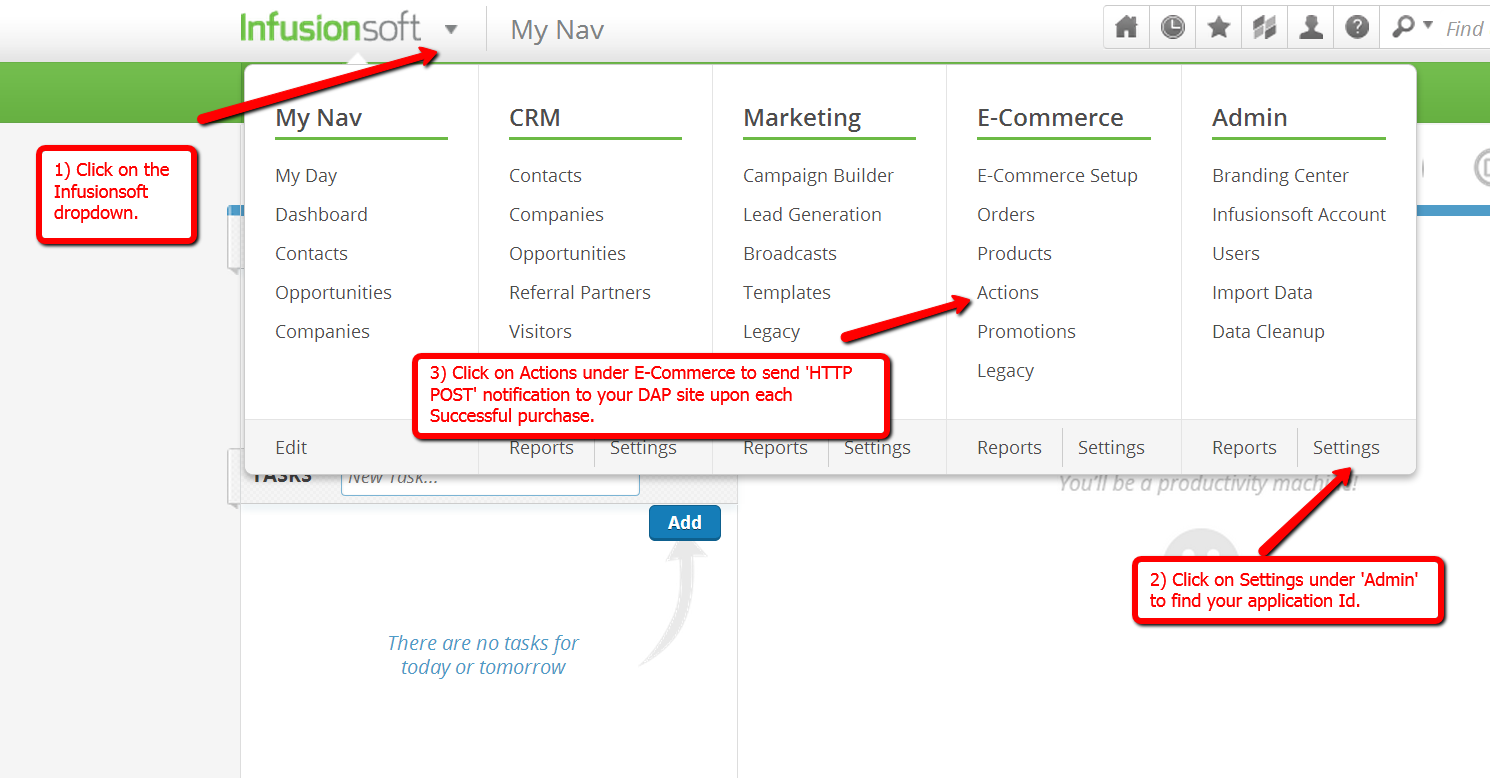
When a user makes a purchase via Infusionsoft Order Form or Shopping Cart, you can set up http post notification/action trigger in Infusionsoft to automatically add user to the DAP product.
1) Find your Infusionsoft APP Id.
2) After you click on ‘Settings’ under ‘Admin’, you will end up on this page:
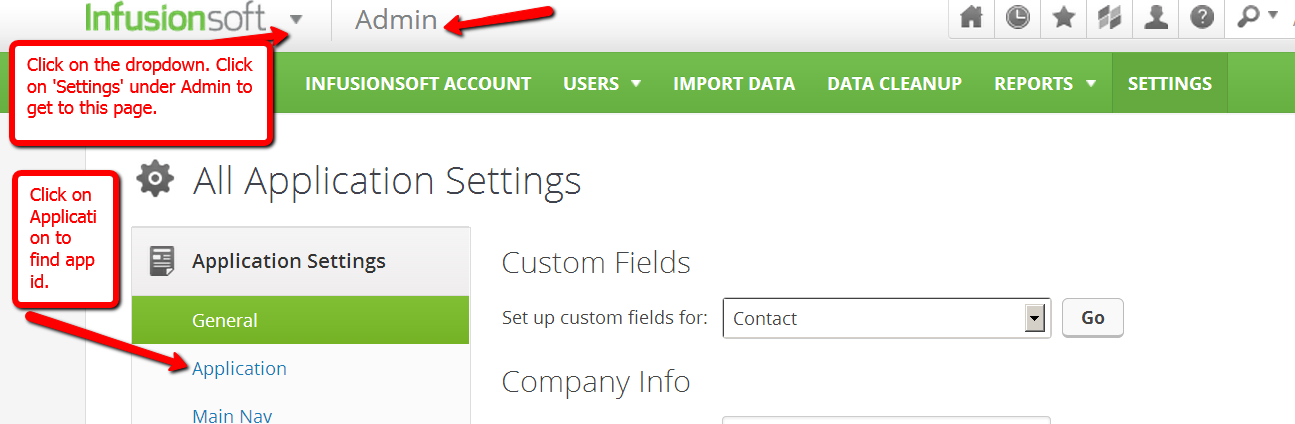
3) Click on ‘Application’ to find the encrypted key / app id (towards the bottom of the page). Copy the encrypted key.
You will need to enter this in the conn.cfg.php script in your dap folder.
4) Install the Infusionsoft SDK as described here
Make sure to use the App Id you got in step 3 above in /dap/conn-cfg.php.
5) Click on Actions under ECommerce to setup ‘http post’ action trigger.
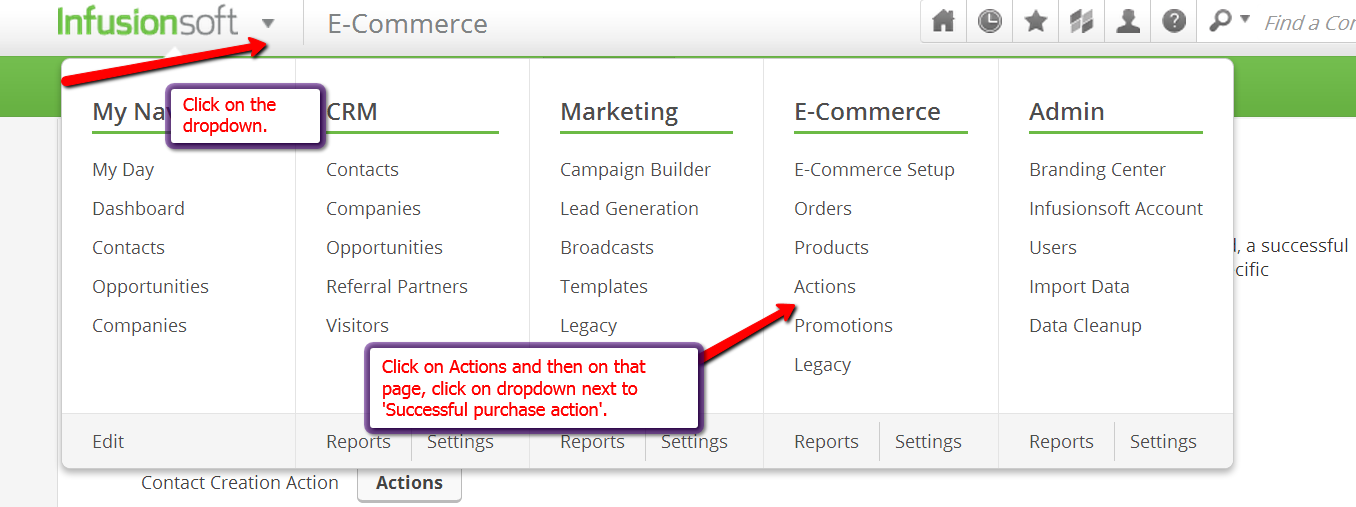
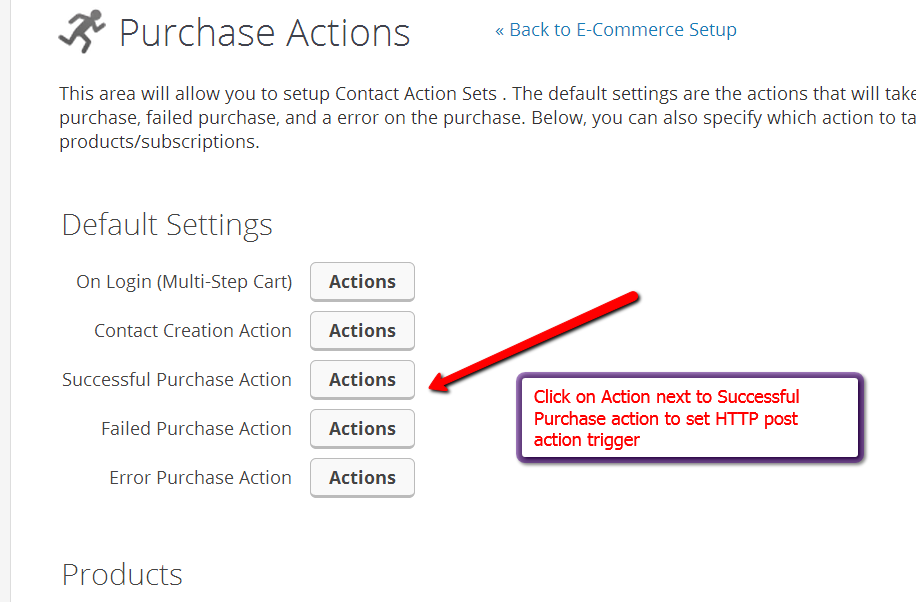
5) Set the ‘http post’ action trigger.
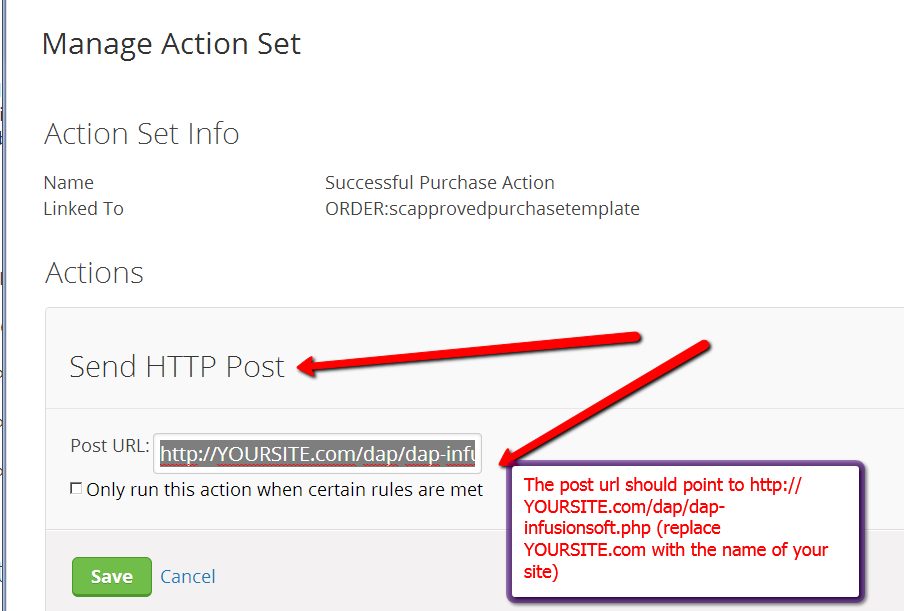
6) Select Infusionsoft -> Ecommerce -> settings -> Set up an ‘auto bill’ success action trigger (if auto bill is successful, set it to send a http post notification to http://YOURSITE.com/dap/dap-infusionsoft.php).
Now when a recurring payment goes through, infusion will notify dap and dap will automatically extend users access to product.
7) Now create products in DAP using the EXACT same name as your Infusionsoft products that you want to integrate with DAP.
8) Now make a test purchase via Infusionsoft and see if the user gets added to DAP automatically.
For testing, set up daily billing and setup a test subscription and see if the user’s access end date in dap extends automatically upon each subscription payment.
For Free products, you can use Infusionsoft opt-in form on your squeeze page and integrate it with DAP.
1) Just set the HTTP POST upon opt-in (in your Infusionsoft account) to point to http://yoursite.com/dap/dap-infusionsoft-optin-productID.php
NOTE: Replace productID with the actual DAP product Id.
If productID=10, then set the HTTP POST to http://yoursite.com/dap/dap-infusionsoft-optin-10.php
2) If you want to integrate a DAP product with the DAP product ID = 10 with Infusionsoft, then ftp to your site, download /dap/dap-infusionsoft-optin.php, copy contents of /dap/dap-infusionsoft-optin.php to /dap/dap-infusionsoft-optin-10.php. Change $default_product_id to 10 in the dap-infusionsoft-optin-10.php script.
Upload this script to the dap folder on your site (via FTP).
3) Install the Infusionsoft SDK as described here
Make sure to complete these steps for Infusionsoft Integration with DAP.
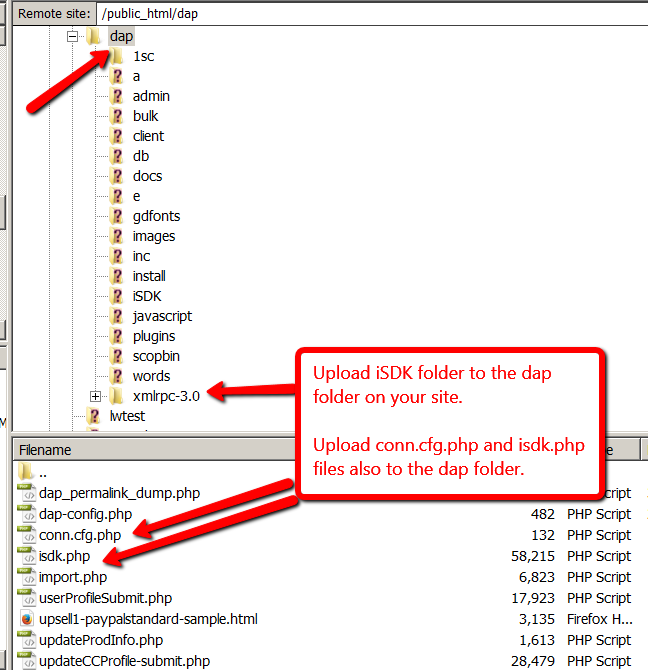
1) Download the Infusionsoft Software Development Kit (PHP iSDK package) from https://github.com/infusionsoft/PHP-iSDK
2) Extract the contents of the zip file. Upload the iSDK/src/xmlrpc-3.0 folder into the DAP folder on your site (via FTP), as well as the following 2 individual files: conn.cfg.php and isdk.php directly to the dap folder on your site.
If you uploaded it correctly, you should see a folder called xmlrpc-3.0 right under dap folder on your site.
You should also see conn.cfg.php and isdk.php right under dap folder on your site.
3) Edit /dap/conn.cfg.php. This needs to have the Infusionsoft API code and application name for your Infusionsoft account.
< ?php $connInfo = array(‘connectionName:applicationName:i:[API_code_goes_here]:This is the connection for applicationName.infusionsoft.com’); ?>
Here,
connectionName = demo
applicationName = Your Infusionsoft Application Name
[API_code_goes_here] = Go to Setup – > Misc. Setting -> go to Miscellaneous tab -> Enter an api passphrase and hit Save. It will generated an encrypted API Code. Replace [API_code_goes_here] above with the api code.
The connectionName needs to be hardcoded to “demo”.
For ex: I have used the applicationName of “veena” below.
< ?php $connInfo = array(‘demo:veena:i:dd2ebm098bsasghf68ihk:This is the connection for veena.infusionsoft.com’); ?>
That’s it. Now DAP can connect to Infusionsoft using the connection parameters in conn.cfg.php.
Currently the integration between Infusionsoft and DAP is one-way. It’s from Infusionsoft=>DAP.
The good news is… in the upcoming release of DAP (4.6), we have completed 2-way integration with Infusionsoft. So you can do both DAP=>Infusionsoft as well as Infusionsoft=>DAP
1) Infusionsoft=>DAP – FREE Registration
When a user opts in to the Infusionsoft list, you can set up http post notification/action trigger in Infusionsoft to automatically add user to the DAP product. See this document on how to setup this integration.
2) Infusionsoft=>DAP – PAID Registration
When a user makes a purchase via Infusionsoft Order Form or Shopping Cart, you can set up http post notification/action trigger in Infusionsoft to automatically add user to the DAP product.
See this document on how to setup this integration.
3) DAP=>Infusionsoft- FREE Registration
When a user opts in via the DAP FREE signup form, you can set up ‘plugin notification’ in DAP Products=>Notifications tab to automatically add users to an Infusionsoft compaign/group.
See this document on how to setup this integration.
4) DAP=>Infusionsoft – PAID Registration
When a user makes a purchase via say the DAP Shopping Cart or Paypal or Clickbank or any other DAP integrated payment processors, you can set up ‘plugin notification’ in DAP Products=>Notifications tab to automatically add users to an Infusionsoft compaign/group.
If you use Infusionsoft to sell or to get users to register to your list, the users will get added to DAP. But even if you sell products using other shopping carts/ payment processors (like Paypal, Clickbank etc), you can get those users to make it to Infusionsoft via DAP.
Paypal/CB/DAP Cart => DAP => Infusionsoft
See this document on how to setup this integration.