Integrating Clickbank via INS
DAP has built-in support for ClickBank’s Instant Notification Services (INS) (starting v3.9)
This is very similar to Paypal’s Instant Payment Notification (IPN).
The ClickBank INS notification will be processed instantly in real time, and your members will receive their welcome email with their membership login info instantly after purchase.
For high-level ClickBank user-flow, see this post.
Integrating with ClickBank is the same whether it’s a one-time product, a subscription product with recurring payments, or a PitchPlus (one-click upsells) product.
CB INS Setup
1. Login to your ClickBank account
2. Go to the “Account Settings” tab at the top
3. Click on “My Site” from the sub-menu at the top.

4. Under Advanced Tools, update the Instant Notification Service URL (accept the terms of service etc), and make sure the URL points to:
http://YourSite.com/dap/dap-clickbank.php
Replace YourSite.com above with your actual domain name.
5. Screenshot below shows Version 1.0, but starting DAP v4.2, we have added support for CB INS 2.1.
So if you’re using DAP v4.2 or later, then select INS Version 2.0 and set the CB INS URL TO :
http://YourSite.com/dap/dap-clickbank-2.1.php
But if you’re using DAP v4.1 or earlier, then select Version 1.0
and set INS URL TO:
http://YourSite.com/dap/dap-clickbank.php

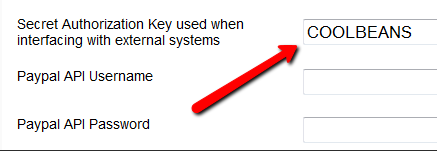
6. Whatever value you put in the Secret Key field in ClickBank (see image above), put the same value (must be ALL UPPERCASE) in to your DAP Admin Dashboard on your web site, at:
Setup > Config > Payment Processing > Secret Authorization Key used when interfacing with external systems

7. The Product Title in CB must match the Product Name in DAP.
8. The Thank You Page url in CB product settings page, should be set to point a static thank-you page you create in your WordPress blog – something like http://YourSite.com/thank-you/ .
And the page should state something to the effect of…
Thank you for your purchase. The download information for the product you just purchased has been sent to the email id you just use during the purchase.
Please check that email id in a few minutes, and you will see an email from us with your login information.
That’s it!
Testing
Make a test purchase.
If the integration was setup correctly, the user will be registered in DAP. You will find the user account in the DAP Users > Manage screen and you will find the completed transaction / order details on the DAP Orders page.
If the test order is listed in DAP Orders page, then CB is correctly integrated with DAP. Check the payment status in DAP Orders page. If it says Success, but no welcome/thank-you email got sent, then make sure you set the thank-you email for that product in DAP products page.
Troubleshooting
If no order is listed in DAP orders page for the test purchase, then CB is not integrated with DAP.
To troubleshoot, do the following:
- Set DAP Setup > Config > Log Level to 5.
- Empty log content under System -> Logs.
- Run another test purchase.
- Send us the log snippet from System -> Logs.
