DAP-to-Aweber Integration
UPDATE April 2, 2015: Starting DAP 4.8, DAP now integrates with Aweber via their API.
UPDATE July 23, 2014: The DAP-to-Aweber integration below has slightly changed – the documentation below has already been updated with the new information.
Subscriber Flow
The flow of subscriber in this model, is “FROM DAP TO Aweber“. User signs up at DAP first, then DAP adds her to Aweber.
If you are looking for the other way, i.e, “FROM Aweber TO DAP”, then click here.
Please Note
When DAP adds a subscriber to your Aweber list, it can currently “send” only the user’s Name and Email address to Aweber. DAP cannot (and does not) send the user’s unique password in DAP, or their affiliate id, etc. If you want Aweber to send out the password, then here’s how you can do it.
How it works
With the “DigitalAccessPass.com” Aweber Email Parser, integrating DAP with Aweber is a total breeze.
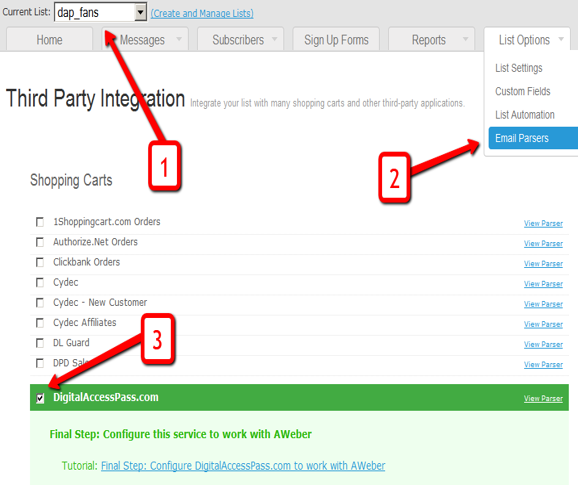
1. Login to your account at Aweber.com and from the “Current List” drop-down, pick the list to which you want DAP to add users to.
2. Click on “List Options”, and from the drop-down, select “Email Parser”
3. On the Email Parsers page, select the check-box next to the “DigitalAccessPass.com”
That’s it for the Email Parser activation at Aweber. You will be shown something like the image below – but note that there is no “Final Step”. So nothing further to do on this Aweber page.

4. Log in to your DAP Admin Dashboard and pick the product (whose members you wish to add automatically to your Aweber list from step 1 above)
This step is where things changed on Aweber’s end sometime in June/July 2014. So if you previously performed this step and your Aweber integration has stopped working, please double-check the steps here.
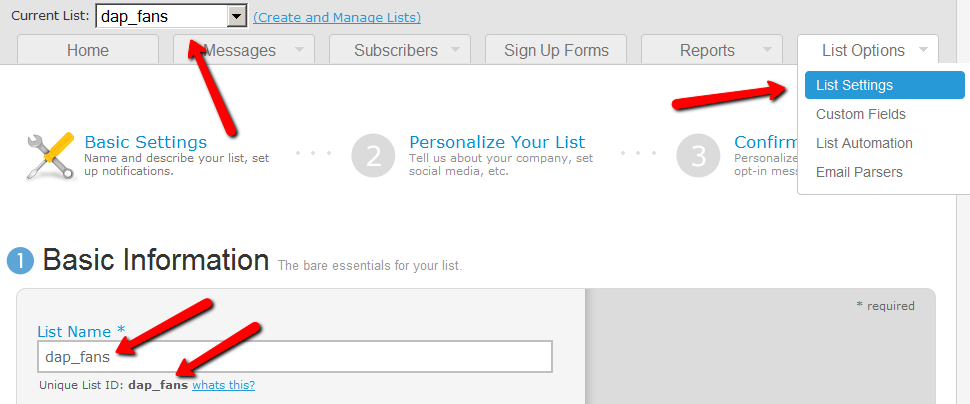
5. Go back to Aweber and select the right list. Then, under List Options > List Settings, under “Basic Information” section, you’ll see “List Name” and right below that, you’ll see “Unique List ID“.
In the image below, both appear to be the same. But on most Aweber accounts, especially new lists recently created, these may not be the same.
Take the “Unique List ID” (NOT THE “List Name”, like it used to be earlier)
Add the text “@aweber.com” to the end of that text – that now becomes your “Aweber List Email”. So if your list’s unique list id is “dap_fans”, then your Aweber List Email becomes “dap_fans@aweber.com”.
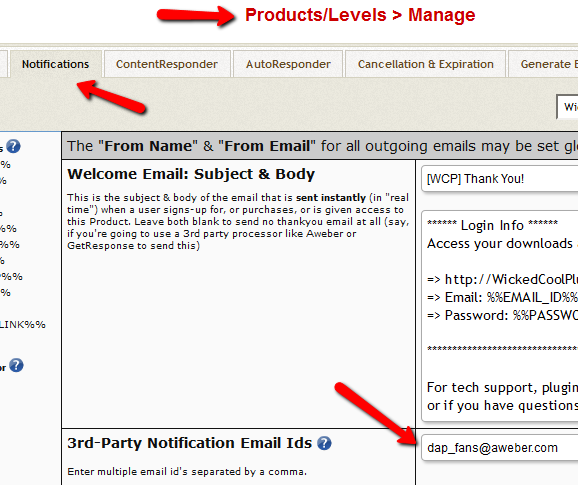
Copy this, go to the DAP Products > Manage page, and under the “Notifications” tab, add this Aweber List Email to the “3rd Party Notification” field, and save.
That’s it!
How This Works
So let’s say you picked the list “dap_fans” in your Aweber account, and the DAP Product “Example Subscription Product” (as shown in the screenshots above).
So once you add “dap_fans@aweber.com” to the product’s “3rd Party Notification Email Ids” field and save it, every time someone gets access to the “Example Subscription Product” product (regardless of whether they buy it, or you give them access on the backend), an email is sent out to the email id dap_fans@aweber.com , which looks like this:
From: Joe Subscriber <joe@subscriber.com>
Subject: New User Signup (3rd Party Notification)
Body:
Name: Joe Subscriber
Email: Joe@Subscriber.com
Product: Example Subscription Product
And because you have already activated the DigitalAccessPass.com parser in your “dap_fans” list, Aweber automatically adds “Joe Subscriber” with the email id (Joe@Subscriber.com) to your dap_fans list. And the parser has been written in such a way, that the product name will be used as your “Ad Tracking” field for the subscriber. So you will be able to group them and run reports on them in your Aweber account.
Frequently Asked Questions
Q: If I integrate DAP with Aweber and someone signs up to my membership site and then later on cancels or stops paying, can DAP automatically remove people from Aweber?
A: Short answer: No. Aweber doesn’t have a “Remove” parser, only an “Add” parser. So if someone who DAP automatically added to your Aweber list when they purchased a product, cancels or asks for a refund, you will have to manually remove them from the Aweber list. But wait, this may not be such a bad thing after all.
ExtraTip: As soon as someone cancels their subscription (or just doesn’t pay, or their credit card is declined), then their membership account in DAP automatically expires. Which means they can no longer access any content (unless you have specifically set DAP Config to deliberately give ex-members access to content that they paid for previously when they were a member).
So that means, their access in DAP has expired, but they are still on your Aweber list.
This may not be bad, because if you keep sending them emails (through Aweber) about new content and new videos and new stuff you are adding to your membership site even after they’ve cancelled, when they come back to your site through the link in your email, they won’t be able to access the actual content.
So it’s a great way of continuing to keep even ex-members curious and coming back to the site, only to be presented with a “Sorry, you don’t have access to this”, which may be a great incentive for them to come back and join your web site.
Of course, for this to work, you must put all the key content on your web site, and use the emails just to get them curious about the content, and eventually bring them back to the site to deliver the content. However, if you are going to send out all the good stuff in your emails (which doesn’t make sense anyway) then this may be an issue for you.
Q) Will DAP add only paid customers to Aweber? Or both Paid and Free members?
The link is really between the DAP Product and your Aweber List. So regardless of who gets access to that product – for free, by paying, or admin added – they will automatically be added to your Aweber list. So if you don’t want your free members to be added to your Aweber list, then keep your “Free” products and your “Paid’ products separate, and don’t set up this integration for the Free products.
Q) I have a question about how Aweber integrates with DAP. In this instance i am selling a monthly and yearly membership. The reader clicks on the subscribe button on my sales page and gets taken to Paypal. Assuming i have integrated Aweber properly, does the person get added to my Aweber List as well as the DAP list? Or is the only way they get added to Aweber is through a webform? I would like to be able to email the subscribers from time to time through Aweber but i am not using a Web form on my sales page, only a subscribe paypal button.
For paid products, here’s the flow:
Payment Processor (For ex – Paypal) == > DAP ==> Aweber
1) User pays via Paypal.
2) Paypal notifies DAP (ofcourse you need to integrate Paypal with DAP first either using Paypal hosted buttons (http://www.digitalaccesspass.com/doc/setting-up-your-paypal-button-and-paypal-ipn/) or using DAP generated button for paypal (http://www.digitalaccesspass.com/blog/2010/12/dap-v4-0/).
3) If the Paypal payment was successful, DAP creates the membership account and sends out the thankyou email to user with their membership login info (you can configure thankyou/welcome in the DAP products page).
4) In the DAP products page, you can select the product and set the Aweber list name in the 3rd party notification Ids field. In this field, you can specify a comma-separated list of email Ids.. one of the email ids can be your Aweber list email i.e. mylist@aweber.com
5) After DAP adds the user to purchased product, it sends out notifications to all email Ids listed in the 3rd party notification id field for that product.
Here’s more info on how to integrate DAP -> Aweber for paid products. Make sure to login to your Aweber account, Click on “My Lists†and within that, select “Email Parserâ€Â. On the Email Parsers page, check the check-box next to the parser named “DigitalAccessPass.com†as described above in this post.
First Name: Veena
Last Name: Prashanth
Email: veena@digitalaccesspass.com
Product: Digital Access Pass with WP LiveLinks


