25
Creating A Login Page Within WordPress
Now DAP already provides you with a built-in, out-of-the-box login form, at YourSite.com/dap/login.php . But if you want to put this form “within” your WordPress blog, so as to give your login form the same Look & Feel as the rest of your blog, then do this…
1) Create a WordPress Page (not “Post”) with the text %%LOGIN_FORM%% in the body of the page, and a title of say, Login, and save the new page. If you used the text “Login” for the title, then the actual link to this page would be YourSite.com/blog/login
2) This page now shows up as “Login” along with the rest of your “pages” on your blog.
3) Go to DAP Admin > Setup > Config . Scroll down to the field Login URL
In the text box, enter the full link to your login page from Step 1:
http://YourSite.com/blog/login
Or if your blog is in the root, then…
http://YourSite.com/login
That’s it! When someone clicks on the “Login” link that now shows in your “Pages” menu, they will now see a nicely formatted login form.

Related: Where is the Logout Link?
12
Using Sneak-Peek For Blog Posts
By default, none of the posts or pages you have protected in DAP will be visible in any of the WP menus (not even in custom menus).
Which means, as far as your visitors (or search engines) are concerned, those posts/pages don’t even exist in your blog – until the content “drips” on them.
Some DAP users want it that way, and some don’t.
Also, from an SEO perspective, if your visitor (who is not a member, and one who is not logged in) can’t even see the post, then neither can Google. This means, if you do a blog-and-ping, when Google arrives at the permalink of your new post, because the post is protected, DAP will redirect Google to your login page. This means, you don’ get the benefit of SEO for your new post.
Also, from a “Curiosity” standpoint, if you protect all of the posts, then your visitor will only see a handful of non-protected blog posts, and logged-in members will see only content that has already dripped on them (accessible to them).
Giving them a “sneak-peek” of the protected content is a great way to get them excited about your content.
So for example, you could have a blog post that talks about a video, and goes into detail about everything that they can learn from watching the video – but the content ends just before the video, and where the video would’ve normally appeared, there appears a “Login Form” that asks them to login first before they can view the content, or purchase access if they wanted to see the video.
How to turn on Sneak-Peek
Go to DAP Dashboard > Config > WordPress Sneak-Peek
It is set to “N” (no) by default. Change this to “Y” and click on the “Update” button to save the change.
And then when they click on the “more” button to read the rest of the post, the full post is protected anyway, and they are presented with a login screen.
WARNING: READ THIS BEFORE YOU TURN ON SNEAK-PEEK
As soon as you turn on Sneak-Peek, DAP will show all content from your blog posts, but only up to the “More” tag. This means, if you don’t have a “More” tag in any of your content, then all of your blog posts will show to all users, regardless of whether they have access or not.
So, the most important thing here is this:
SNEAK-PEEK and MORE are INSEPARABLE.
If you do sneak-peek, you MUST include a “More” tag.
So when you create a WordPress blog post, split the post into two parts using the “More” tag. This creates a “public preview” portion of the actual post, that shows up on your blog’s home page and in the permalink when that post is displayed. To read the rest of the post, your visitor has to click on the “More” link, and that’s when depending on whether the user has access, the rest of the post will be displayed.
65
DAP-to-Aweber Integration
UPDATE April 2, 2015: Starting DAP 4.8, DAP now integrates with Aweber via their API.
UPDATE July 23, 2014: The DAP-to-Aweber integration below has slightly changed – the documentation below has already been updated with the new information.
Subscriber Flow
The flow of subscriber in this model, is “FROM DAP TO Aweber“. User signs up at DAP first, then DAP adds her to Aweber.
If you are looking for the other way, i.e, “FROM Aweber TO DAP”, then click here.
Please Note
When DAP adds a subscriber to your Aweber list, it can currently “send” only the user’s Name and Email address to Aweber. DAP cannot (and does not) send the user’s unique password in DAP, or their affiliate id, etc. If you want Aweber to send out the password, then here’s how you can do it.
How it works
With the “DigitalAccessPass.com” Aweber Email Parser, integrating DAP with Aweber is a total breeze.
1. Login to your account at Aweber.com and from the “Current List” drop-down, pick the list to which you want DAP to add users to.
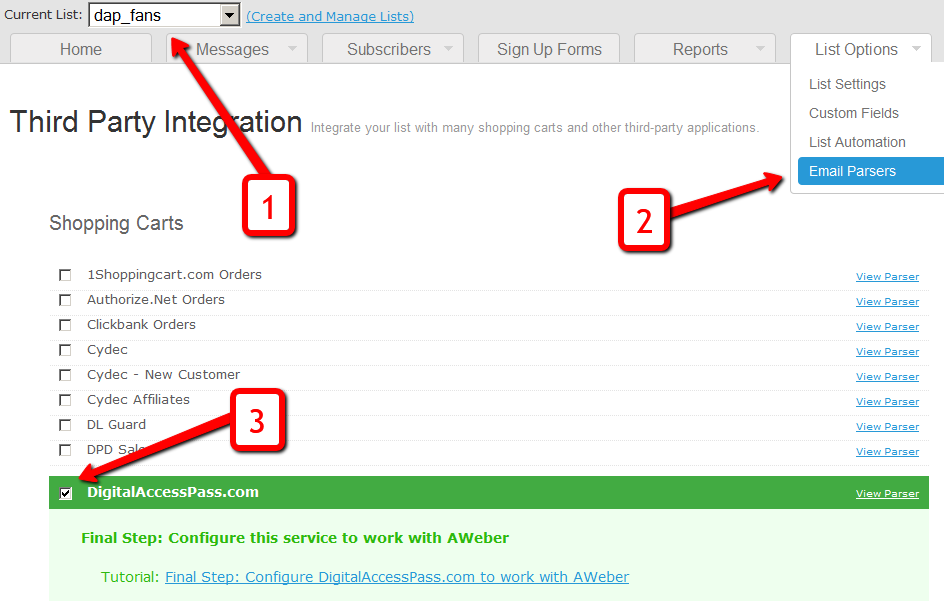
2. Click on “List Options”, and from the drop-down, select “Email Parser”
3. On the Email Parsers page, select the check-box next to the “DigitalAccessPass.com”
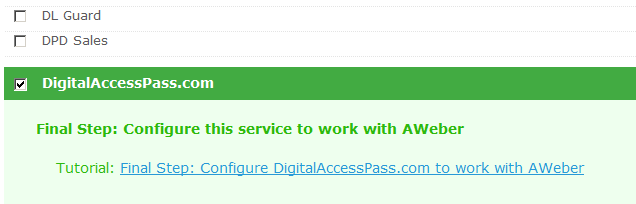
That’s it for the Email Parser activation at Aweber. You will be shown something like the image below – but note that there is no “Final Step”. So nothing further to do on this Aweber page.
4. Log in to your DAP Admin Dashboard and pick the product (whose members you wish to add automatically to your Aweber list from step 1 above)
This step is where things changed on Aweber’s end sometime in June/July 2014. So if you previously performed this step and your Aweber integration has stopped working, please double-check the steps here.
5. Go back to Aweber and select the right list. Then, under List Options > List Settings, under “Basic Information” section, you’ll see “List Name” and right below that, you’ll see “Unique List ID“.
In the image below, both appear to be the same. But on most Aweber accounts, especially new lists recently created, these may not be the same.
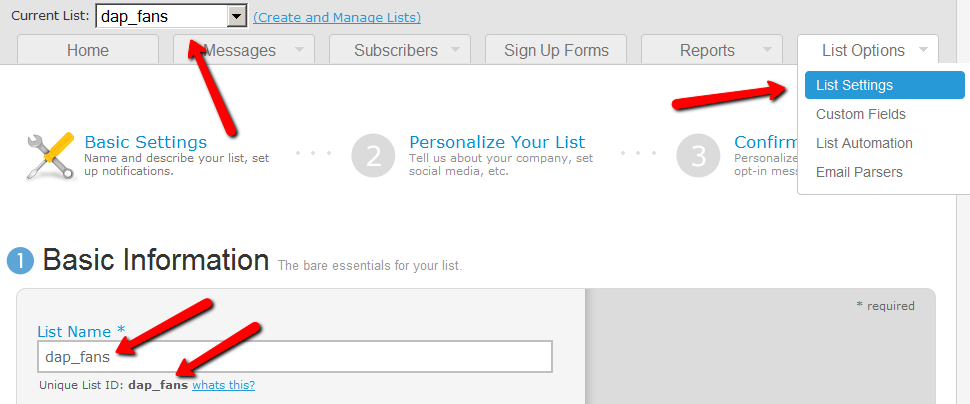
Take the “Unique List ID” (NOT THE “List Name”, like it used to be earlier)
Add the text “@aweber.com” to the end of that text – that now becomes your “Aweber List Email”. So if your list’s unique list id is “dap_fans”, then your Aweber List Email becomes “dap_fans@aweber.com”.
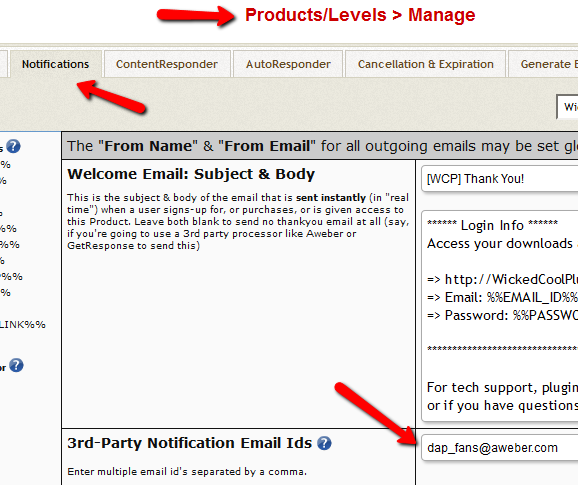
Copy this, go to the DAP Products > Manage page, and under the “Notifications” tab, add this Aweber List Email to the “3rd Party Notification” field, and save.
That’s it!
How This Works
So let’s say you picked the list “dap_fans” in your Aweber account, and the DAP Product “Example Subscription Product” (as shown in the screenshots above).
So once you add “dap_fans@aweber.com” to the product’s “3rd Party Notification Email Ids” field and save it, every time someone gets access to the “Example Subscription Product” product (regardless of whether they buy it, or you give them access on the backend), an email is sent out to the email id dap_fans@aweber.com , which looks like this:
From: Joe Subscriber <joe@subscriber.com>
Subject: New User Signup (3rd Party Notification)
Body:
Name: Joe Subscriber
Email: Joe@Subscriber.com
Product: Example Subscription Product
And because you have already activated the DigitalAccessPass.com parser in your “dap_fans” list, Aweber automatically adds “Joe Subscriber” with the email id (Joe@Subscriber.com) to your dap_fans list. And the parser has been written in such a way, that the product name will be used as your “Ad Tracking” field for the subscriber. So you will be able to group them and run reports on them in your Aweber account.
Frequently Asked Questions
Q: If I integrate DAP with Aweber and someone signs up to my membership site and then later on cancels or stops paying, can DAP automatically remove people from Aweber?
A: Short answer: No. Aweber doesn’t have a “Remove” parser, only an “Add” parser. So if someone who DAP automatically added to your Aweber list when they purchased a product, cancels or asks for a refund, you will have to manually remove them from the Aweber list. But wait, this may not be such a bad thing after all.
ExtraTip: As soon as someone cancels their subscription (or just doesn’t pay, or their credit card is declined), then their membership account in DAP automatically expires. Which means they can no longer access any content (unless you have specifically set DAP Config to deliberately give ex-members access to content that they paid for previously when they were a member).
So that means, their access in DAP has expired, but they are still on your Aweber list.
This may not be bad, because if you keep sending them emails (through Aweber) about new content and new videos and new stuff you are adding to your membership site even after they’ve cancelled, when they come back to your site through the link in your email, they won’t be able to access the actual content.
So it’s a great way of continuing to keep even ex-members curious and coming back to the site, only to be presented with a “Sorry, you don’t have access to this”, which may be a great incentive for them to come back and join your web site.
Of course, for this to work, you must put all the key content on your web site, and use the emails just to get them curious about the content, and eventually bring them back to the site to deliver the content. However, if you are going to send out all the good stuff in your emails (which doesn’t make sense anyway) then this may be an issue for you.
Q) Will DAP add only paid customers to Aweber? Or both Paid and Free members?
The link is really between the DAP Product and your Aweber List. So regardless of who gets access to that product – for free, by paying, or admin added – they will automatically be added to your Aweber list. So if you don’t want your free members to be added to your Aweber list, then keep your “Free” products and your “Paid’ products separate, and don’t set up this integration for the Free products.
Q) I have a question about how Aweber integrates with DAP. In this instance i am selling a monthly and yearly membership. The reader clicks on the subscribe button on my sales page and gets taken to Paypal. Assuming i have integrated Aweber properly, does the person get added to my Aweber List as well as the DAP list? Or is the only way they get added to Aweber is through a webform? I would like to be able to email the subscribers from time to time through Aweber but i am not using a Web form on my sales page, only a subscribe paypal button.
For paid products, here’s the flow:
Payment Processor (For ex – Paypal) == > DAP ==> Aweber
1) User pays via Paypal.
2) Paypal notifies DAP (ofcourse you need to integrate Paypal with DAP first either using Paypal hosted buttons (http://www.digitalaccesspass.com/doc/setting-up-your-paypal-button-and-paypal-ipn/) or using DAP generated button for paypal (http://www.digitalaccesspass.com/blog/2010/12/dap-v4-0/).
3) If the Paypal payment was successful, DAP creates the membership account and sends out the thankyou email to user with their membership login info (you can configure thankyou/welcome in the DAP products page).
4) In the DAP products page, you can select the product and set the Aweber list name in the 3rd party notification Ids field. In this field, you can specify a comma-separated list of email Ids.. one of the email ids can be your Aweber list email i.e. mylist@aweber.com
5) After DAP adds the user to purchased product, it sends out notifications to all email Ids listed in the 3rd party notification id field for that product.
Here’s more info on how to integrate DAP -> Aweber for paid products. Make sure to login to your Aweber account, Click on “My Lists†and within that, select “Email Parserâ€Â. On the Email Parsers page, check the check-box next to the parser named “DigitalAccessPass.com†as described above in this post.
First Name: Veena
Last Name: Prashanth
Email: veena@digitalaccesspass.com
Product: Digital Access Pass with WP LiveLinks
12
Modifying Config
The Configuration data of your DAP installation can be customized online.
- Log in to DAP as admin at:
http://YourSite.com/dap/ - Click on the “Config” link in the nav bar at the top.
- You will see a drop-down (showing “Basic” by default). You can modify option by option (“Basic”, “Payment Processing”, etc) or view them all together at one time (“All”).
- WARNING: Save each modified config field individually. This means, every time you modify one row of config data, hit the “Save” button at the end of that row. You will not be able to change multiple rows and have all of them saved all at once. It has to be saved row by row*.
- Modify fields like “Site Name”, “Admin Name”, “Admin Email” etc.
NOTE: The reason why we allow only one row to be “Saved” at a time, is to prevent you from messing up (by accident) config stuff that was already working. So, this way, you can mess up only one row at a time 🙂
See more details about the config screen below.
Config Screen Details
Config > Basic

1. Site Name:
This is where you put in the descriptive name for your web site. When sending emails, you may sometimes wish to use a “name” for your site rather than just a domain name. “Welcome to Digital Access Pass”, you can say.
2. Admin Name:
This is the “from name” used in outgoing emails.
3. Admin Email:
This is the “from email” used in outgoing emails.
4. DAP Log Level:
When set to “Log All Activity”, it logs all kinds of verbose details to the logs, to help during installation and troubleshooting. When set to “Log Errors Only” it logs only major errors and issues.
So during installation and setup, set this field to “Log All Activity”. Once everything is up and running and you are ready to launch your site, turn this up to “Log Errors Only”.
Config > Payment Processing

The first 7 fields on this page are required ONLY if you are going to be using a) 1ShoppingCart.com (incl. private labels) or b) ClickBank.
The 7 fields are:
1. “Should DAP process Customer Emails even when the Product names don`t match?”
2. “Email Server Where Order Emails Come In”
3. “Email Server Protocol (ssl/nossl)”
4. “Email Server Protocol (pop3/imap)”
5. “Email Server Port”
6. “Email Server User Name”
7. “Email Server Password”
If you are going to be using 1ShoppingCart.com or ClickBank, then read the explanation for the fields below. But Iif you are going to be using Paypal, then you can skip reading the explanation for these 7 fields.
So here is the documentation for the Payment Processing tab, which includes the 7 fields.
The way DAP integrates with 1ShoppingCart (1SC) and ClickBank (CB) is via Email. Whenever someone makes a purchase through 1SC or CB, they send you the site owner – what is called a “Payment Notification Email”. This email lets you know that someone just purchased one of your products, and contains the buyer information like name, email address, mailing address, etc.
We call this the email id at which you receive these payment notification emails – as the “Billing Email”. So all you need to do to set up integration between DAP and 1SC/CB, is to tell DAP what this billing email id is, and how to access it, so that DAP can log in to this email, look at all the payment notification emails, pick out the ones you want it to process, automatically create an account for your member on your membership site, and send them an email notifying them how to log in to their account on your membership site and access the product that they just purchased from you.
1. “Should DAP process Customer Emails even when the Product names don`t match?”
Now, you may have multiple web sites with multiple products, and you may be receiving payment notifications for many web sites at one single “Billing Email”. But you don’t want to add them all to your membership site, right? You just want to add those who purchase a specific product, to your membership site. So this field is where you tell DAP whether it should add ALL buyers to your membership site, or just those who purchased a specific product. By default, this is set to “N”, which means, DAP will ONLY process emails where the Product name you created in DAP exactly matches the Product name in the billing email. If you still don’t understand this, watch the videos, and just leave this at the default “N” for now until you understand more.
2. “Email Server Where Order Emails Come In”
This usually looks like “mail.yoursite.com”. You can find this info in your web host control panel, on the “Emails” tab, where you would normally create new email ids for your web site.
3. “Email Server Protocol (ssl/nossl)”: Leave this at the default, which is “nossl”.
4. “Email Server Protocol (pop3/imap)”: Leave this at the default, “imap”.
5. “Email Server Port”: Leave this at the default, “143”.
6. “Email Server User Name”:
This is the actual billing email id. Ex: billing@yoursite.com or whatever email id it is where you get the Payment Notification Emails from 1SC/CB.
7. “Email Server Password”:
This is the password to check that email id.
The following fields apply to everyone, not just to users of 1SC/CB.
8. “How long does user have from date of purchase to get a refund? (in days)”
“60” is recommended and is the default. But you can change this to any number you want.
9. “Enter the symbol of the currency in which you are accepting payments”
Default is “$”. If you are going to be using any other currency, then enter the symbol here.
10. “This is for Paypal Mass Pay – if you picked “$” as your currency symbol, enter “USD” here
If you are going to be paying your affiliates in US dollars, and picked the “$” in field #9 above, then enter USD here.
Config > Advanced

1. “Should Affiliate Section be displayed on User `Home` Page? (If using ClickBank, set this to `N`)
If you are in a mom-and-pop, or non Internet Marketing Niche, where you dont want to confuse users by displaying the affiliate section on the default user home page, then set this to “N”. All users will be signed up as affiliates by default they just wont see their affiliate link and affiliate stats on their user home page.
2. “Max. # of User Logins From Different IP`s”
This is a security feature. This is where you restrict the number of different IPs that a user can log in to their account on your membership site. This is to prevent password sharing, so if you see the email id being used to log in from more IPs than the above limit, then DAP will automatically lock their account, and send them and you an email notifying you both that the account has been locked. You can then either wait for them to contact you by email to get their account unlocked, or if you trust/know the user, you can unlock the account yourself on the “Edit User” screen. Once you unlock the user, both you and the user will get an email notifying you both that the account has been unlocked.
You can customize the content of the lock and unlock notification emails on the Templates page.
3. “Allow access to previously-paid-for content even after subscriber cancels?”
Set to “N” by default. If you want people who have cancelled their account, or unsubscribed from your membership site to have access to content that they had access previously, then set this to “Y”.
NOTE: If you set this to “Y”, then remember this: Say you are offering a free 1 month trial. And you are giving them access to a few videos or blog posts, then even if they cancel their free trial, then they will continue to have access to the 1st months content. If you had set this to “N”, then at the end of the 1st month, if they cancel their trial, then they wont be able to access 1st months content. Thats the difference.
4. “Force 3rd-Party Form (eg., Aweber integration) fill-up during Account Activation”
This is for advanced users only, if you are planning to use Aweber, and want every new member who signs up for a membership in DAP, to also be automatically added to your Aweber account. This requires some advanced set up, which is explained at http://www.digitalaccesspass.com/doc/aweber-integration/ . This is not something you should be looking to set up when youre first trying to set up DAP. This is a power-user feature, and you should get back to this towards the end of your membership setup, rather than at the beginning.
5. “Self-Service: Allow members to use credits and choose products a-la-carte.”
This is for those who have purchased the “Self-Service Store” (SSS) plugin only. If you dont have this, then skip ahead to the next one.
If you have purchased SSS, then set this to “Y” to enable your Self-Service Store where users can cash in their credits and buy the products they want for this month, rather than you (as the site owner) deciding what content they get this month.
6. “Self-Service: How to order the products displayed in your Self-Service Store?”
Again, this is for those who have purchased the “Self-Service Store” (SSS) plugin only. If you dont have this, then skip ahead to the next one.
This setting allows you to control how the products in your SSS are displayed Most popular first, Ascending order by name, etc.
7. “Location of your login page (eg., if using WordPress). Should start with a forward slash (`/`)”
By default, your membership site login page is: http://YourSite.com/dap/login.php
Instead of sending them to this page, you can put the login form on a “WordPress Page” within your own blog, so that the look and feel is always the same, and your member never has to leave the familiar look and feel of your blog just to login.
So if you put the login form on a WP page (not post) called “Login”, then your full link to your login page would be: http://YourSite.com/blog/login/
So to change the login page from the default page, and point it to your custom login page, just remove the domain name section from the above WP login page link, and paste the remaining text in this field. So you would enter”¦
/blog/login
“¦in this field.
8. “URL to which User is redirected to, right after log in. Default: /dap/index.php”
After your member logs in, by default, theyre redirected to http://YourSite.com/dap/index.php
You can change this to whatever URL you want (just leave out the domain name from the link).
9. “WordPress Sneak Peek: Show snippets of post (upto the `More` break) even for protected posts?”
With this turned off (set to “N” by default), when someone visits your blog, they will ONLY see posts that they are “eligible” to view. This applies to your blogs main page as well as individual posts. For instance, if you have 100 posts, and have protected 95 of them, then on your blogs home page, your casual visitor will see only 5 blog posts in TOTAL. They wont even see the titles or bodies of the protected posts until they become a member.
If set to “Y” (Show snippets even of protected blog posts), then your users will see content from each blog post of even protected posts, but only up to the “More” button. Clicking on the “More” link would then ask them to login first before they can access the remainder of the content.
So when Googles spider (or your visitor) arrives at your blog after you publish a new post, it/they will see a summary of the post, instead of being redirected to a login page. This is extremely powerful from an SEO perspective.
10. “Use Double Opt-in? If “Y”, then user has to click link to activate a/c. “N” means single-optin.”
By default, “Double Optin” is set to “Y”. It means, when your member first joins your membership site (she doesnt have an account so far), then only the very first time when an account is being created using her email address, then an “Activation Email” (customize on Templates page) with an activation link is sent to your member. They have to click on the activation link to set their account status to “Active”. This process also records their IP address, in case you need them for as “Anti Spam” proof.
But if you set this to “N”, then whenever their account is first created, their account is directly activated by DAP, and no activation link is required to be clicked, and no activation email is sent to your member.
– Ravi Jayagopal
Customizing Header and Footer
This applies only if you have not integrated the DAP login form into your WordPress blog.
Header and Footer are now part of DAP Templates.
3
Personalization For Your Blog Posts
1) Personalize post Titles and Content with MERGE variables:
%%FIRST_NAME%% – Gets replaced with their first name
%%EMAIL%% – Gets replaced with their email
%%MEMBER_HOME_PAGE%% – Gets replaced with the ‘login’ page
So if you create a blog post with the title “Welcome %%FIRST_NAME%%“, then when your member views that post after they’ve logged in, they will see “Welcome John“.
2) Personalize the Login Form:
You can put the Login Form on any WP “Pageâ€Â.
3) Personalize Member and Affiliate Information: