Office Auto Pilot Integration
1. Integrate OAP Web Form => DAP Free Product
You can use OAP Registration Form and integrate it with a DAP Product.
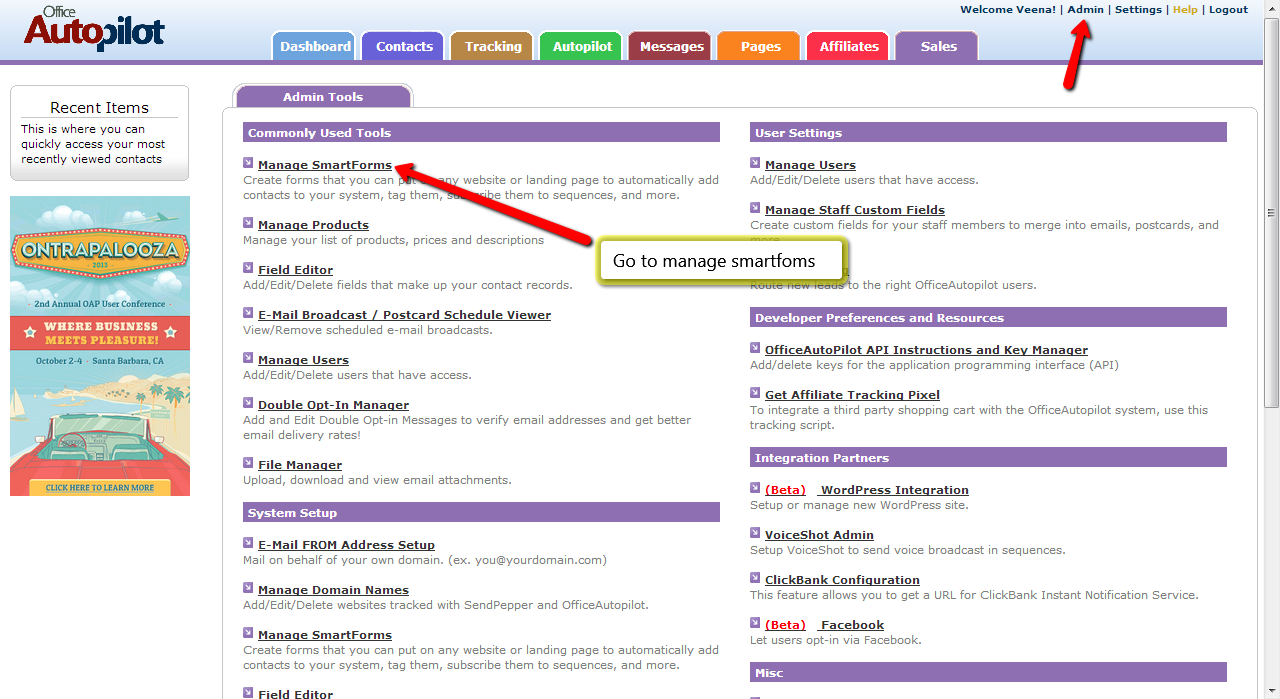
(1) Login to your Office Auto Pilot account.
(2) Go to Admin->Manage SmartForms
(3) Add a new smartform or edit the existing one
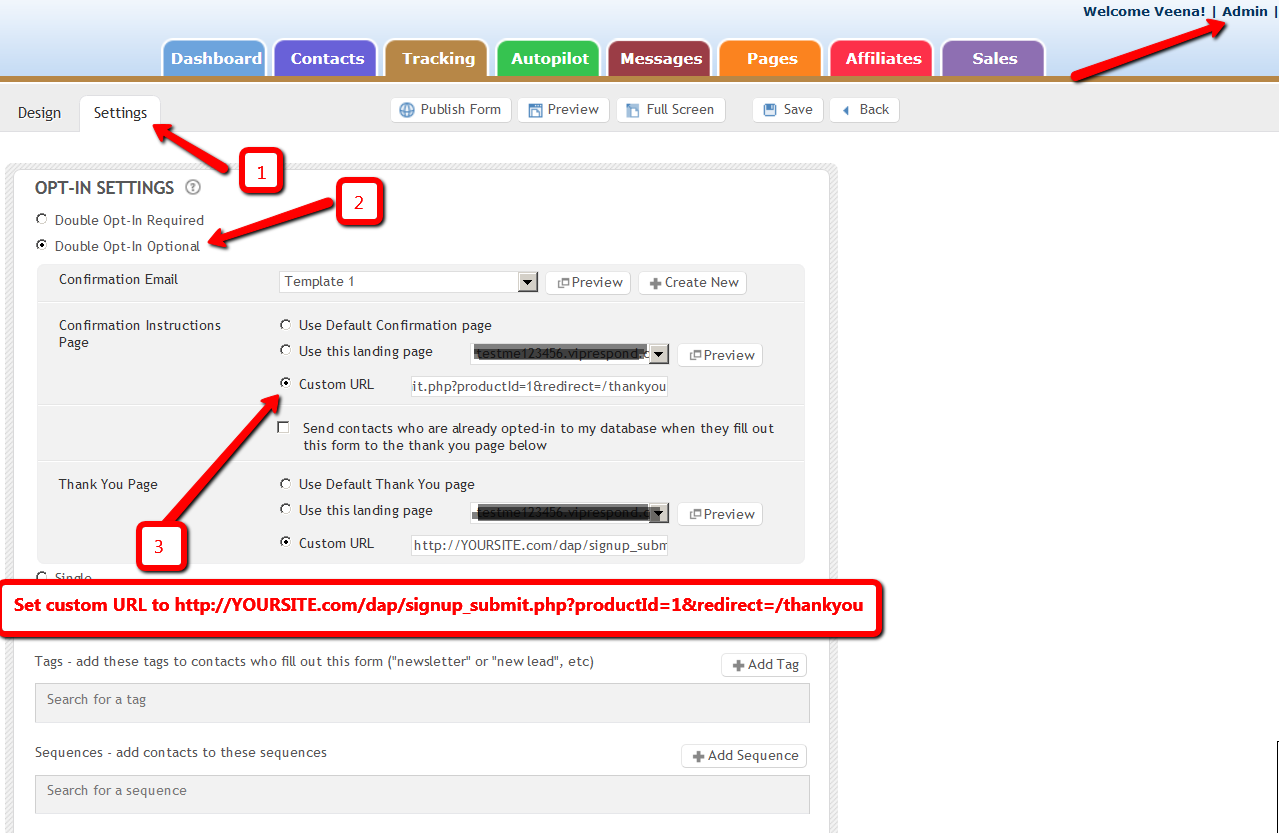
(4) Go to Smartform -> Settings tab and select Opt-in settings >And set ‘Custom URL’ to http://YOURSITE.com/dap/signup_submit.php?productId=1&redirect=/thankyou&oap=1
Please NOTE:
Set productId to the Id of the DAP product you want to integrate with OAP.
Set redirect tag to the URL of the page where you want the users to land after they complete confirmation. In the example above, the redirect tag is set to /thankyou but you can change it to the URL of the page where you want the users to go after they complete confirmation.
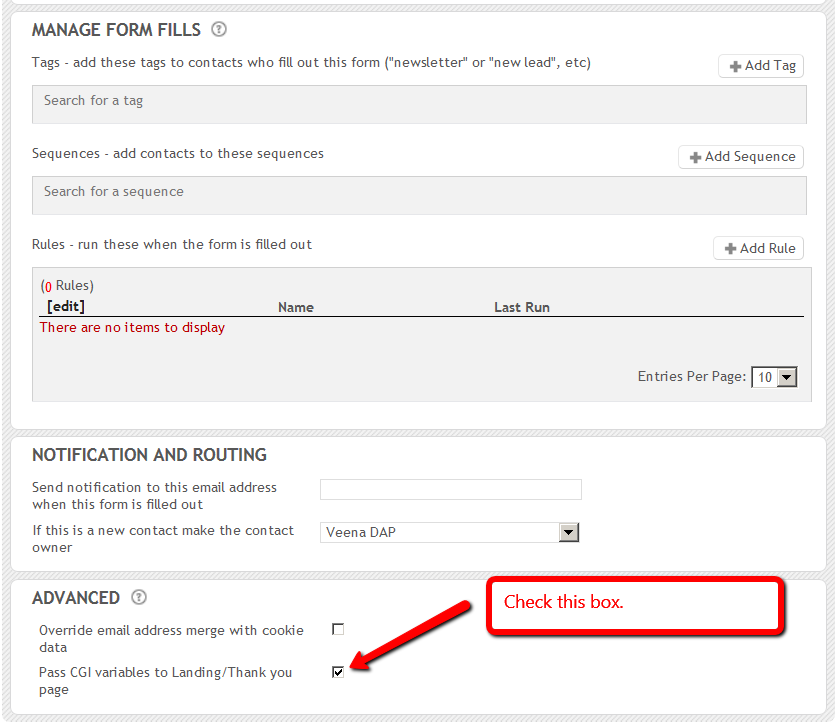
(5) On this page, towards the bottom of the page, under Advanced, check the box to “Pass CGI variables to Landing/Thank you page”.
(6) Save and publish the form.
(7) Copy the code and paste it into your WordPress squeeze page.
(8) Visit this page in a new browser where you are not already logged in to DAP.
(9) Fill the information and submit .
(10) The user should receive a confirmation email from OAP upon signup. When they click on the confirmation link in the email, the user account will get created in dap automatically and user will land at the page that you have set above (step 4).
2. Integrate DAP Free Signup Form => OAP List
You can use DAP Free Signup Form and integrate it with OAP list.
(1) Create your FREE product in DAP Products Page.
(2) Make sure that “Allow Free Signup” is set to “Yes” in DAP Products page.
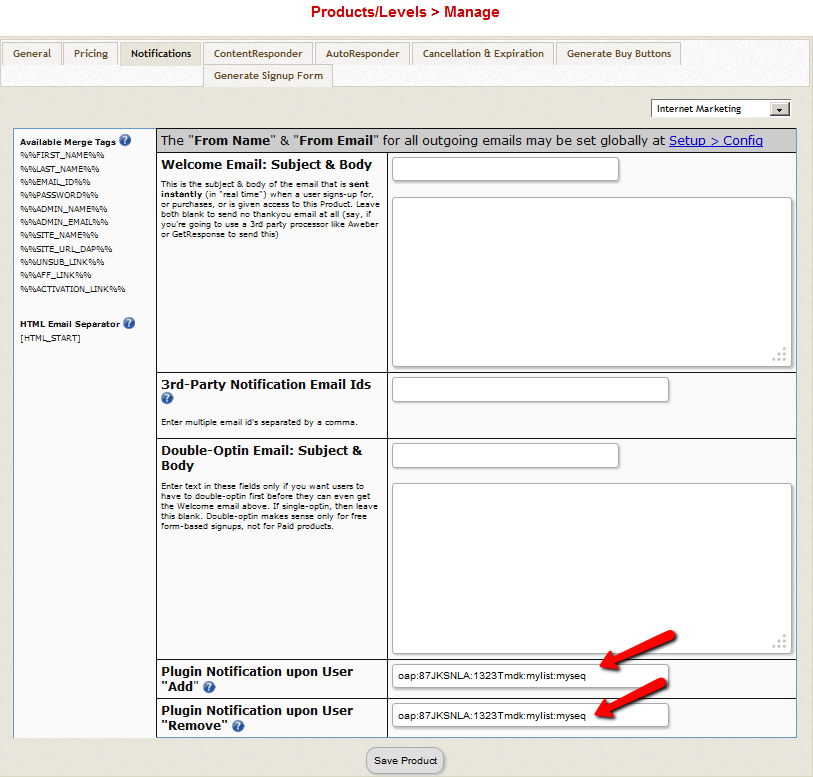
(3) In Products/Levels -> Manage -> Notification tab -> Plugin Notification upon User “Add”, enter data in this format:
oap:<APPID>:<KEY>:<GROUP NAME>:<SEQUENCE NAME>
For example, say APPID=87JKSNLA, KEY=KLAcjTmdk, GROUP NAME=mylist, SEQUENCE NAME=myseq
oap:87JKSNLA:KLAcjTmdk:mylist:myseq
(4) In Products/Levels > Manage->Notification tab->Plugin Notification upon User “Remove” enter the value as like:
oap:<APPID>:<KEY>:<GROUP NAME>:<SEQUENCE NAME>
For example, say APPID=87JKSNLA, KEY=KLAcjTmdk, GROUP NAME=mylist, SEQUENCE NAME=myseq
oap:87JKSNLA:KLAcjTmdk:mylist:myseq
Testing
(1) Add a new user manually to the DAP FREE product (integrated with OAP) using Users > Add/Edit ->Add New Single User To Product
(2) Go to DAP Admin -> Users -> Manage page and see if the new user got added to dap and if yes then go to your OAP account and check under Contacts. The new user/subscriber should have gotten added to your OAP subscriber list.
(3) To remove a user from the list, go to DAP Admin -> Users > Manage -> Find the user and click on ‘Remove’ to remove user’s access to the product. It will trigger the ‘remove’ call to OAP.
2. Integrate DAP Paid Product => OAP List
The integration between DAP->OAP will work if you sell using a payment button that’s integrated with dap but not generated in OAP. If you use OAP to sell / generate payment button, it will not integrate with DAP. But if you use say paypal buttons directly or use dap shopping cart or some other shopping cart that’s integrated with dap, then the users will be first added to dap and you can use the same steps to integrate DAP to OAP that you used above to integrate the DAP free product to OAP.
– In Products/Levels -> Manage -> Notification tab -> Plugin Notification upon User “Add”, enter data in this format:
oap:<APPID>:<KEY>:<GROUP NAME>:<SEQUENCE NAME>
For example, say APPID=87JKSNLA, KEY=KLAcjTmdk, GROUP NAME=mylist, SEQUENCE NAME=myseq
oap:87JKSNLA:KLAcjTmdk:mylist:myseq
– In Products/Levels -> Manage -> Notification tab -> Plugin Notification upon User “Remove”, enter data in this format:
oap:<APPID>:<KEY>:<GROUP NAME>:<SEQUENCE NAME>
For example, say APPID=87JKSNLA, KEY=KLAcjTmdk, GROUP NAME=mylist, SEQUENCE NAME=myseq
oap:87JKSNLA:KLAcjTmdk:mylist:myseq
That’s it. This completes the integration of paid product in DAP with OAP.
Testing
(1) Add a new user manually to the DAP PAID product (integrated with OAP) using Users > Add/Edit ->Add New Single User To Product
(2) Go to DAP Admin -> Users -> Manage page and see if the new user got added to dap and if yes then go to your OAP account and check under Contacts. The new user/subscriber should have gotten added to your OAP subscriber list.
(3) To remove a user from the list, go to DAP Admin -> Users > Manage -> Find the user and click on ‘Remove’ to remove user’s access to the product. It will trigger the ‘remove’ call to OAP.


