Custom Fields
1) Support for Admin-Defined Custom Fields in DAP
In DAP 4.2, we have added the support for admin defined custom-fields. You can define your own custom fields in DAP admin panel, accept/store the custom fields via DAP Free Signup/Registration form and it can be viewed/managed in the DAP admin panel.
We have also added the ability to allow the admins to refer to the custom field values via merge tags within DAP email messages (auto-responder/broadcast).
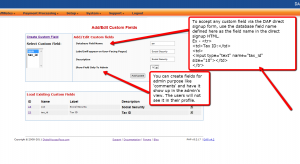
Here’s a screenshot of the DAP admin panel => Users => Custom Fields page.
(Click to enlarge)
Here’s the steps to define your own ‘custom’ field in DAP admin panel => Users => Custom Fields page.
Step 1: Database Field Name
Define the fieldname. DAP will use the name defined here to manage this field. The database field name is also used within the dap direct signup form/html so when the user’s enter a value for the field during sign-up, DAP will store it in the right database field.
If you want to accept any custom field via the DAP direct signup form, then use the database field name defined here as the field name in the direct signup HTML code generated from DAP products page.
Ex –
<tr>
<td>Tax ID:</td>
<td>
<input type=”text” name=”custom_tax” size=”10″></td>
</tr>
<tr>
Step 2: Label (will appear on User-Facing Pages)
The Label will appear on the user’s profile page. The database field name is only for internal use… the label is what the user’s will see.
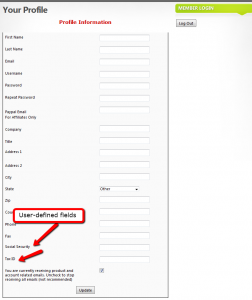
Screenshot of user profile page with sample custom fields – Social Security and Tax ID.
Here the label names are Social Security and Tax ID.
(Click to enlarge)
Step 3: Description
Just for Admin User to describe the custom fields. Not displayed to the user.
Step 4: Show Field Only To Admin
NOTE: If you want the users to see and update the custom field, set ‘Show Field Only To Admin’ to ‘N’.
If this is set to “Y”, then only admin will see this field in the DAP admin -> manage users page (when you click on the user’s name).
2) Using Custom Fields in Signup Form
Say you want to include a field called “Tax Id” in your Free Signup Form that you generated in DAP Products page.
So first define a custom field with the database field name tax_id in the Custom Fields page in DAP Admin (as shown above).
Here’s the default free signup form code generated from dap products page (if your form code looks different, see the last section at the end of this post).
<div id=”stylized” class=”dap_direct_signup_form”>
<form id=”dap_direct_signup” name=”dap_direct_signup” method=”post” action=”http://techizens.com/dap/signup_submit.php”>
<label>First Name</label>
<input type=”text” name=”first_name” id=”first_name” />
<label>Email</label>
<input type=”text” name=”email” id=”email” />
<button type=”submit”>Sign Up</button>
<input type=”hidden” name=”productId” value=”1″ />
<input type=”hidden” name=”redirect” value=”http://yoursite.com/login/?msg=SUCCESS_CREATION” />
</form>
</div>
Just add this to the signup form code:
<label>Tax Id</label>
<input type=”text” name=”custom_tax_id” id=”custom_tax_id” />
So basically, you add the word ‘custom_‘ in front of the custom field’s database field name. So if the database field name is “tax_id“, then in the form, it becomes custom_tax_id (as you see above)
So your final free signup form will look like this:
<div id=”stylized” class=”dap_direct_signup_form”>
<form id=”dap_direct_signup” name=”dap_direct_signup” method=”post” action=”http://techizens.com/dap/signup_submit.php”>
<label>First Name</label>
<input type=”text” name=”first_name” id=”first_name” />
<label>Email</label>
<input type=”text” name=”email” id=”email” />
<label>Tax Id</label>
<input type=”text” name=”custom_tax_id” id=”custom_tax_id” />
<button type=”submit”>Sign Up</button>
<input type=”hidden” name=”productId” value=”1″ />
<input type=”hidden” name=”redirect” value=”http://yoursite.com/login/?msg=SUCCESS_CREATION” />
</form>
</div>
That’s it.
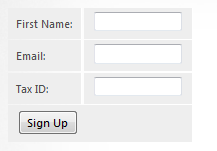
Put the signup form code on your WP page/post/sidebar, and the form is displayed like this…
You can do the same for each custom field you want to accept in the dap free signup form:
1) Create the custom field in DAP Admin -> Users -> Custom Fields Page
2) Add the field to the free signup form as shown in the example above for tax_id.
Displaying Custom Fields On Your Site
You can display the value of the user’s own custom fields on your pages, using the merge tag like this:
%%DAPCUSTOMFIELD_tax_id%%
Using Custom Fields In DAP Emails
You can send custom field values in the DAP emails by using merge tags like this – %%custom_tax_id%%
Add ‘custom_’ in front of the custom field’s database field name.
So if you have defined a custom field called tax_id in your database, to include this field in the autoresponder/broadcast email, just add this – %%custom_tax_id%% to the body of your email.
That’s it. When the user receives the email, dap will automatically replace the merge tag with the user’s tax id value.
So if your email message body contains the following text:
Your Tax Id: %%custom_tax_id%%
When the user receives the message, it will look like this (in this example, the user’s taxId = 9999):
Your Tax Id: 9999
If you are using an older version of DAP < 4.4.3, then see the section below.
Older versions of DAP < 4.4.3
Your default code will look like this…
<form name=”dap_direct_signup” method=”post” action=”http://contentresponder.com/dap/signup_submit.php”>
<table>
<tr> <td>First Name: </td> <td><input type=”text” name=”first_name” size=”10″></td></tr>
<tr> <td>Email:</td> <td><input type=”text” name=”email” size=”10″></td></tr>
<tr> <td colspan=”2″><input type=”submit” name=”Submit” value=”Sign Up”></td></tr>
</table>
<input type=”hidden” name=”productId” value=”1″><input type=”hidden” name=”redirect” value=”/blog/login?msg=SUCCESS_CREATION”>
</form>
Add this to your code
<tr>
<td>Tax ID:</td>
<td>
<input type=”text” name=”custom_tax_id” size=”10″></td>
</tr>
<tr>
Final version looks like this
<form name=”dap_direct_signup” method=”post” action=”http://contentresponder.com/dap/signup_submit.php”>
<table>
<tr> <td>First Name: </td> <td><input type=”text” name=”first_name” size=”10″></td></tr>
<tr> <td>Email:</td> <td><input type=”text” name=”email” size=”10″></td></tr>
<tr> <td>Tax ID:</td> <td><input type=”text” name=”tax_id” size=”10″></td></tr>
<tr> <td colspan=”2″><input type=”submit” name=”Submit” value=”Sign Up”></td></tr>
</table>
<input type=”hidden” name=”productId” value=”1″><input type=”hidden” name=”redirect” value=”http://yoursite.com/login/?msg=SUCCESS_CREATION”>
</form>


