Creating a Product
The “Products/Levels > Manage” page has 3 sections.
1. Product details
2. ContentResponder
3. Email Autoresponder
All three are explained below.
1. Product Details
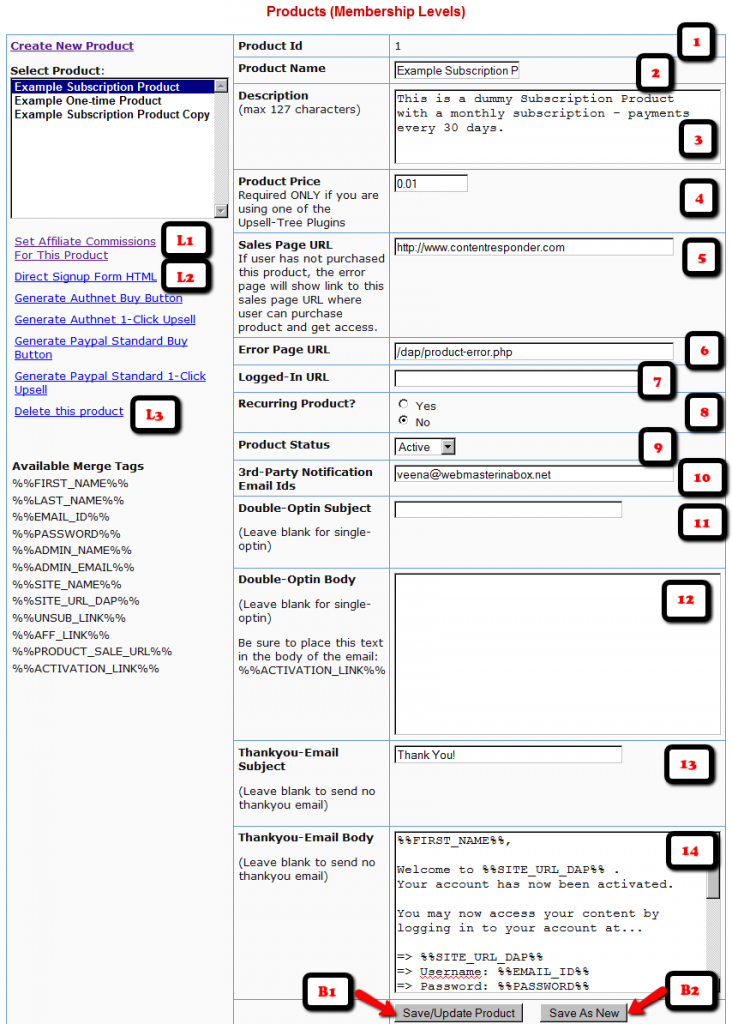
1. Product Id
This is an internal number assigned to every product that is created. Nothing for you to do. It will automatically show a number after you save a new product.
2. Product Name (reqd):
Obviously, this is the name you give your product. So if you are creating a product (subscription-based, or one-time purchase) about how to make money online, then you would call it “How to make money online”. This name will be used by DAP on various screens, emails and reports. So, name it something intuitive, and not something cryptic.
3. Description (reqd)
Use this to expand on what your product does. This field is used on auto-generated error pages and such.
4. Product Price
Required only if you are using DAP itself as a shopping cart, by using one of our “Upsell Tree” Plugins. If you are using a 3rd party cart (like http://1SiteAutomation.com, e-junkie, Paypal standard where the buttons are hosted at Paypal), then you don’t need to enter anything here. Just leave it at 0.00
5. Sales Page URL (optional)
When a user who doesn’t have access to the links in this product, DAP shows her a default error page with a “Lock” symbol, and on that error page, it will say something to the effect of “Sorry, you don’t have access to this Product. Click here to get access.”. And the text “Click here” will point to this “Sales Page URL” will be shown, which the user can then follow to read your sales page and then purchase the product.
6. Error Page URL (optional)
Default value: /dap/product-error.phpIf you leave at this default value above, then DAP will show the default error page when a user tries to access a URL that she doesn’t have access to yet, URL to which access has expired, or she hasn’t purchased the product of which the URL is a part of.
Is this a recurring product? (optional):
Pick “Yes” or “No” depending on if this product is a recurring product for which you expect periodic payments to come in.
If you pick “No”, then when the user purchases this product (or you give her direct access from the admin area), then the user is given access from Day 1 to Day 9999.
Price
Enter the price of your product, regardless of whether it is one-time or recurring. This price is used only if you are using the Authorize.net plugin. If you’re using direct Paypal, ClickBank or 1ShoppingCart, then this field is ignored by DAP.
Billing Cycle (optional):
Applicable only if recurring is set to yes. If this is a recurring product, then you need to enter how often billing is done (in days). So, if your product is available for a monthly subscription, then enter “30” (as in, billing occurs once every “30” days).
Product Status (optional):
If you want to temporarily take this product offline, thus revoking access to this product by all users, then change the status to “Inactiveâ€Â.
3rd Party Notification Email Ids
If you want DAP to send email notifications to 3rd party email addresses (like autoresponder services – eg., Aweber – or to JV partners), then enter one or more email addresses here. Separate multiple email addresses by a comma.
Every time a user subscribes to this product (by paying, or because Admin gave her access), an email is sent out by DAP to all of these email addresses. The “From name” is the subscriber’s name, and the “From email” is the subscriber’s email address.
This is very useful for automatically adding your subscriber to a 3rd party list service that has a “subscribable” email address – like yourlist@aweber.com or 1sa-listid@1siteautomation.com.
Once you fill out the fields, click on the “Save/Update Product” button to save the changes.
Use the same form to make changes to the fields as well.
Integrating With A Payment Processor
The Product Name within DAP should be the exact same (even the case) as the Product Name in your Shopping Cart.
So if you were using a 1ShoppingCart (or private label) to accept payment for selling your digital info product or for access to your membership site, then the Product Name you use in your 1ShoppingCart admin panel should be the exact same name as what you use within DAP.
This is the only way for DAP to know about a new purchase through your 1ShoppingCart cart. And when it parses your 1ShoppingCart notification email, it can figure out that your buyer who purchased that product needs to be added to DAP, so that your buyer can get access to either your info product files, or to your subscription-based site.

