AuthSMTP Integration
If you’re having email delivery issues on your host, you can connect DAP to 3rd-party email systems like Amazon SES and AuthSMTP.
In this article, you’ll see how to integrate DAP with AuthSMTP.
- Signup for an account at AuthSMTP
- Log in to your AuthSMTP account
- Go to Registered From Address tab
- Take the email id from DAP Admin > Setup > Config > From-Email Id and enter that email here and register it here (basically, you’re whitelisting your DAP Admin email id as a registered sender – if you don’t do this, AuthSMTP will reject and discard all emails sent via DAP). You will need to “Confirm” the registration by clicking on an activation link that they will be sending you.
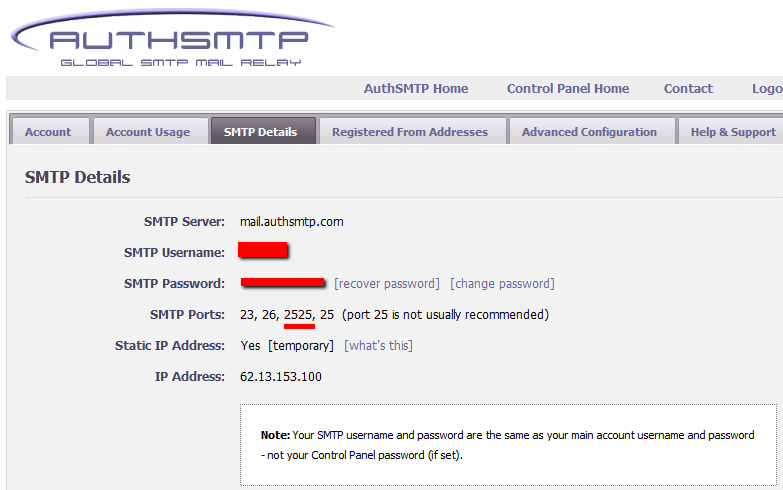
- In your AuthSMTP account, go to SMTP Details tab.
- Make a note of the SMTP Server (usually mail.authsmtp.com), SMTP Username, SMTP Password.

- Now log in to DAP Admin, and go to Email > SMTP
- On this screen, use the section Add a New SMTP Server to create a new SMTP row as follows:
Description: AuthSMTP
Server: mail.authsmtp.com (or from Step 6 above)
Port: 2525 (must be exactly that)
SSL: N (must be exactly that)
User Id: Your AuthSMTP Username (from Step 6 above)
Password: Your AuthSMTP Password (from Step 6 above)
Email Sending Limit Per Hour: 500
(Max 500 if on shared server. Max 2000 if VPS or dedicated server)
Activated: Y - Click on the “Add” button to create and save the new AuthSMTP server setting.
- And now you should see two rows under Manage Existing SMTP Servers: One for “Local Web Host” and another for “AuthSMTP”.
- For the “Local Web Host” row, be sure to set “Active” to “N” – because now that you have set up AuthSMTP, you want all instant welcome emails, autoresponder and broadcast emails to be sent out through AuthSMTP, and not your web host’s email server.
That’s it!
