Free Signups: Adding Users Via DAP Signup Form
DAP allows you to create an opt-in form to directly sign-up users to your Product (which also acts as a “list” if you only want to drip or broadcast emails).
This is very similar to creating a sign-up form at Aweber or 1ShoppingCart, and allowing people to directly sign up by entering just their First Name & Email Id.
How To Generate Free Signup Form Code
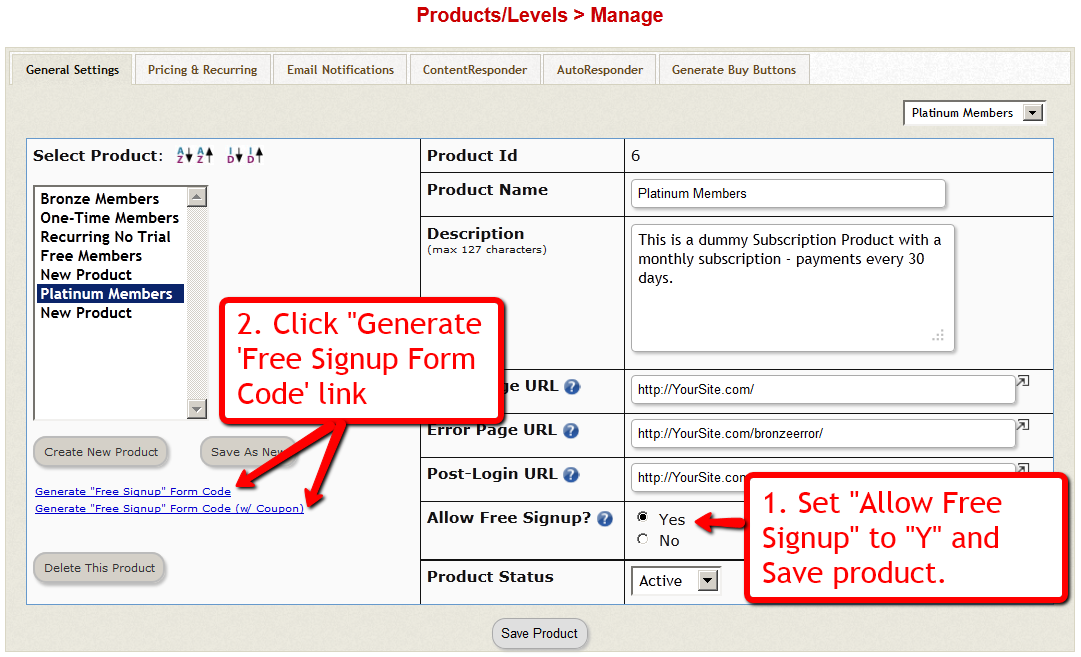
In the DAP Admin menu, go to Products > Manage , and pick the product for which you wish to create the free signup form
1) Set “Allow Free Signup” to “Y” and then first save the product.
2) Once product is saved and page reloads, now click on the first link that says Generate ‘Free Signup Form Code’ link.
(NOTE: This is for advanced DAP users only: Second one (that says w/ Coupon) generates the free signup form code along with an extra field for entering a coupon code – use this if you want the person signing up to also enter a coupon code before they can sign up for the product – you must have previously created the Coupon code under “Payment Processing > Coupons” page.
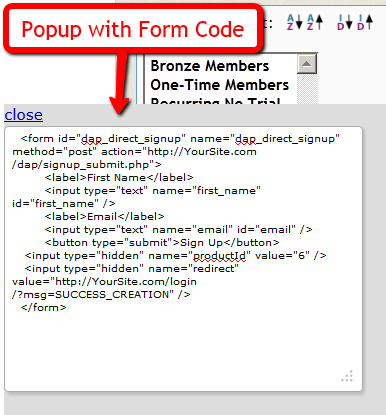
3) That will bring up a little pop-up that will have the HTML for the signup form.
4) The form looks something like this:
<form name=”dap_direct_signup” method=”post” action=”http://www.YourSite.com/dap/signup_submit.php”>
<table>
<tr><td>First Name: </td> <td><input type=”text” name=”first_name” size=”10″></td></tr>
<tr><td>Email:</td> <td><input type=”text” name=”email” size=”10″></td></tr>
<tr> <td colspan=”2″><input type=”submit” name=”Submit” value=”Sign Up”></td></tr>
</table>
<input type=”hidden” name=”productId” value=”1″>
<input type=”hidden” name=”redirect” value=”http://YourSite.com/login/?msg=SUCCESS_CREATION““>
</form>
Copy and Paste the above form into any HTML page, or WordPress Page or Post where you want the free sign-up form to appear.
The form already has all the code required to add the user to your member database, with “Free” access to the Product (for which you generated the HTML code)
That’s it!
Additional Fields On The Signup Form
We also allow the following additional fields to be accepted via the direct signup form:
first_name, last_name, user_name, email, address1, address2, city, state,zip,country, company,phone,fax,title,paypal_email
Take the direct signup form code from the dap products page, and to that, you can add additional attributes with the following names:
For ex:
If you want to accept the user’s paypal email address, the just that to the form code above:
<tr>
<td>Paypal Email:</td>
<td><input type=”text” name=”paypal_email” size=”10″></td>
</tr>
Frequently Asked Questions
Can this form be published on any site? Or can it be published only on the site where DAP is installed?
This form can be published on any web site – can be completely different from the site where DAP is installed. Please note that the above form submits to the url “http://www.YourSite.com/dap/signup_submit.php” – so doesn’t matter which site this form is published on, the user is always added to the site where DAP is installed, which is http://www.YourSite.com.
What happens after user signup?
If you note the text in bold in the above form (reproduced below)…
<input type=”hidden” name=”redirect” value=”http://YourSite.com/login/?msg=SUCCESS_CREATION“>
… you’ll see that the default form redirects to the page http://YourSite.com/login/?msg=SUCCESS_CREATION (which is the login page from your Setup > Config) and on that page, displays on the message “Success! Your membership account has been created. Check your email addresss in a few minutes for your password”.
After Sign up is complete, how to redirect to a link of my choice?
In the form, you can modify the field in the form named “redirect” to any URL of your choice. Here are some examples:
<input type=”hidden” name=”redirect” value=”http://www.SomeOtherNonDAPSite.com/thankyou.html“>
OR
<input type=”hidden” name=”redirect” value=”http://www.YourSite.com/2010/12/31/thank-you“>


