DigitalAccessPass.com (DAP) Documentation
Quick Start Guide
This QuickStart Guide does not go into all screens and all settings. It just shows you the basics you need to understand how DAP works, and quickly get your membership site up and running.
If you want the full documentation, see the menu to your left.
The User Registration Process
In DAP, there are 3 ways in which you can sign up members or subscribers.
1. Free members: They sign up for free via a signup form that asks for (say) their name and email - you can customize the signup form to ask for more data.
2. Paid members: These users buy a one-time product or sign up for a subscription or membership level.
You can create all types of products (free, one-off, payment plans, subscriptions etc) in DAP but if you want to give your users the option to pay using Credit Card or Paypal, you'll need a shopping cart plugin/platform to do this. We recommend our own shopping cart plugin called SmartPayCart.com (SPC). SPC is one of the world's most powerful and customizable shopping cart plugins for Wordpress and integrates seamlessly with DAP. It also automatically logs in members to their members area upon a successful purchase. It also integrates with all leading email platforms.
DAP also integrates with other external shopping cart platforms such as WooCommerce, Samcart, ThriveCart, PayKickStart, Clickbank, JVZoo etc.
3. Admin-added members: You can import members from other platforms, other lists, past customers, etc and give them free or paid access to your content or membership levels, via the DAP admin backend.
DAP does not require your visitors to "pre-register" before buying products or becoming a member. So when it comes to purchasing a product or signing up for a subscription in DAP, the flow is like this:
- Visitor arrives at your web site.
- They click on a buy button on your sales page to become a member (or buy a one-time product)
- They're taken to...
a) Your Payment Processor directly (eg., Paypal, ClickBank), or...
b) Your Shopping Cart Checkout Page (eg., SmartPayCart.com) where they can pay using Credit Card or Paypal, or...
2) Checkout page powered by an external Shopping Cart Platform that integrates with DAP. - When they complete checkout and finish paying for the product, at that very instant, DAP (on your site) gets the buyer's information from the payment processor or your shopping cart. And THAT is actually when the member account is first created.
- DAP uses the buyer's purchase email Id and generates a random password to create user account. You can configure DAP to send out a welcome email with the user's login credentials. You can configure this email in the DAP products page >> notifications tab. Continue reading for more details on this.
- If you use a shopping cart plugin like SmartPayCart.com (SPC), after they complete checkout and finish paying, they are automatically logged in to the member's area on your site, and they can start consuming your members-only content that you have made available to "buyers of this product" (a.k.a "members of this level"). If this is not a "membership" product, then you could also send them to any static "Thank You" page. You can control where the users land after they complete a purchase.
Watch video to see how you can start selling your products online in less than 5 minutes!
Start Selling in Less Than 5 Minutes Using SPC
Only 4 Steps To A DAP Membership Site
1) Create a Product: Name the product, designate as free or paid, set up billing and access, protect content, setup welcome email to send membership login/download credentials.
2) Create Member Pages such as, Login Page, "My Content" page, "My Profile" page, "Invoice" page, "Affiliate Details" page etc. DAP comes with a "member page" shortcode builder that will allow you to quickly create these member pages. Continue reading for more details on member pages.
3) Enter your login and post-login landing page URL in DAP global configuration (DAP admin >> setup >> config).
4a) Free Product Configuration
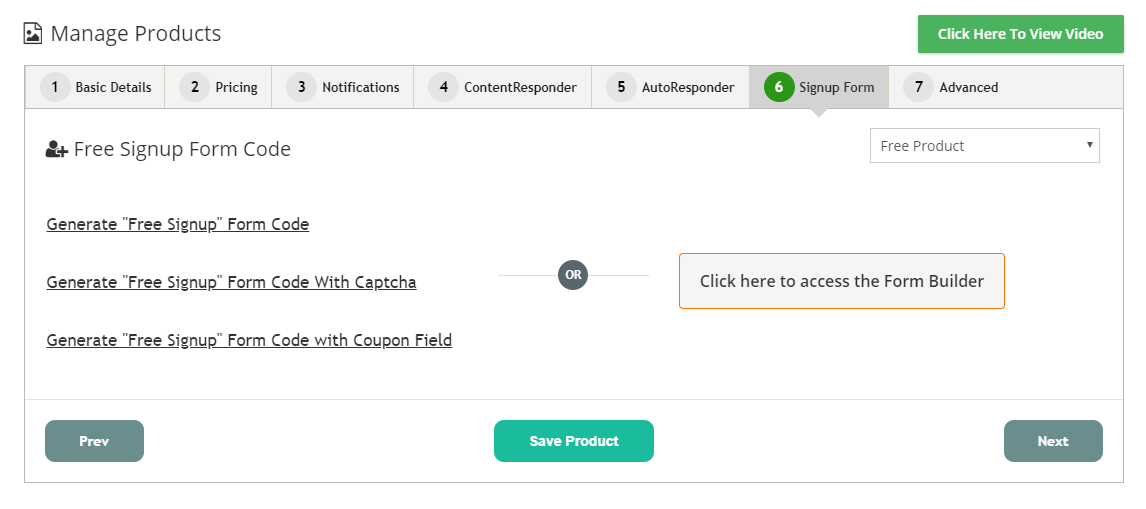
- You can generate a signup form in DAP Products Page >> Signup Form tab
- Use the DAP form builder (DAP Products/Levels >> Create / Manage Forms) to create/customize a registration form.
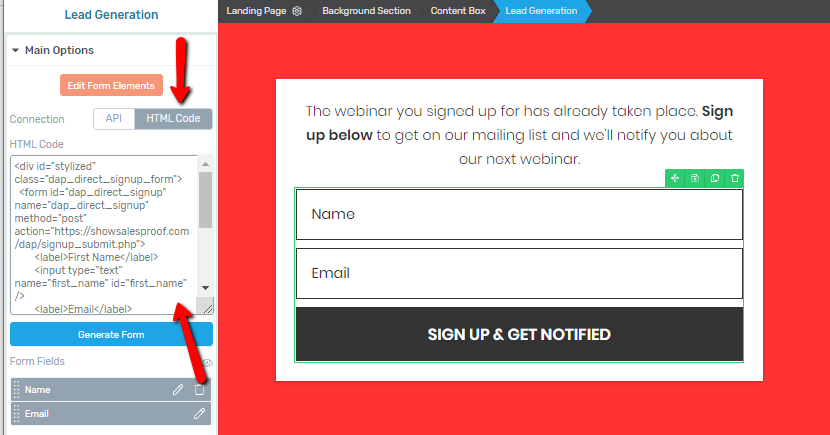
- You can generate your signup form in any external platform such as Thrive Leads, and to integrate it with DAP, just insert the DAP signup form code (that you get from DAP Products Page >> Signup Form tab), in the HTML section of your form plugin / platform.
--Or--
--Or--
4b) Paid Products
You can create payment buttons to sell your products in your shopping cart platform or in payment processor such as Paypal and publish on your sales page.
As long as you integrate it with DAP, upon successful purchase, buyers will automatically get access to the right product in DAP, and DAP will send out the welcome email with login/download credentials that you configure in DAP products page.
For e.g., If you have three products (or "levels") called "Platinum Members", "Gold Members" and "Silver Members" in DAP, then you can generate 3 different buy buttons, one for each product, and publish it on your sales page. When users complete purchase, they'll get access to the right level/product in DAP and can instantly access content.
You can use a shopping cart plugin like SmartPayCart.com (SPC) to create your buy buttons and integrate SPC with Stripe/Authnet (for credit card payment) and/or Paypal.
SPC is a shopping cart plugin made for DAP and integrates better with DAP than any other cart platforms.
5) If it's a paid product, publish the "Buy Button" on your Sales page. If it's a free product, publish the Signup/Opt-in Form on your Registration Page.
That's it!
Product/Membership Level
Everything starts with a product.
If you want to create a free newsletter, create a Product in DAP. You can call it whatever you want. Say you call it "Free Newsletter". Generate a signup form for the free product in DAP and publish it on your opt-in page.
If you want to deliver a free report, create a DAP Product called say "Free Report" and generate/publish a signup form for that product.
If you want to have membership levels, just create a product in DAP. Let's say you call it "Gold Membership". Generate and publish a buy button for that product.
So if you have 3 levels in your membership site called "Platinum Membership", "Gold Membership" and "Silver Membership", then you would create 3 subscription products in DAP by those names, create 3 buy buttons, one for each level, and publish the buttons on your sales page. And under each of those products, you would separately protect all pages, posts, categories or files that should be available to members of each of those levels.
Say you have 9 pages of content and you want your platinum members to get access to all 9, gold members to get access to only 6, and Silver to get access to only 3.
You would go into the "Platinum Membership" product in DAP, go to the "ContentResponder" tab, and move all 9 pages from left to right, and once those 9 pages are protected as part of that product, that means that anyone who is a platinum member would have access to just those 9 pages, and nothing else.
Then you would go into the "Gold Membership" product in DAP, go to the "ContentResponder" tab, and this time, move only 6 of those same pages from left to right, and once those 6 pages are protected as part of that product, that means that anyone who is a gold member would have access to just those 6 pages, and nothing else. And they wouldn't be able to access any pages that are protected as part of OTHER products but NOT this product. So they won't be able to access those 3 extra pages that the Platinum members get access to.
Then you would go into the "Silver Membership" product in DAP, go to the "ContentResponder" tab, and this time, move only 3 pages from left to right, and once those 3 pages are protected as part of that product, that means that anyone who is a gold member would have access to just those 3 pages, and nothing else. And they wouldn't be able to access any pages that are protected as part of OTHER products but NOT this product. So they won't be able to access those 6 extra pages that the Platinum members get access to, or the 3 extra pages that the Gold members get access to.
So each product is a self-contained bucket of information, which defines what content is available to the buyers (or members) of that product.
Remember, in DAP, you can protect the same content under different Products. And as long as a member has access to the content under at least one Product, they will be able to get to it.
So if you have protected a video page under both "Platinum Membership" and "One-Time Bonus" products, and a member has access to both products, and their access to Platinum Membership product has since expired, but their access to One-Time Bonus is still active, then your member can get to the video page via the product where their access is active, even if the same content has expired under a different product.
If you are selling a one-time product called say "My Launch Secrets", then you would create a one-time product in DAP with that name, set up the product, protect content relevant to the product (pages, posts and files) under this product, create a buy button, and publish that button on your sales page.
Now, let's start creating the member pages like login page, member home page, etc.
How to create Member Pages in DAP
Member Page Builder - Watch Video for details
DAP comes with a member page builder that will allow you to quickly and easily create and customize your member pages.
Here are the member-facing pages you can generate in DAP:
Login Page: Membership site is any website that has premium content and requires an account and login to access it. So one of things you're going to need as a membership site owner is a way for your members to login and access the premium content that they have purchased from you.
My Content Page: This page basically shows the logged-in member a list of all the products they have access to, when the access to the product starts and ends, etc. This is also the page that will list all of the content/links that are "dripping" on them, one by one, as and when they drip. The most recently dripped link will show up at the top of the list.
My Profile Page: This page will allow your members to update their profile information such as name, email, password, billing details, other custom fields, etc.
Affiliate Page: DAP comes with a built-in affiliate module. Your affiliates will find their earning, traffic and payment details on this page.
Invoice Page: Your members will find their purchase invoice on this page. They'll find a list of all of their purchase orders and invoice on this page.
Member-Facing Cancellation Page: You can create a member-facing cancellation page to allow your members to self-cancel their subscription. DAP will also allow you to add a pause/resume button if you want to allow your users to pause or resume their subscription themselves.
Steps to Build Member Pages in DAP
Step 1: To get started, visit DAP member pages and click on Create New Member Pages.
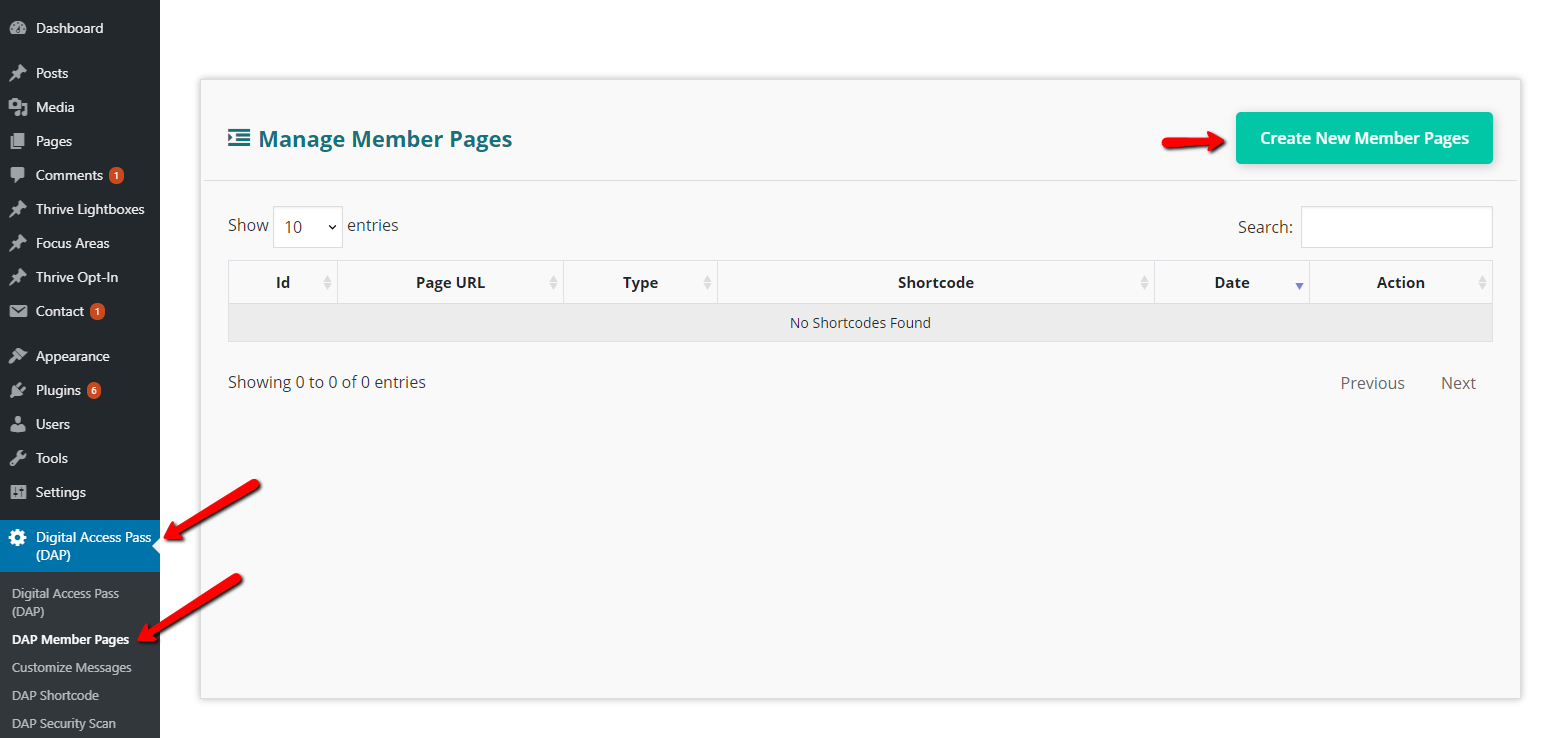 .
. Step 2:
It'll bring up a page like this (see image below).
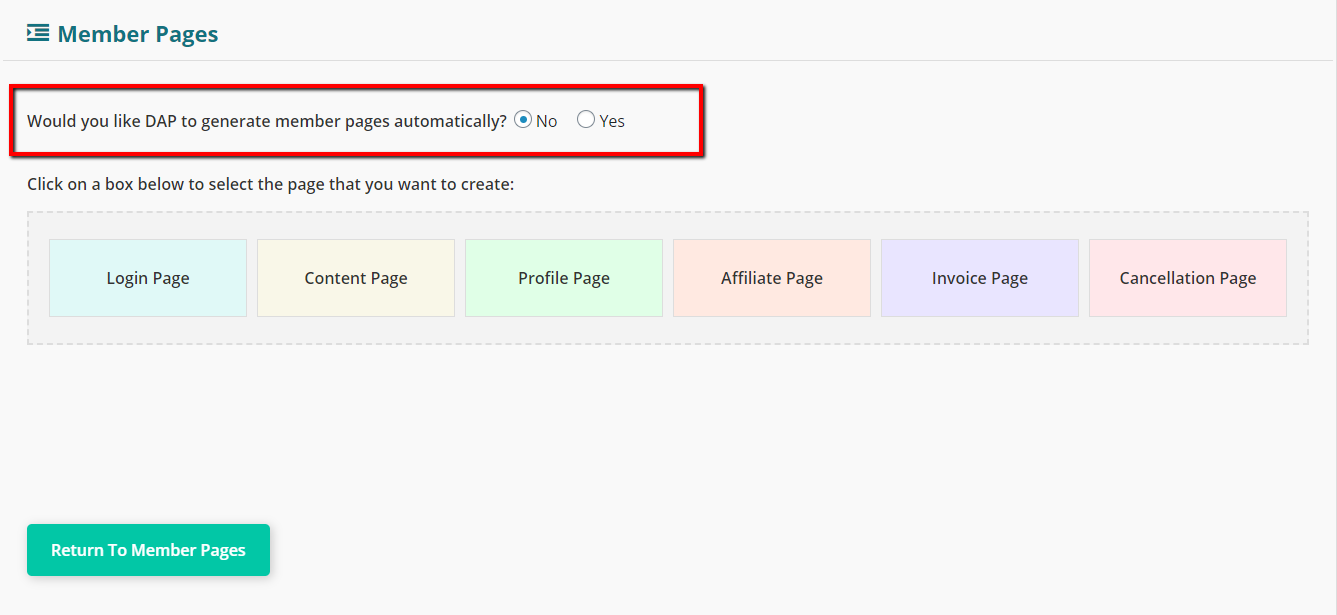 .
.
Step 3: If you want to create these pages one at a time, select the "NO" radio button, click on the right box to generate the page and follow the steps. For more details, please watch the video above.
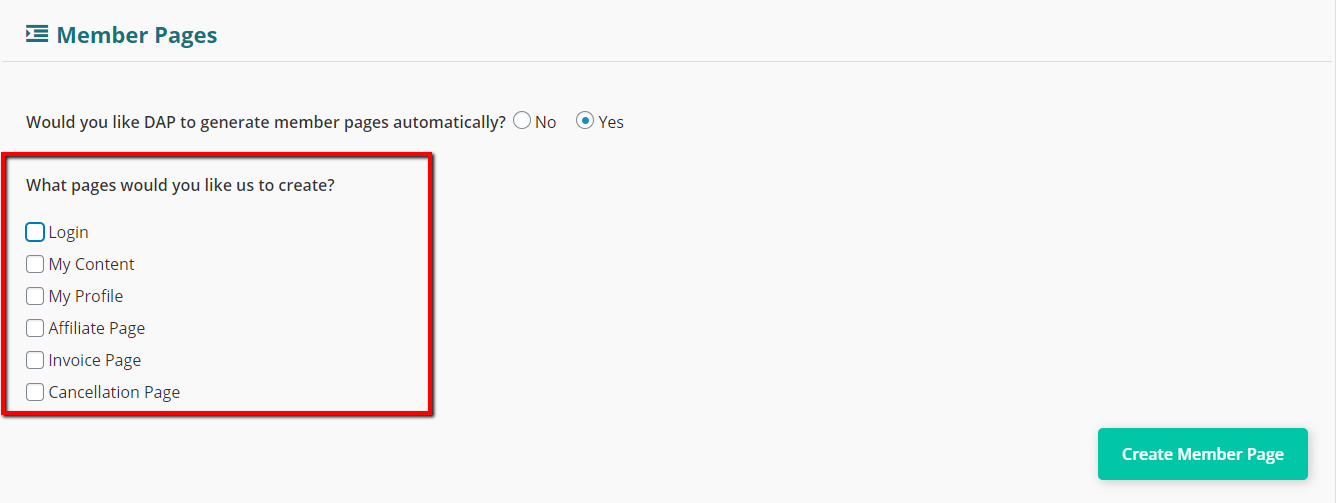
Recommended Option: If you want DAP to automatically generate member pages for you, Click on the "YES" radio button. And follow the steps. This is the easiest way to generate member pages. You can always edit/update the settings after DAP creates the pages for you.
 .
.
Step 4:
Enter the URL of your login page in DAP Admin >> Setup >> Config page >> Access & Navigation section >> Login URL field.
Enter the URL of your post-login landing page in DAP Admin >> Setup >> Config page >> Access & Navigation section >> Post Login URL field.
Creating Your First Product
Creating a One-Time Product
When you're creating your very first product, there are a few extra steps, most of which are a one-time setup because it's the first time you're setting up DAP. Once you complete the one-time setup, starting with the 2nd product, it's going to take you just a minute or two to create each product.
Let's walk through one full product end-to-end so you can understand the full flow.
- Log in to your DAP Dashboard
- Go to Products/Levels > Manage
- It'll bring you to the manage products page. You'll find a list of all your products here.
- When you're just starting out with DAP, you'll find two sample products on this page.
- Select any one product and click on the clone button to create a copy of the product. This will save it as a new product with the word "Copy" at the end of the product name: Example Subscription Product Copy. Now click on the edit button to edit the product.
- You will now be on the General Settings tab of the product.
- Modify Product Name. Eg., Platinum Membership
- Modify Product Description. Eg., Platinum Membership get access to our entire library of Videos
- Upload a product image.
- Select product type as "online course" or "other".
- In the Billing & Access tab, designate product as 'free' or 'paid'. If it's a free product, enter access duration. If it's a paid product, select type as one-time or recurring. Then fill in billing and access details for the product.
- In the Notifications tab, you can configure / customize your double opt-in and welcome email content. You can turn on Double-Optin Email: Subject & Body for your free products. For paid products, you don't need your members to double optin, as they've just purchased this product. You can configure/customize the contents of the Welcome Email. This email will automatically go out to users when an account is created in DAP (via payment or signup). You can send membership login credentials in the welcome email. If double opt-in is turned on, then DAP will first send out the double opt-in email when users sign up and when they complete confirmation, DAP will automatically send out the welcome email.
- You can also integrate DAP with your email platform such as Aweber, ActiveCampaign, Drip, ConvertKit, GetResponse, Mailchimp or even Zapier via the DAP Automation Engine. When users get access to the product in DAP, if you have connected it to an external email platform or zapier via the DAP automation engine, DAP will automatically add users to the configured list in the right email platform. You can access the automation engine from DAP products/levels >> Manage Automation page.
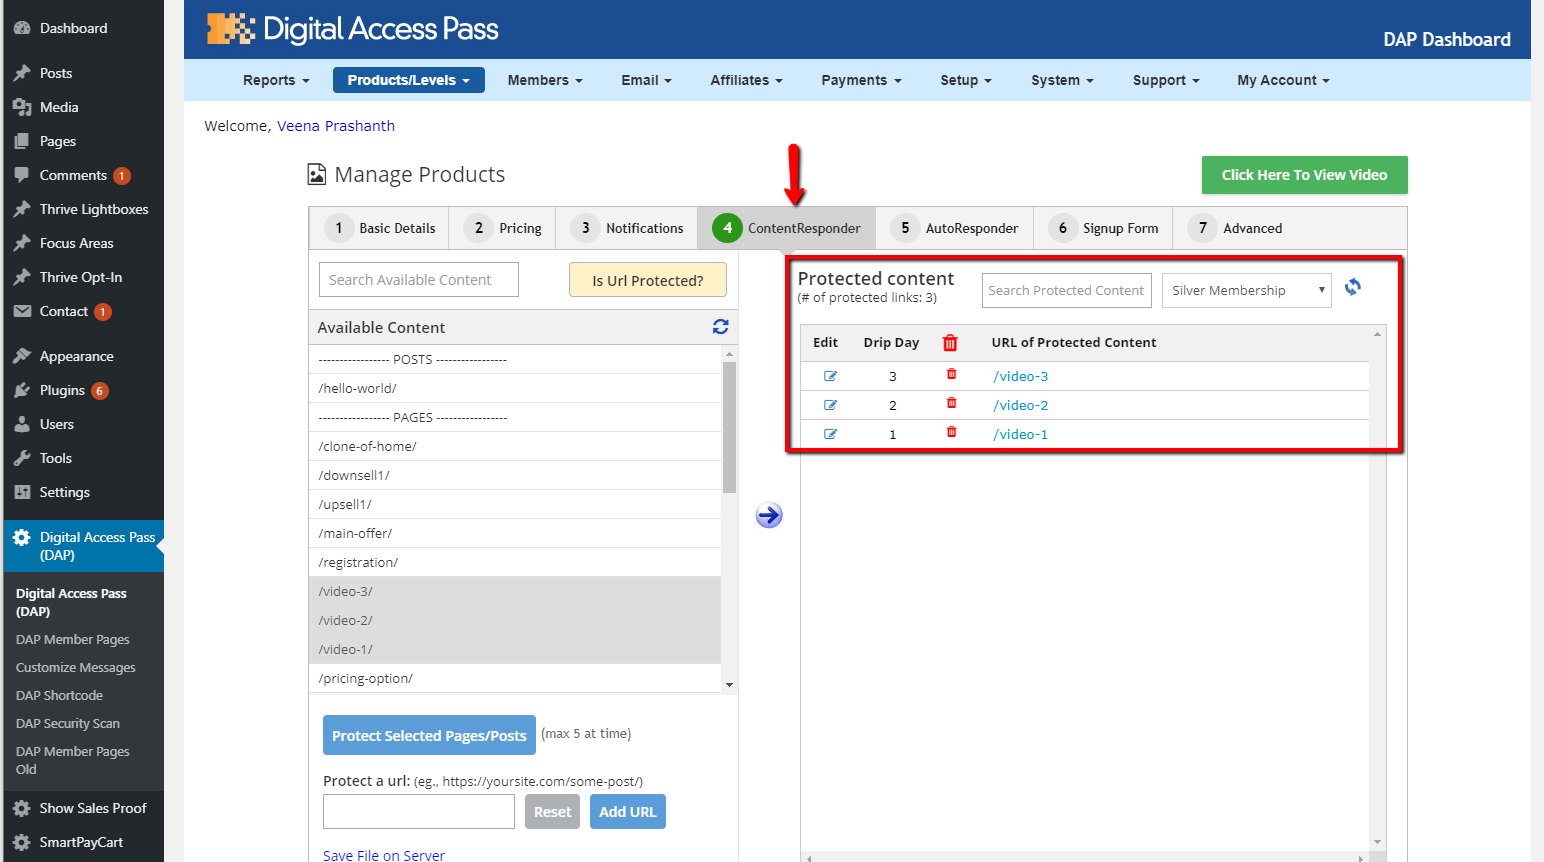
- In the Content Responder tab, you can add content to your product. This is the tab where you specify what content (post, pages, files, etc) is going to be available to those who have purchased (or signed up for) this Product. The left column - Available Content - shows published pages and posts from your WordPress blog. The right column - Protected Content - shows all of the content already "added" to this Product. When content is added to the protected content column, only logged-in members that have purchased the product (or signed up for it) can access the content.
- To see how this works, pick the first blog post from the left by highlighting it, then click on the round, blue "Arrow" image (pointing from left to right) to "Add" the selected post to this Product.
- As soon as you do that, a few moments later, you'll see the post appear in the Protected Content column on the right, as a clickable link. That means, this post is now protected, and is accessible ONLY to users who have purchased this Product (Platinum Membership). To test, click on this newly added link on the right, and that blog post will open up in a new tab in your browser. And you will see the DAP "Lock" image with a message that says Sorry, you don't have access to this content....
- You see the "Sorry..." message only because you as the DAP Admin don't have access to this protected content yet. That is because, you, the DAP Admin, don't have access to the Platinum Membership product yet. So the next thing is to give yourself access to the Product.
- Go to Member > Manage in the DAP Dashboard menu at the top.
TIP: You can open the above Manage link in a new browser tab by doing a "Right-click, Open in new tab" as you hover over that link with your mouse. This is so you can continue to have the Product page open in a new tab, and come back to it quickly. - On the Members > Manage page, you'll see a list of users below in the list of users below. At this time, you will see only 1 user listed - that is yourself, the DAP Admin user. Now we have to give you access to your newly created product, Platinum Membership.
- To do this, first check the checkbox at the beginning of that row. Then look for "Bulk Action" towards the top of the page, select Give Access and select the product. Click on the apply button. That will give you access to the product.
- Now, in the search results below, you'll see that the Admin user now has access to the Platinum Members product. But DAP initially adds you as a FREE user. So on that same row, click on the link that says PAID to make you a paid user, just as if you had just paid yourself and purchased the product. So you, the DAP Admin, now have valid access to this product.
- Go back to the Products/Levels > Manage screen (if you have it open in a separate tab, this is where you will find it useful) and select the Platinum Membership product. Then go to the ContentResponder tab. Now click on the protected link in the right section under Protected Content.
It will open in a new tab, and this time, you won't see the "Lock" image, but instead, you'll see the full content of that post. That's because you now have valid, paid access to the Platinum Members product under which you had protected this post. - At a later time, you can add the rest of your content to this product, by adding the content from left to right, and making it a part of this product. For now, let's see how to set the dripping for this post.
- Now, to the left of the newly protected link (under Protected Content), you will see a small link with the text "edit". Clicking on that will launch the "Drip Settings Popup". And there, you will see that the Start Day # is set to 1 by default. Which means, this content is available to the user from day 1 (the day they purchased this product).
As you add more content to this product, by default, they're all initially set to drip on day 1. But if you want to drip, say, one post per week, then you can click on the "edit" link next to each content, and set the Start Day to be, say, 1, 8, 15, etc. Setting to 8 means that the content will be released to the user only on the 8th day (from the time of their purchasing this product). And until then, if they visit that post or page directly, then they will see the same "Lock" image you saw earlier. - In the Email Autoresponder tab, you can drip out follow up emails. This is the tab where you can create a fully pre-scheduled, Autoresponder series for each product by itself. Similar to the ContentResponder tab, this tab also has two columns: Available Emails on the left, Assigned Emails on the right.
Initially, you'll see just one pre-written autoresponder email in the Available Emails column. And there are two links next to it: add & edit.
Clicking on add will add this email to this Product's autoresponder series, and will set it to go out on day #1 by default. Clicking on edit will take you to a different screen (Email > Autoresponders), where you can edit the subject and body of this particular email, and also create more emails in the system which then you can add to various Products separately.
So you could create one single email called Thank You For Your Purchase on the Email > Autoresponders page, and then go back to the Products page (Products/Levels > Manage), pick any product, go to the Autoresponders tab, and then add this email to that specific product.
Once you have added an email from the Available Emails on the left, to the Assigned Emails on the right, you will see a small edit link next to the email subject on the right. Clicking on that will launch the Email Drip Settings popup, where you can specify on which day this specific email is to be sent to buyers of this product. So if you set an email to go out on Day #7, then it will go out to the buyers of this Product (say, Platinum Members), on the 7th day after they've purchased that product or level (TIP: the day of their joining is day #1). If you use an external email platform, you can skip this tab and configure emails directly in your email platform. - That's it. In the Payments / Signup Form tab, you will find your product summary and next steps. Enter the following details.
=> Sales Page URL: Enter https://YourSite.com/ for now (of course, replace "YourSite.com" with your actual domain name). You can change it later to point to your actual sales page where your buy button is going to be for this product
=> Error Page URL: Skip for now
=> Post-Login URL: Enter the URL of the Member Home Page (MHP) we created earlier. It should look something like https://YourSite.com/member-home/
=> Product Status: Active
We've now completed the Product setup (for the most part). It's time to create a buy button for this product, and put it on your sales page, so that people can start buying the product (or, "subscribing" to this "level").
Creating The Buy Button
You can create payment buttons to sell your products in your shopping cart platform or in payment processor such as Paypal and publish on your sales page.
As long as you integrate it with DAP, upon successful purchase, buyers will automatically get access to the right product in DAP, and DAP will send out the welcome email with login/download credentials that you configure in DAP products page.
For e.g., If you have three products (or "levels") called "Platinum Members", "Gold Members" and "Silver Members" in DAP, then you can generate 3 different buy buttons, one for each product, and publish it on your sales page. When users complete purchase, they'll get access to the right level/product in DAP and can instantly access content.
You can use a shopping cart plugin such as SmartPayCart.com (SPC) to create your buy buttons and integrate SPC with Stripe/Authnet (for credit card payment) and/or Paypal. SPC is a shopping cart plugin made for DAP and integrates better with DAP than any other cart platforms.
Publish the "Buy Button" on your Sales page.
That's it!
Conclusion
And that's basically it for this guide.
The goal of this guide was to quickly help you create your first Product, setup content protection and dripping, give you a quick overview of the Members page (on how to give yourself access to the Products you create as DAP Admin), showed you how to put that buy button code on your sales page, complete a test purchase, and arrive at the member's home page.
If you want the full documentation, see the menu to your left.
We would love to hear from you what you thought about this Quick Start Guide, and how we can improve not only DigitalAccessPass, but also our videos and documentation. So feel free to open a support ticket to let us know.