Using DAP to protect multiple blogs on a single site/domain
Protecting multiple blogs on 1 domain
DAP needs to be installed to the root of your website and not inside a subfolder.
So if you have a domain called yoursite.com, and if you installed dap correctly, you should be able to access dap login page via http://yoursite.com/dap in a browser.
To protect multiple blogs on the same domain, you just need to install and activate the DAP live links plugin in each of the blog (under wp-content/plugins folder).
When you activate the dap live links plugin in more than 1 blog, it will throw a warning about DAP already installed/activated. Ignore that warning about dap already installed.
Two things to note:
1) The list of available blog posts and pages that you see on the DAP Products page will only show the list from the last blog that was most recently updated. So if you just updated Blog A, and go into the Products page, DAP will show the list of all available pages & posts from Blog A. So if you want to protect Blog B content, then simply go into Blog B’s WP admin, edit and update any page or post (no need to make any changes, just a forced update of any post will do), and then when you go back to the DAP Products page, you will see the list now from Blog B.
DAP will still protect both blogs but whats displayed in dap admin panel -> products page depends on the blog last updated.
2) Make sure you think about what happens when DAP/WP sync is turned on. DAP could be syncing users to 2 different forums/wp databases based on which blog the user is on. If the user logs in to DAP, and accesses blog1, dap will sync the user to blog1. If the user logs in to DAP, and accesses blog2, dap will sync the user to blog2. The user will have 1 account in the dap database but the user account will be created in both WP databases (blog1/blog2).
So other than a few simple logistical issues to think about, DAP can very well support additional blogs on which installed. Just be sure to add the LiveLinks plugin to each new blog that you want DAP to support.
Troubleshooting Login Issues
1. “You are already logged in… click here to continue”
Q: When users log in, they aren’t redirected to the page that I have set either in the global or the product settings. They remain on the login form and see the message “You are already logged in… click here to continue”. And when they click the link, then they are redirected to the correct page. How can I avoid showing my users this message?
A: Make sure you enter the your actual login page’s URL (where you have the login form) into DAP Admin > Setup > Config > “Login URL” field. Save changes. Then in a different browser, visit your log out link by going to http://YourSite.com/dap/logout.php (even if you aren’t already logged in) which would then reload all Config changes, and the next time you or your users log in, they won’t see that message, and will go directly to your member’s home page (or “Post-Login URL” as per global or product settings).
2. You are unable to log in as DAP Admin (OR)
You don’t remember your DAP Admin Email/Password
Starting DAP v4.3.1, if you log in to the WordPress Admin panel on your site, you’ll also be logged in automatically as DAP Admin. And when you click on the “Digital Access Pass” link towards the bottom-left part of your screen in the WP Admin panel, you’ll be taken to the DAP Admin Home Page.
So this is for those of you who haven’t upgraded to 4.3.1 yet, or for some reason, you’re locked out of DAP Admin. So keep reading…
Your DAP Admin Email/Password is NOT THE SAME as your WP admin Username/Password. Make sure you use the right DAP admin email Id/Password to access DAP admin panel.
a) If you do not remember what your DAP Admin Password is, then you can find it by putting in your DAP admin email and clicking on the “Forgot Password” link in the login form at…
http://YourSite.com/dap/login.php .
And then DAP will email you the right password for that email id.
b) If you do not remember what your DAP Admin Email id is, go to WP Admin -> Settings -> General -> E-mail address . Try the email address there and do a “Forgot Password” with that.
c) If even that doesn’t work, then login to your Webhost Control Panel ; Go to the phpMyAdmin icon to access your dap/WP database, look for the dap_users table, “browse” through the data, and you will find the dap admin id/password there with the account_type of “A” (for Admin).
3. Login Page Shows 404 / Page Not Found Error
If you get a 404 page or an incorrect login page when you click on the DigitalAccessPass link in the WP admin panel menu, then do this:
Login to your DAP admin dashboard outside of WP (if you are unable to login from within your WP admin panel), by going to:
http://yoursite.com/dap/login.php
(Note: replace yoursite.com with the name of your site).
After logging in, check this setting in Setup -> Config -> Advanced category to make sure it is pointing to the right page:
Location of your login page (eg., if using WordPress). Should start with a forward slash (`/`)
You can change the login page to /dap/login.php (default dap login page).
Or you may create a custom login page and set the URL of that custom login page in the ‘Location of your login page’
When you click on the DigitalAccessPass link in the left sidebar of your WP admin panel, the page that shows up is the page configured here: ‘Location of your login page’
So if you set ‘Location of your login page’ to say /login but if there is no such page (http://yoursite.com/login), then the result will be a 404 error. So make sure you set ‘Location of your login page’ (under Setup -> Config -> Advanced) correctly.
NOTE: Admin will always be redirected to dap admin panel upon login. The users will be redirected to whatever the product-level login redirect is set to in DAP products page (or global login redirect under dap Setup->Config->Advance->’URL to which the user is redirected to upon login’ if no product level login redirect is set).
To customize the login page or to customize members area page, see –
http://www.digitalaccesspass.com/doc/creating-a-login-page-within-wordpress/
-and-
http://www.digitalaccesspass.com/doc/creating-member-affiliate-sections-within-wordpress/
E-Junkie Integration
Customer Flow
- Buyer comes to your web site and clicks on your buy button and is taken to e-junkie to checkout
- Buyer finishes paying, and then they are redirected to a static page on your site that says something to the effect of “Thank you for your purchase. Please check your email id that you just used during purchase, for information about how to login and access the product you just purchased.”
- While this is happening, in the background, e-junkie would’ve already notified DAP via their back-end notification process called “Common Notification”, and DAP would’ve already created an account for the buyer, and emailed the buyer the login details.
- Buyer checks their email id, and they see the email from you giving them their login details.
- They login to your site using that information.
That’s the big picture. Now for the specifics on how to integrate DAP & e-Junkie.
E-Junkie Integration with DAP
1) Create a product in DAP that you want to be able to sell via e-junkie
2) Create a product in e-junkie with exactly the same name as the DAP Product name, and create a buy button for it.
3) Go to the e-junkie Seller Admin > Edit Account Preferences > Common Notification URL field
Set it to point to…
http://yoursite.com/dap/dap-ejunkie.php
(replace yoursite.com with the name of your site)
4) Go back to DAP Setup -> config -> payment processing section.
Look for these config items:
Merchant’s Payment Gateway API Login ID
Merchant’s Payment Gateway Transaction Key
And set these to match your ejunkie merchant login Id and password. This is needed for security validation.
That’s it!
Go ahead and test your purchase and see if it makes it to DAP Payment/Coupons => Orders page and if the users get added.
Affiliate Program Overview
Overview
DAP’s built-in affiliate module makes every one of your members an affiliate by default.
You can have 1-tier or 2-tiers of commissions. Up to you.
If a user has an account in DAP (on your site), it means they have a User Id in the system, which means they are also instant and automatic affiliates – regardless of whether you actually choose to show them their affiliate link or not, regardless of whether you have set up commissions for products or not.
Now obviously, if you have not setup commissions for your Products, and are not showing them the affiliate details page, maybe because you’re not using DAP as your affiliate program manager, then of course they won’t get to see their affiliate link, which means they won’t be promoting your DAP affiliate link.
If you want to show them their affiliate link and other affiliate stats, then you simply need to create a “Affiliate Info” page (merge tags available).
If your site is YourSite.com , and if your member’s user id is 123, then their default affiliate link is:
http://YourSite.com/dap/a/?a=123
So basically, their user id (123) is also their affiliate id.
If you’re the DAP Admin, then your user id is probably 1. In which case, your own affiliate id for your site would then be:
http://YourSite.com/dap/a/?a=1
Affiliate Link With Custom Landing Page
If your affiliate (say, id #123) wishes to link to a specific page on your site, then this is what the link would look like:
http://YourSite.com/dap/a/?a=123&p=/custom-landing-page
Which is the same as…
http://YourSite.com/dap/a/?a=123&p=http://YourSite.com/custom-landing-page
Both of them will set the affiliate cookie for affiliate id #123, and then redirect the visitor to the landing page URL custom-landing-page, which is basically the same as http://YourSite.com/custom-landing-page
How The DAP Affiliate Program Works
- You first set up the commissions for each product on the Affiliates > Commissions page in your DAP Admin Dashboard.
- Your affiliate takes their affiliate link http://YourSite.com/dap/a/?a=123 and promotes it on their blog, web site, FaceBook, Twitter, etc.
- When prospect/visitor clicks on their affiliate link and arrives at your web site, a cookie gets set on the prospect’s computer with the affiliate’s id (123 in this example).
- The user then goes on to purchase a product from your web site.
- Immediately after purchase, they are redirected to the member’s area.
- At this time, the affiliate is instantly given credit for the new member referral. Please note that at this time, the only thing that is recorded by DAP, is that new member with user id 456 has been referred by affiliate 123. And if you have set up a “Pay Per Lead” commission, then it is instantly credited to the affiliate’s account. So if you had set up a “Pay Per Lead” of $1 per lead, then a sum of $1 is credited to affiliate 123’s account at this time.
- If the affiliate were to log in to their account at this time, they will only see the credit for the “Lead” and not (yet) for the Sale.
- Within an hour of the purchase, the DAP hourly cron job will run as usual (it runs at the top of every hour, 24 times a day).
- When this hourly cron job runs, it will carefully comb through all purchases made recently, for which there is a recorded affiliate, go and see what kind of commissions have been set up for this product, see if there are any special overrides for the referring affiliate, identify the right commission (Pay-per-sale fixed or Pay-per-sale percentage), and then at that time, the referring affiliate’s account will be “credited” with the actual commission for the sale, if any. So if the purchase was for $100, and you have set up a “Pay-Per-Sale” commission of 33%, then $33 is “credited” to the referring affiliate’s account.
- So if the affiliate were to view their affiliate info page, then they will see an new credit of $33 in their account.
Lifetime Affiliates
Once an affiliate is “tied” to a member’s account, that association is forever. And the member now forever belongs to this affiliate. So any future purchases made by this same member (using same account) will always result in commissions being credited to the same original affiliate, regardless of which other affiliate’s id they click on before making a purchase. See example below.
- Affiliate John refers customer Mary
- Mary buys, John gets affiliate commission
- A while (days, months or years) later, Mary clicks on a different affiliate link belonging to Paul
- Mary buys another product from your web site using the same email id as before
- John will still get the commission for the new product that Mary just bought, because John is the lifetime affiliate for Mary.
- So no matter how many times Mary makes a purchase, regardless of which affiliate link she used (even her own), John will get the commission every time, for life.
We have plenty more documentation available about our affiliate program. Check it out here: https://digitalaccesspass.com/doc/category/affiliates/
Infusionsoft Integration
Currently the integration between Infusionsoft and DAP is one-way. It’s from Infusionsoft=>DAP.
The good news is… in the upcoming release of DAP (4.6), we have completed 2-way integration with Infusionsoft. So you can do both DAP=>Infusionsoft as well as Infusionsoft=>DAP
1) Infusionsoft=>DAP – FREE Registration
When a user opts in to the Infusionsoft list, you can set up http post notification/action trigger in Infusionsoft to automatically add user to the DAP product.
See this document on how to setup this integration.
2) Infusionsoft=>DAP – PAID Registration
When a user makes a purchase via Infusionsoft Order Form or Shopping Cart, you can set up http post notification/action trigger in Infusionsoft to automatically add user to the DAP product.
See this document on how to setup this integration.
3) DAP=>Infusionsoft- FREE Registration
When a user opts in via the DAP FREE signup form, you can set up ‘plugin notification’ in DAP Products=>Notifications tab to automatically add users to an Infusionsoft compaign/group.
See this document on how to setup this integration.
4) DAP=>Infusionsoft – PAID Registration
When a user makes a purchase via say the DAP Shopping Cart or Paypal or Clickbank or any other DAP integrated payment processors, you can set up ‘plugin notification’ in DAP Products=>Notifications tab to automatically add users to an Infusionsoft compaign/group.
If you use Infusionsoft to sell or to get users to register to your list, the users will get added to DAP. But even if you sell products using other shopping carts/ payment processors (like Paypal, Clickbank etc), you can get those users to make it to Infusionsoft via DAP.
Paypal/CB/DAP Cart => DAP => Infusionsoft
See this document on how to setup this integration.
DAP Shopping Cart And Upsell Tree Plugin Summary
DAP Shopping Cart / DAP Upsell Tree Plugins
DAP offers a 1-click upsell shopping cart that integrates with Paypal Website Payments Pro and Authorize.net and an upsell plugin that integrates with Paypal Standard.
1) Paypal Standard Upsell Tree Plugin
2) Paypal Payments Pro Upsell Tree Plugin / DAP shopping cart
3) Authorize.net Upsell Tree Plugin / DAP shopping cart
Note:
1) You can offer any number of upsells.
2) You do not have to offer upsell to use the DAP shopping cart. You can use it even if there are no upsells.
3) Your buyers do not leave your site. They complete the payment on your site if you use the DAP shopping cart/upsell plugin for Paypal Payments Pro or Authnet.
You must have SSL / https (for security) enabled on your web site to use any of the above plugins. Ask your web host to enable SSL for your site.
The following applies if you use the DAP upsell plugin for Paypal Standard:
Your users need to have a Paypal Account to purchase (no CC option) and anything that involves recurring payments (whether it is free trials + recurring , or recurring from day 1) wont work if you offer it as part of an Upsell. Anything recurring *must* be the very first product they add to their purchase again all of this is applicable only if youre using the Upsell-Tree Plugin for Paypal Standard. These are Paypal API limitations. But if you just want your users to buy a single recurring product then upsell other one-time products as the upsells, then the Paypal Standard Plugin will work great. If you do not offer any upsells and just have a Paypal Standard account, then the best option is to use either the DAP generated Paypal buttons (described above) or the Paypal hosted buttons (described above).
===============
If you use your own merchant account like Authorize.net or
Paypal Website Payments Pro, then none of the above applies in which case you can do recurring products during any part of your purchase flow (first product, or as part of the upsell).
For example:
Step 1: Add Product 1 to cart (can be recurring or 1-time product)
Step 2: Order Page
Step 3: Add/Decline Upsell Product 2 (must be a one-time product for Paypal standard, can be a recurring or one-time product for paypal payments pro)
Step 4: Add/Decline Upsell Product 3 (can be a one-time product for Paypal standard, can be a recurring or one-time product for paypal payments pro)
Step 5: Thank You Page
In the button code that you generate in the DAP products page, you will see something like this:
input type=”hidden” name=”payment_succ_page” value=”https://www.yoursite.com/dap/continue.php?url=/dap/upsell1.html”
Here url = /dap/upsell1.html tells dap where to return the customers after they complete the paypal payment.
If you do not offer upsells, just change this line in the form code as shown below so it will take the users to a thankyou page after they complete payment.
input type=”hidden” name=”payment_succ_page” value=”https://<strong>yoursite.com</strong>/thankyou”
Create a WP page called thankyou (URL = https://yoursite.com/thankyou) so the customers can be returned to that page upon successful payment.
Here yoursite.com should be replaced by the name of your site.
The DAP cart is not a multi-product cart at this time. It is more geared towards people purchasing single products at a time like a membership product or a one-off info product. You could however use Upsells even now, to give them further options to buy.
Integrating DAP with Paypal Standard
This doc applies to Paypal Standard only.
(Click here for integration with Paypal Website Payments Pro)
You do not have to log in to your Paypal account to generate your buy buttons. You can do it from within the DAP Admin Dashboard.
1) Enabling Instant Payment Notification (IPN) within your Paypal account.
a) Log in to your Paypal account and click on the “Profile” link in the menu, then on the next page, click “My selling tools.”
b) Under “Getting paid and managing risk” section, click “Update” beside “Instant payment notifications”
c) If IPN is already enabled, and you already have a URL in that field, then skip ahead to Step 2.
Else, if IPN is not already enabled, then click on “Choose IPN Settings”
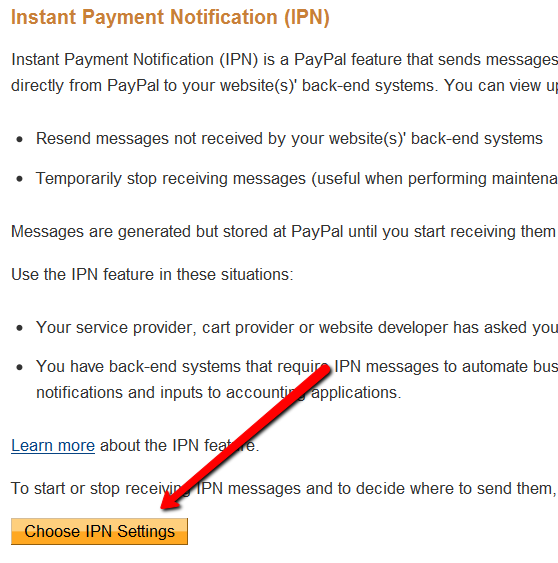
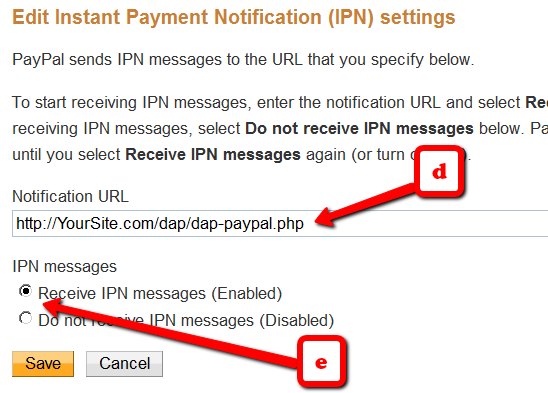
d) On the next screen, in the Notification URL field, enter…
http://YourSite.com/dap/dap-paypal.php
Don’t forget to replace “YourSite.com” with your actual web site’s domain name.
e) Make sure “Receive IPN Messages” is selected.
f) Click on “Save”.
2) Enable “Auto-Return” and “Payment Data Transfer”
- Log in to your Paypal account.
- Go to Profile.
- Click on Website Payment Preferences
- Turn Auto Return to On (see image below)
- Set Return URL to http://YourSite.com/dap/dap-thankyou.php
- Scroll down further to the Payment Data Transfer (optional) section
- Set Payment Data Transfer to On
- Scroll all the way to the bottom of the page, and then Save the changes.
- Now come back to this same page just like you did before (Profile > Website Payment Preferences)
- This time, simply scroll down to the Payment Data Transfer (optional) section
- Now you will see a long, ugly string of text next to the Identity Token field (see image below). Copy that string.
- Go back to DAP Dashboard > Setup > Config > Payment Processing > Paypal Identity Token field, and enter this string there, and save it.
3) Config settings
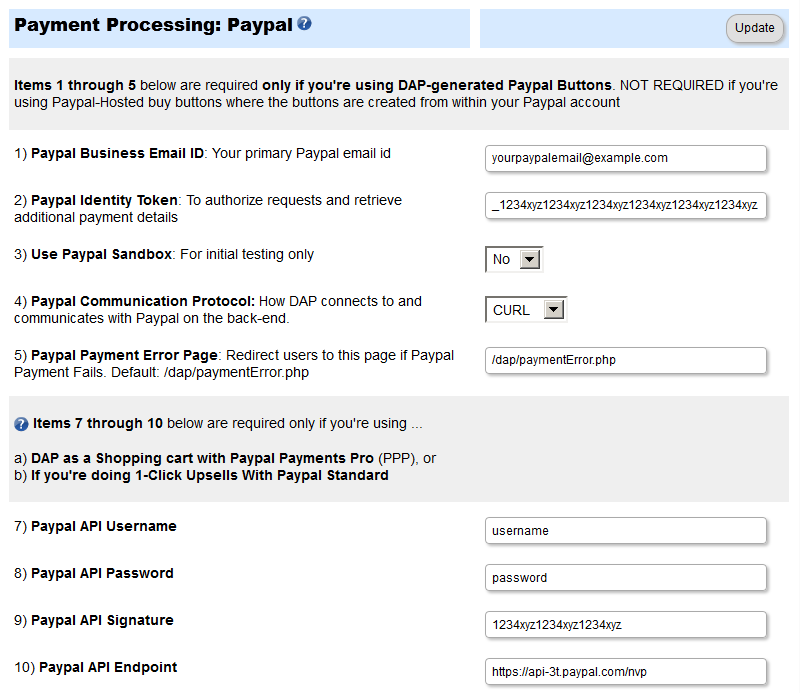
Go to “Setup > Config“.
Click on the Paypal link in the sub-menu at the top.
The current page will then skip to the “Payment Processing: Paypal” section about half-way down the page.
Fill out items 1 through 5 only.
(items 7-10 are required only if you’re using Paypal Website Payments Pro, or doing Upsells with Paypal Standard)
4) Generate Buy Button from within DAP
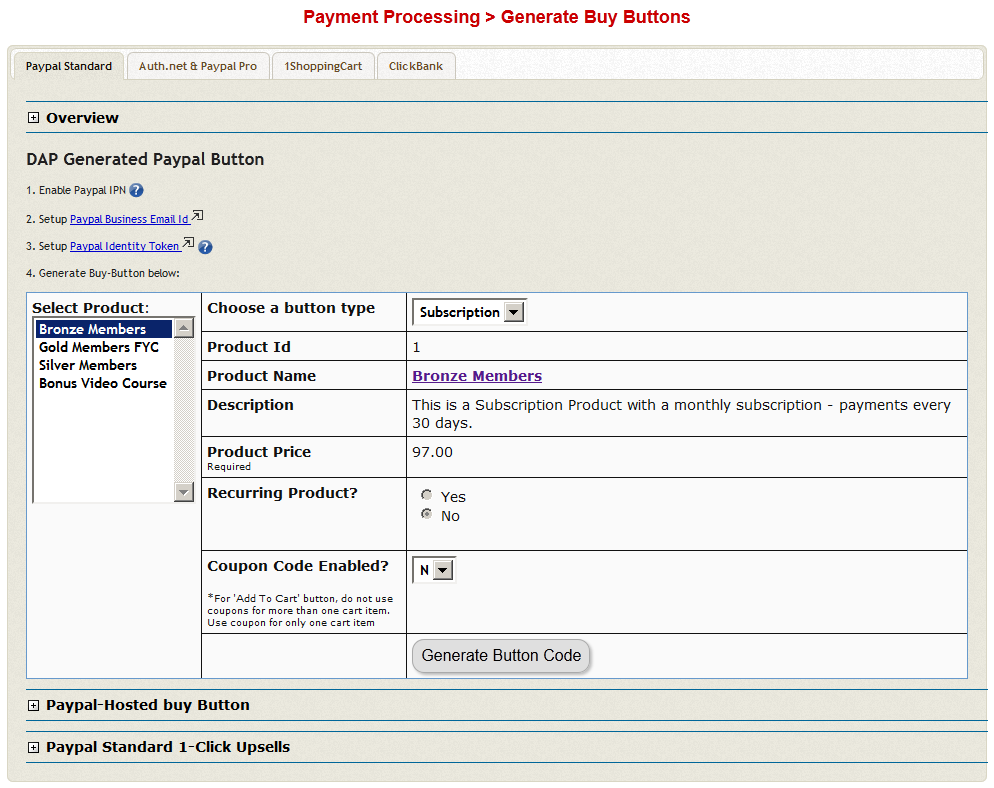
On the main DAP Admin menu, go to Payment Processing > Generate Buy Buttons page, then switch to Paypal Standard tab
Choose product for which you wish to generate the buy button, and then click on “Generate Button Code” button.
5) Publish generated buy-button code on your Sales page.
That’s it!
Sales Flow
Here’s how the flow works now:
- Prospect clicks on buy-button your sales page and is taken to a Paypal checkout page at Paypal.com
- They purchase your product and complete the payment
- They are initially redirected to the “Auto Return” url from Step 2 above
- DAP captures customer email, name, product name, etc
- DAP creates member account for buyer on your system, and gives them access to the product, will send out the Welcome-Email from the product page, etc
- It auto-logs them in to your membership site – no need for member to wait for Welcome email just to get their login information (that email is sent anyway, and will be waiting for them in their inbox)
- DAP now needs to know where to redirect the user to.
a) If Product-level Logged-In URL is set in DAP for this Product that they just purchased, then it redirects them to that URL
b) If no Product-level Logged-In URL is set, OR if the buyer has access to more than 1 product (if they had previously purchased another one of your products, for example), then it uses the Global “Logged-In URL” setting from: Setup > Config > Advanced > URL to which user is redirected to right after login
2) DAP Generated Buttons For Paypal
With DAP 4.0, we have added support for DAP generated buttons for Paypal. You no longer have to generate buttons within Paypal.
Paypal Integration Summary
DAP supports 3 different types of Paypal Integration.
1) Paypal Hosted Buttons
2) DAP Generated Buttons For Paypal
3) DAP Shopping Cart with Upsells
Let’s get into more details about each one of them.
[s3mv]DAP-Paypal-Integration-Overview.mp4,640,350,false,false[/s3mv]1) Paypal Hosted Buttons
You generate the button within your Paypal account.
Click Here to find instructions to integrate DAP and Paypal Hosted Buttons.
If the integration is not working, Click Here to find troubleshooting instructions.
Note: you only need to set the following config items for Paypal hosted buttons.
a) If you want to use Paypal Sandbox for testing, then set the following to “Y”.
DAP Setup -> Config -> Paypal -> Use Paypal Sandbox: For initial testing only
If you want to connect to your Paypal live account, then set it to “No”.
b) If your site has trouble connecting to Paypal via CURL and you see this error in DAP orders page => Check Product and Price(Reprocessible), then update the config below to FOPEN.
DAP Setup -> Config -> Paypal -> 4) Paypal Communication Protocol: How DAP connects to and communicates with Paypal on the back-end.
That’s it.
The following config items are NOT needed if you use the Paypal hosted buttons.
Paypal API Username – Only needed if you use the DAP upsell tree plugins for Paypal Payments Pro or Paypal Standard.
Paypal API Password – Only needed if you use the DAP upsell tree plugins for Paypal Payments Pro or Paypal Standard.
Paypal API Signature – Only needed if you use the DAP upsell tree plugins for Paypal Payments Pro or Paypal Standard.
Paypal API Endpoint – Only needed if you use the DAP upsell tree plugins for Paypal Payments Pro or Paypal Standard.
Paypal Business Email ID – Only needed if you use the DAP generated button for Paypal (DAP Payments/Coupons -> Generate paypal button)
Merchant Payment Gateway API Login ID: Only needed if you use e-junkie or the DAP upsell tree plugin for Authorize.net
Merchant Payment Gateway Transaction Key: Only needed if you use e-junkie or the DAP upsell tree plugin for Authorize.net
The following fields in the DAP Products page ONLY need to be set if you use DAP upsell tree plugin or the DAP generated button for Paypal.
Recurring Count, Trial Amount and Product Price
If you are using regular paypal button, you can leave these empty. Even if these are not-empty, DAP will not use it for regular paypal hosted buttons.
2) DAP Generated Buttons For Paypal
With DAP 4.0, we have added support for DAP generated buttons for Paypal. You no longer have to generate buttons within Paypal.
You can generate the button for Paypal from within your DAP Admin Panel -> Payment Processing -> Generate Paypal Button page.
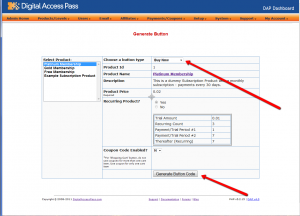
Click Here to find instructions to integrate the DAP generated button with Paypal.
3) DAP Shopping Cart / DAP Upsell Tree Plugins
1) Paypal Standard Upsell Tree Plugin
2) Paypal Payments Pro Upsell Tree Plugin / DAP shopping cart
Click Here for details.
DAP Shortcodes
DAP has a feature called “DAP Shortcodes” that allows you to do partial or in-page content protection.
(RELATED: If you are looking for merge tags to place into WordPress posts, then see Merge Tags for WordPress. For email-related merge tags, see Merge Tags for Email).
So if you had a blog post or page with 3 paragraphs of text and a video, you can protect just the video from certain groups of viewers, and leave the text portions open for anyone to read.
And you can…
a) Replace the text that is enclosed by the short codes with an error message.
So entering this in to your page/post’s body…
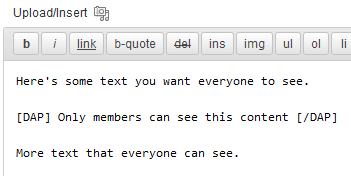
… then becomes this…
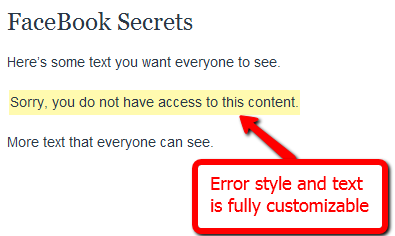
You can fully customize the style and text of the error message.
Or…
b) You can make the private text completely disappear from the page
By adding an additional parameter to the shortcode, you can make the error message completely disappear.
So this…
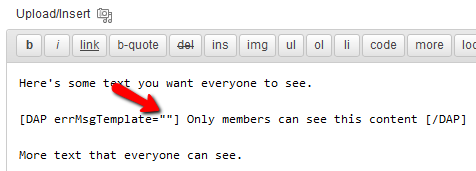
…is seen like this by the visitor…
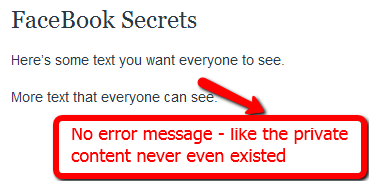
No error message at all – like that section of content never even existed, and no errors or warnings shown either.
Teaser On Steroids
The DAP Shortcodes may be used to quickly protect content that you don’t necessarily wish to create a DAP Product for.
So if you don’t care about dripping some content, but just wish to protect it from say, non-members, or make it available only to certain “levels”, then you can do it by using the DAP Shortcode, and not have to worry about adding it to any particular level first.
These Shortcodes may or may not be used within content that is already protected as part of a DAP Product. Totally up to you.
Shortcode Summary
This section just lists all of the available shortcodes so you can quickly see everything in one glance. Details about each shortcode is available in the next section below.
Basic DAP Shortcode
[DAP]...private content...[/DAP]
Expanded DAP Shortcode Options
[DAP]...private...[/DAP]
[DAP hasAccessTo="1" errMsgTemplate=""]...private...[/DAP]
[DAP hasAccessTo="1,2,3" errMsgTemplate="SHORT"]...private...[/DAP]
[DAP hasAccessTo="1" errMsgTemplate="SHORT"]...private...[/DAP]
[DAP hasAccessTo="1,2,3" errMsgTemplate="LONG"]...private...[/DAP]
Member-Specific Content
[DAP userId="144"]protected content[/DAP]
In-Page Dripping
[DAP startday="1" endday="9999" hasAccessTo="1"]Video 1 Embed Code[/DAP]
[DAP startday="2" endday="9999" hasAccessTo="1"]Video 2 Embed Code[/DAP]
[DAP startday="3" endday="9999" hasAccessTo="1"]Video 3 Embed Code[/DAP]
If you don’t include endday in your shortcode, then the default value for endday is taken as 9999 – which means forever access.
Hiding Content From Logged-In Members
(a.k.a showing content only to visitors)
[DAP isLoggedIn="N"]....content to show only to NON-members... [/DAP]
Showing Different Content To Visitors -vs- Members
Use both codes as shown below (one following the other):
[DAP isLoggedIn="N"]....sales page content shown only to visitors (and members who have not yet logged in)...[/DAP][DAP isLoggedIn="Y"]...member content that will replace sales content shown only to logged-in members...[/DAP]
publicUntil
[DAP publicUntil="2012-12-31" hasAccessTo="1"]This message will be completely public UNTIL (and including) December 31st, 2012 after which it will be protected as part of product 1[/DAP]
publicAfter
[DAP publicAfter="2012-01-01" hasAccessTo="1"]This message will be completely public AFTER (and including) January 1st, 2012 until which time it will be protected as part of product 1[/DAP]
hasNoAccessTo
[DAP hasAccessTo="2" hasNoAccessTo="1,3" ]This message will appear only to active users of product 2 but only for those who DO NOT also have access to products 1 or 3[/DAP]
startday / endday
[DAP hasAccessTo="2" startday="1" endday="1"]This message will appear to you only to users of Product 2, on Day 1 and no further[/DAP]
startdate / enddate
[DAP hasAccessTo="2" startdate="2012-01-01" enddate="2012-01-31"]This message will appear to you only to users of Product 2, between the dates of Jan 1st, 2012 and Jan 31st, 2012 - and no further[/DAP]
Negative Days
[DAP hasAccessTo="2" startDay="-6" endDay="-3"]Howdy[/DAP]
Error Message From File
[DAP hasAccessTo="2" startday="1" endday="1" errMsgTemplate="file:http://YourSite.com/customMessage.html"]This message will appear to you only today[/DAP]
[DAPUserLinks]
[DAPUserLinks showProductName="Y" showAccessStartDate="Y" showAccessEndDate="Y" showDescription="Y" showLinks="Y" orderOfLinks="NEWESTFIRST" howManyLinks="10000" errMsgTemplate="SHORT" productId="ALL" dateFormat="YYYY-MM-DD" showproductcount="Y"]
orderOfLinks
orderOfLinks can have one of two values…
NEWESTFIRST will drip newly dripped links at the top. So day 7 link will be above day 1 link.
OLDESTFIRST will drip newly dripped links towards the bottom. So day 1 link will be above day 7 link.
showproductcount=”N” will disable the heading “You have access to X products” at the top of the “My Content” section.
So, here’s another version of the DAPUserLinks shortcode:
[DAPUserLinks showProductName="Y" showAccessStartDate="Y" showAccessEndDate="Y" showDescription="Y" showLinks="Y" orderOfLinks="OLDESTFIRST" howManyLinks="10000" errMsgTemplate="SHORT" productId="ALL" dateFormat="YYYY-MM-DD" showproductcount="N"]
[DAPComingSoon]
[DAPComingSoon showProductName="Y" showAccessStartDate="Y" showAccessEndDate="Y" showDescription="Y" showLinks="Y" orderOfLinks="NEWESTFIRST" howManyLinks="10000" errMsgTemplate="SHORT" productId="ALL" makelinksclickable="N" dateFormat="YYYY-MM-DD"]
[DAPUserProfile]
[DAPUserProfile showFirstName="Y" showLastName="Y" showUserName="Y" showEmail="Y" showPassword="Y" showAddress1="Y" showAddress2="Y" showCity="Y" showState="Y" showZip="Y" showCountry="Y" showPhone="Y" showFax="Y" showCompany="Y" showTitle="Y" showPaypalEmail="Y" showOptedOut="Y" showCustomFields="Y"]
[DAPUpline]
To show affiliate’s/sponsor’s first name:
[DAPUpline showField="first_name"]
To show affiliate’s/sponsor’s last name:
[DAPUpline showField="last_name"]
To show affiliate’s/sponsor’s custom field (say “ssn”):
[DAPUpline showField="custom_ssn"]
More examples and details in the “Shortcode Details” section below.
—————————————————————————————————————-
Shortcode Details
All of the shortcodes listed in the above “Shortcode Summary” section, are explained here.
Basic DAP Shortcode
[DAP]…private content…[/DAP]
This is the shortest version of the DAP Shortcode. In this version, anything you put between the [DAP] and [/DAP] tags, will be viewable only by a logged-in user.
No other restrictions for the content to be viewed, except that the viewer has to be logged in to your membership site (via DAP). So basically all free and paid members, regardless of which product they have access to, regardless of whether their product access is active or expired, can view the private content.
Full DAP Shortcode
[DAP hasAccessTo=”1,2,3″ errMsgTemplate=”SHORT”]…private…[/DAP]
This is the full version of the DAP Shortcode. All inner tags – hasAccessTo and errMsgTemplate – are all OPTIONAL.
hasAccessTo: Comma-separated list of one or more Product Id’s that you want the user to have access to before they can view the content. So if you enter 3 different product id’s (like hasAccessTo=”2,7,14″) it means “Anyone with access to AT LEAST ONE of those products with the product Id’s 2, 17 or 14. It does NOT mean they have to have access to all of them at once. Access to any one is fine.
errMsgTemplate: This determines the HTML/text of the error message displayed, if user DOES NOT have access to the content being protected.
Values may be Can be SHORT, LONG or “” (empty). NOT mandatory. If omitted entirely from the tag, then the default template used is SHORT.
If you want no error message to be displayed, and want the protected content to silently disappear completely if user does not have access to it, then include the tag, but set it to “” (blank/empty), like this…
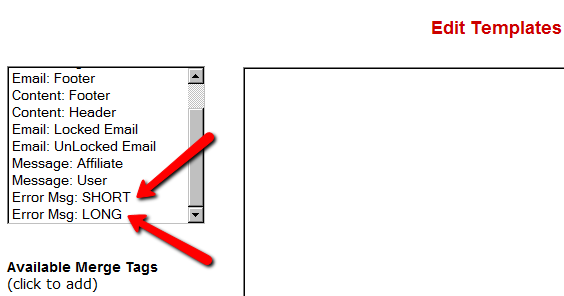
[DAP errMsgTemplate=””]…private…[/DAP]The HTML/text displayed by the SHORT and LONG templates can be configured via the Setup > Templates screen, as shown below.
Examples
[DAP]...private content...[/DAP]
Viewable by Any Logged-in User
[DAP hasAccessTo="1" errMsgTemplate="SHORT"]...private...[/DAP]
Viewable by ANY logged in user (FREE or PAID – doesn’t matter) who is a user of the product with the ID “1” (you can get the Product id from the “Products > Manage” screen). Display HTML/text from the SHORT template if user does not have access to the private content.
[DAP hasAccessTo="1,2,3" errMsgTemplate="LONG"]...private...[/DAP]
Viewable by ANY logged in user (FREE or PAID – doesn’t matter) who has access to EITHER of the Products – 1, 2 or 3. Display HTML/text from the LONG template if user does not have access to the private content.
Member-Specific Content
“For Your Eyes Only”
Let’s say you run a coaching program. You have 10 clients. You want Joe Customer to see a tailor-made custom video meant only for Joe, and Jill Member to see a specific PDF report written specifically for Jill’s business. Now using the new “userId” parameter in the DAP shortcode, you can now protect a piece of content so that only a specific DAP user can see it.
[DAP userId="144"]protected content[/DAP]
In-Page Dripping
DAP Shortcodes now include the ability to specify a “Day” right within the shortcode itself. So you can now publish, say, 10 videos on one page, and you can enclose each video’s embed code with a separate DAP Shortcode that has a different “Day” setting, so the very same page will show 1 video on Day 1, 2 videos on Day 2, 3 videos on Day 3, and so on.
Like this…
[DAP day="1" hasAccessTo="1"]Video 1 Embed Code[/DAP]
[DAP day="2" hasAccessTo="1"]Video 2 Embed Code[/DAP]
[DAP day="3" hasAccessTo="1"]Video 3 Embed Code[/DAP]
NOTE: Please remember that you may not omit the hasAccessTo field – you must use the hasAccessTo field to specify a product id, because all start “days” for a user are associated with a product.
Hiding Content From Logged-In Members
Starting DAP v4.1, you can now mark content such that it will NOT be displayed to members who ARE logged in. To put it another way, it will HIDE content from members, and show it ONLY to NON-Members.
For example, this could be your sales copy or your buy-button, that you don’t want your logged in members (who may have already purchased the product) to see.
Here’s the shortcode for that.
[DAP isLoggedIn="N"]....content to show only to NON-members... [/DAP]
publicUntil
You can set a date UNTIL which a blog post is public (no protection or rules will be applied from any other shortcode parameters.
[DAP publicUntil="2012-12-31" hasAccessTo="1"]This message will be completely public UNTIL (and including) December 31st, 2012[/DAP]
publicAfter
You can set a date AFTER which a blog post will become public (no protection or rules will be applied from any other shortcode parameters.
[DAP publicAfter="2012-01-01" hasAccessTo="1"]This message will be completely public AFTER (and including) January 1st, 2012[/DAP]
hasNoAccessTo
A much requested feature. You can now specify a list of products that a user does NOT have access to, like this:
[DAP hasAccessTo="2" hasNoAccessTo="1,3" ]This message will appear only to active (current) users of product 2 but don't have access to 1 or 3[/DAP]
startday / endday
Now you can specify “startday” and “endday” in the shortcodes to make the contents stop being shown after a certain end “day”. Previously available “day” variable has been deprecated and replaced by “startday” instead. However, if you already are using it somewhere, it will continue to work as is. However, if you wish to use the “endday” variable, you must now also use “startday” instead of “day”. Very useful for, say, displaying a message on the Welcome page only on the first day.
[DAP hasAccessTo="2" startday="1" endday="1"]This message will appear to you only to users of Product 2, on Day 1 and no further[/DAP]
startdate / enddate
You can also specify actual dripping “dates” (instead of “days”) by using “startdate” and “enddate” in the shortcodes to make the contents stop being shown after a certain end “date”.
[DAP hasAccessTo="2" startdate="2012-01-01" enddate="2012-01-31"]This message will appear to you only to users of Product 2, on between the dates of Jan 1st, 2012 and Jan 31st, 2012 - and no further[/DAP]
Negative Days
“startday” and “endday” can also be a negative number.
For eg., [DAP hasAccessTo="2" startDay="-6" endDay="-3"]Howdy[/DAP]
This basically means, the message “Howdy” will be shown starting 6 days before the “Access End Date” of the user’s access to the product with Id “2” (specified in hasAccessTo). So you can use this to display a special message – or specially priced offer (buy button) – for those whose access has not yet expired. Last day (same day of access end date) is day 0. Day before that is -1.
Error Message From File
You can now specify a file name whose contents are to be used as error message. Use the existing errMsgTemplate field, but add a “file:…” to the beginning, and make sure the file name is a fully qualified URL starting with http:// and your domain name. So you can say…
[DAP hasAccessTo="2" startday="1" endday="1" errMsgTemplate="file:http://YourSite.com/customMessage.html"]This message will appear to you only today[/DAP]
[DAPUserLinks]
Allows you to heavily customize how the links are displayed when you use the merge tag %%USERLINKS%%…
[DAPUserLinks showProductName="N" showAccessStartDate="Y" showAccessEndDate="Y" showDescription="Y" showLinks="Y" orderOfLinks="NEWESTFIRST" howManyLinks="10000" errMsgTemplate="SHORT" productId="ALL" dateFormat="YYYY-MM-DD"]
[DAPComingSoon]
Allows you to display links that are coming soon.
[DAPComingSoon showProductName="Y" showAccessStartDate="Y" showAccessEndDate="Y" showDescription="Y" showLinks="Y" orderOfLinks="NEWESTFIRST" howManyLinks="10000" errMsgTemplate="SHORT" productId="ALL" makelinksclickable="N" dateFormat="YYYY-MM-DD"]
[DAPUserProfile]
Allows you to selectively display profile fields on a page. Just set the profile field that you don’t want shown to “N” in the tag below.
Default is “Y”. So Leaving out the text showLastName=”Y” entirely from the shortcode, is the same as setting it “Y”, which means it will be displayed.
So just entering the text [DAPUserProfile] into a page, will show ALL fields.
And to not show say, Phone and Fax, you would do something like this:
[DAPUserProfile showPhone="N" showFax="N"]
So all other fields will be displayed, except those two.
[DAPUpline]
This shortcode shows a user their referring Affiliate’s (a.k.a Sponsor’s) information. So when a user visits the page that has this shortcode, it will display information of that user’s referring Affiliate – either from cookie (if exists), or if they’re already a member, then their current Affiliate’s information. And if neither the cookie is set, nor the user has an Affiliate attached to their account already, then it will show the info of the DAP Admin). So you can use it to show the user information of the person (affiliate) who referred them to the page. Think of it as a “Your Sponsor” tag.
To show affiliate’s first name, use this:
[DAPUpline showField="first_name"]
To show affiliate’s last name, use this
[DAPUpline showField="last_name"]
[DAPUpline showField="user_name"]
[DAPUpline showField="email"]
[DAPUpline showField="address1"]
[DAPUpline showField="address2"]
[DAPUpline showField="city"]
[DAPUpline showField="state"]
[DAPUpline showField="zip"]
[DAPUpline showField="country"]
[DAPUpline showField="phone"]
[DAPUpline showField="fax"]
[DAPUpline showField="company"]
[DAPUpline showField="title"]
[DAPUpline showField="paypal_email"]
For Custom fields…
[DAPUpline showField="custom_customfieldname"]
DAP Shopping Cart Checkout page
Here’s a screen-shot of how the DAP checkout page looks if you use the DAP internal shopping cart.
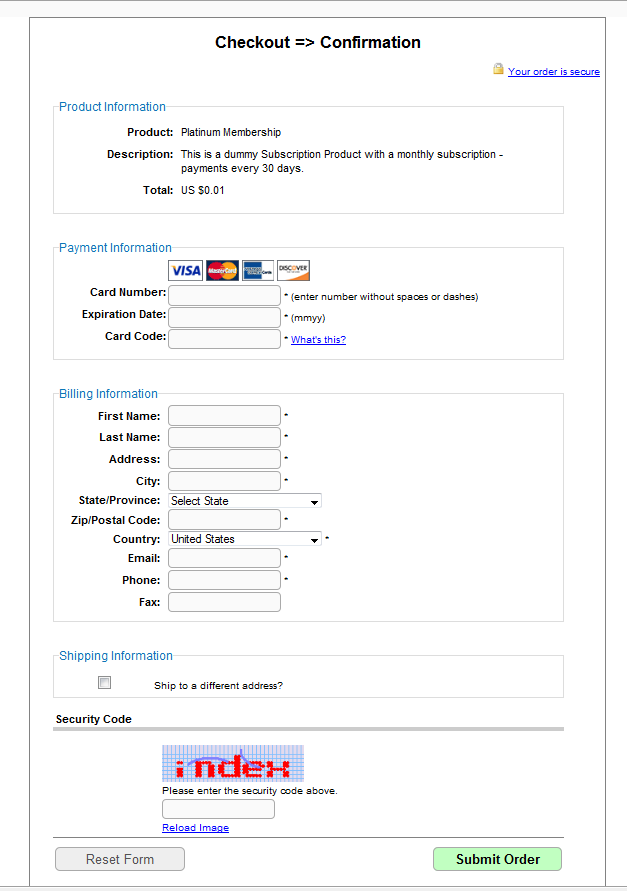
You can always add your own header (/dap/inc/cartheader.php) and footer (/dap/inc/cartfooter.php) to the checkout page.

